SQL Server integration
이 콘텐츠는 아직 번역되지 않았습니다.
SQL Server is a relational database management system developed by Microsoft. The Aspire SQL Server integration enables you to connect to existing SQL Server instances or create new instances from Aspire with the mcr.microsoft.com/mssql/server container image.
Hosting integration
Section titled “Hosting integration”The SQL Server hosting integration models the server as the SqlServerServerResource type and the database as the SqlServerDatabaseResource type. To access these types and APIs, add the 📦 Aspire.Hosting.SqlServer NuGet package in the AppHost project.
aspire add sqlserverAspire CLI는 대화형입니다. 프롬프트 시 알맞은 검색 결과 선택:
Select an integration to add:
> sqlserver (Aspire.Hosting.SqlServer)> Other results listed as selectable options...#:package Aspire.Hosting.SqlServer@*<PackageReference Include="Aspire.Hosting.SqlServer" Version="*" />Add SQL Server resource and database resource
Section titled “Add SQL Server resource and database resource”In your AppHost project, call AddSqlServer to add and return a SQL Server resource builder. Chain a call to the returned resource builder to AddDatabase, to add SQL Server database resource.
var builder = DistributedApplication.CreateBuilder(args);
var sql = builder.AddSqlServer("sql")                 .WithLifetime(ContainerLifetime.Persistent);
var db = sql.AddDatabase("database");
builder.AddProject<Projects.ExampleProject>("exampleproject")       .WithReference(db)       .WaitFor(db);
// After adding all resources, run the app...
builder.Build().Run();When Aspire adds a container image to the AppHost, as shown in the preceding example with the mcr.microsoft.com/mssql/server image, it creates a new SQL Server instance on your local machine. A reference to your SQL Server resource builder (the sql variable) is used to add a database. The database is named database and then added to the ExampleProject.
When adding a database resource to the app model, the database is created if it doesn’t already exist. The creation of the database relies on the AppHost eventing APIs, specifically ResourceReadyEvent. In other words, when the sql resource is ready, the event is raised and the database resource is created.
The SQL Server resource includes default credentials with a username of sa and a random password generated using the CreateDefaultPasswordParameter method.
When the AppHost runs, the password is stored in the AppHost’s secret store. It’s added to the Parameters section, for example:
{ "Parameters:sql-password": "<THE_GENERATED_PASSWORD>"}The name of the parameter is sql-password, but really it’s just formatting the resource name with a -password suffix. For more information, see Safe storage of app secrets in development in ASP.NET Core and Add SQL Server resource with parameters.
The WithReference method configures a connection in the ExampleProject named database.
Add SQL Server resource with database scripts
Section titled “Add SQL Server resource with database scripts”By default, when you add a SqlServerDatabaseResource, it relies on the following SQL script to create the database:
IF( NOT EXISTS ( SELECT 1 FROM sys.databases WHERE name = @DatabaseName ))CREATE DATABASE [<QUOTED_DATABASE_NAME>];To alter the default script, chain a call to the WithCreationScript method on the database resource builder:
var builder = DistributedApplication.CreateBuilder(args);
var sql = builder.AddSqlServer("sql")                 .WithLifetime(ContainerLifetime.Persistent);
var databaseName = "app-db";var creationScript = $$"""    IF DB_ID('{{databaseName}}') IS NULL        CREATE DATABASE [{{databaseName}}];    GO
    -- Use the database    USE [{{databaseName}}];    GO
    -- Create the todos table    CREATE TABLE todos (        id INT PRIMARY KEY IDENTITY(1,1),        -- Unique ID for each todo        title VARCHAR(255) NOT NULL,             -- Short description of the task        description TEXT,                        -- Optional detailed description        is_completed BIT DEFAULT 0,              -- Completion status        due_date DATE,                           -- Optional due date        created_at DATETIME DEFAULT GETDATE()    -- Creation timestamp    );    GO
    """;
var db = sql.AddDatabase(databaseName)            .WithCreationScript(creationScript);
builder.AddProject<Projects.AspireApp_ExampleProject>("exampleproject")       .WithReference(db)       .WaitFor(db);
// After adding all resources, run the app...
builder.Build().Run();
The preceding example creates a database named app_db with a single todos table. The SQL script is executed when the database resource is created. The script is passed as a string to the WithCreationScript method, which is then executed in the context of the SQL Server resource.
Add SQL Server resource with data volume
Section titled “Add SQL Server resource with data volume”To add a data volume to the SQL Server resource, call the WithDataVolume method on the SQL Server resource:
var builder = DistributedApplication.CreateBuilder(args);
var sql = builder.AddSqlServer("sql")                 .WithDataVolume();
var db = sql.AddDatabase("database");
builder.AddProject<Projects.AspireApp_ExampleProject>("exampleproject")       .WithReference(db)       .WaitFor(db);
// After adding all resources, run the app...
builder.Build().Run();
The data volume is used to persist the SQL Server data outside the lifecycle of its container. The data volume is mounted at the /var/opt/mssql path in the SQL Server container and when a name parameter isn’t provided, the name is generated at random. For more information on data volumes and details on why they’re preferred over bind mounts, see Docker docs: Volumes.
Add SQL Server resource with data bind mount
Section titled “Add SQL Server resource with data bind mount”To add a data bind mount to the SQL Server resource, call the WithDataBindMount method:
var builder = DistributedApplication.CreateBuilder(args);
var sql = builder.AddSqlServer("sql")                 .WithDataBindMount(source: @"C:\SqlServer\Data");
var db = sql.AddDatabase("database");
builder.AddProject<Projects.AspireApp_ExampleProject>("exampleproject")       .WithReference(db)       .WaitFor(db);
// After adding all resources, run the app...
builder.Build().Run();Data bind mounts rely on the host machine’s filesystem to persist the SQL Server data across container restarts. The data bind mount is mounted at the C:\SqlServer\Data on Windows (or /SqlServer/Data on Unix) path on the host machine in the SQL Server container. For more information on data bind mounts, see Docker docs: Bind mounts.
Add SQL Server resource with parameters
Section titled “Add SQL Server resource with parameters”When you want to explicitly provide the password used by the container image, you can provide these credentials as parameters. Consider the following alternative example:
var builder = DistributedApplication.CreateBuilder(args);
var password = builder.AddParameter("password", secret: true);
var sql = builder.AddSqlServer("sql", password);var db = sql.AddDatabase("database");
builder.AddProject<Projects.AspireApp_ExampleProject>("exampleproject")       .WithReference(db)       .WaitFor(db);
// After adding all resources, run the app...
builder.Build().Run();
For more information on providing parameters, see External parameters.
Use a specific SQL Server container image tag
Section titled “Use a specific SQL Server container image tag”If you want to use a specific tag for the SQL Server container image, you can call the WithImageTag method to override the default tag. This is useful when you need to test against a specific version of SQL Server:
var builder = DistributedApplication.CreateBuilder(args);
var sql = builder.AddSqlServer("sql")                 .WithImageTag("2025-RTM-ubuntu-24.04-preview");
var db = sql.AddDatabase("database");
builder.AddProject<Projects.AspireApp_ExampleProject>("exampleproject")       .WithReference(db)       .WaitFor(db);
// After adding all resources, run the app...
builder.Build().Run();
The preceding code uses the 2025-RTM-ubuntu-24.04-preview tag for the SQL Server container image. For a list of available tags, see SQL Server container image tags.
Connect to database resources
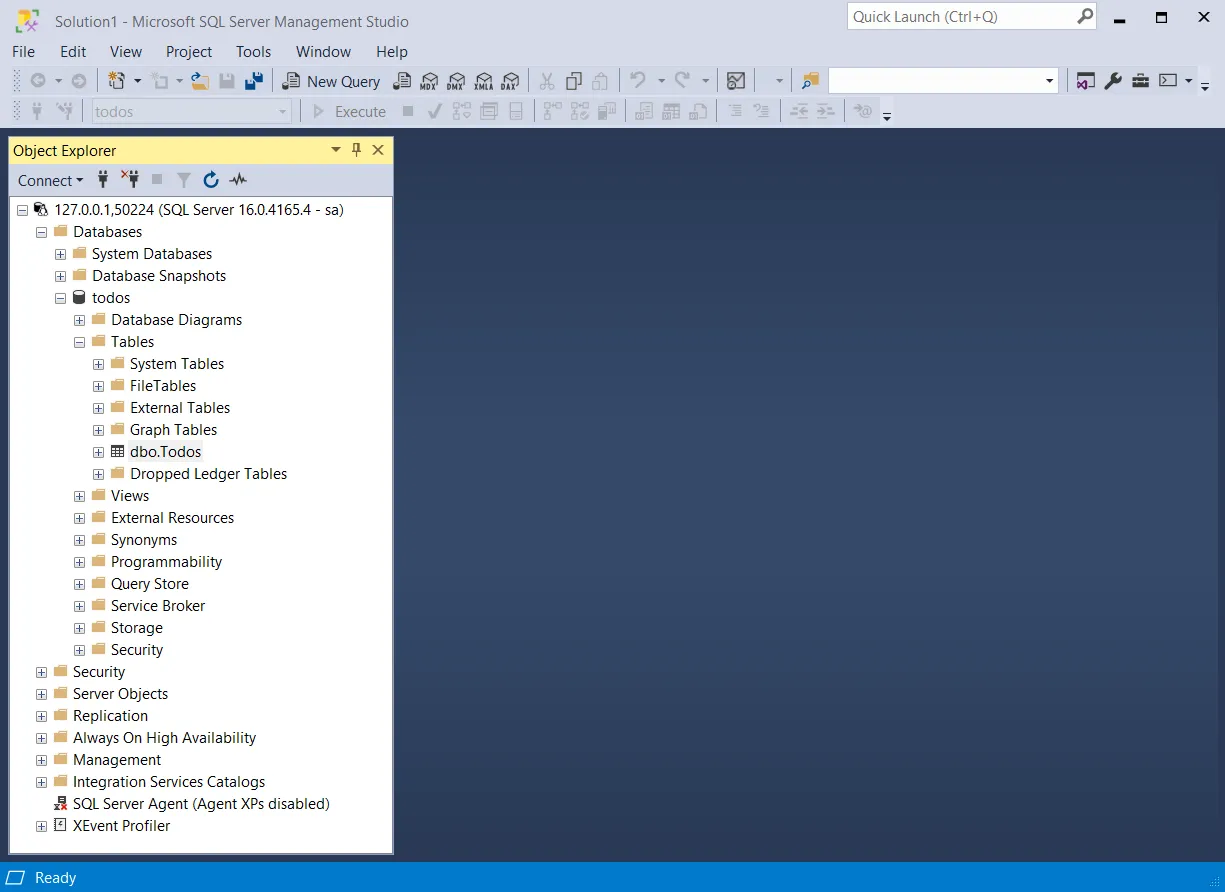
Section titled “Connect to database resources”When the Aspire AppHost runs, the server’s database resources can be accessed from external tools, such as SQL Server Management Studio (SSMS) or MSSQL for Visual Studio Code. The connection string for the database resource is available in the dependent resources environment variables and is accessed using the Aspire dashboard: Resource details pane. The environment variable is named ConnectionStrings__{name} where {name} is the name of the database resource, in this example it’s database. Use the connection string to connect to the database resource from external tools. Imagine that you have a database named todos with a single dbo.Todos table.
To connect to the database resource from SQL Server Management Studio, follow these steps:
-
Open SSMS.
-
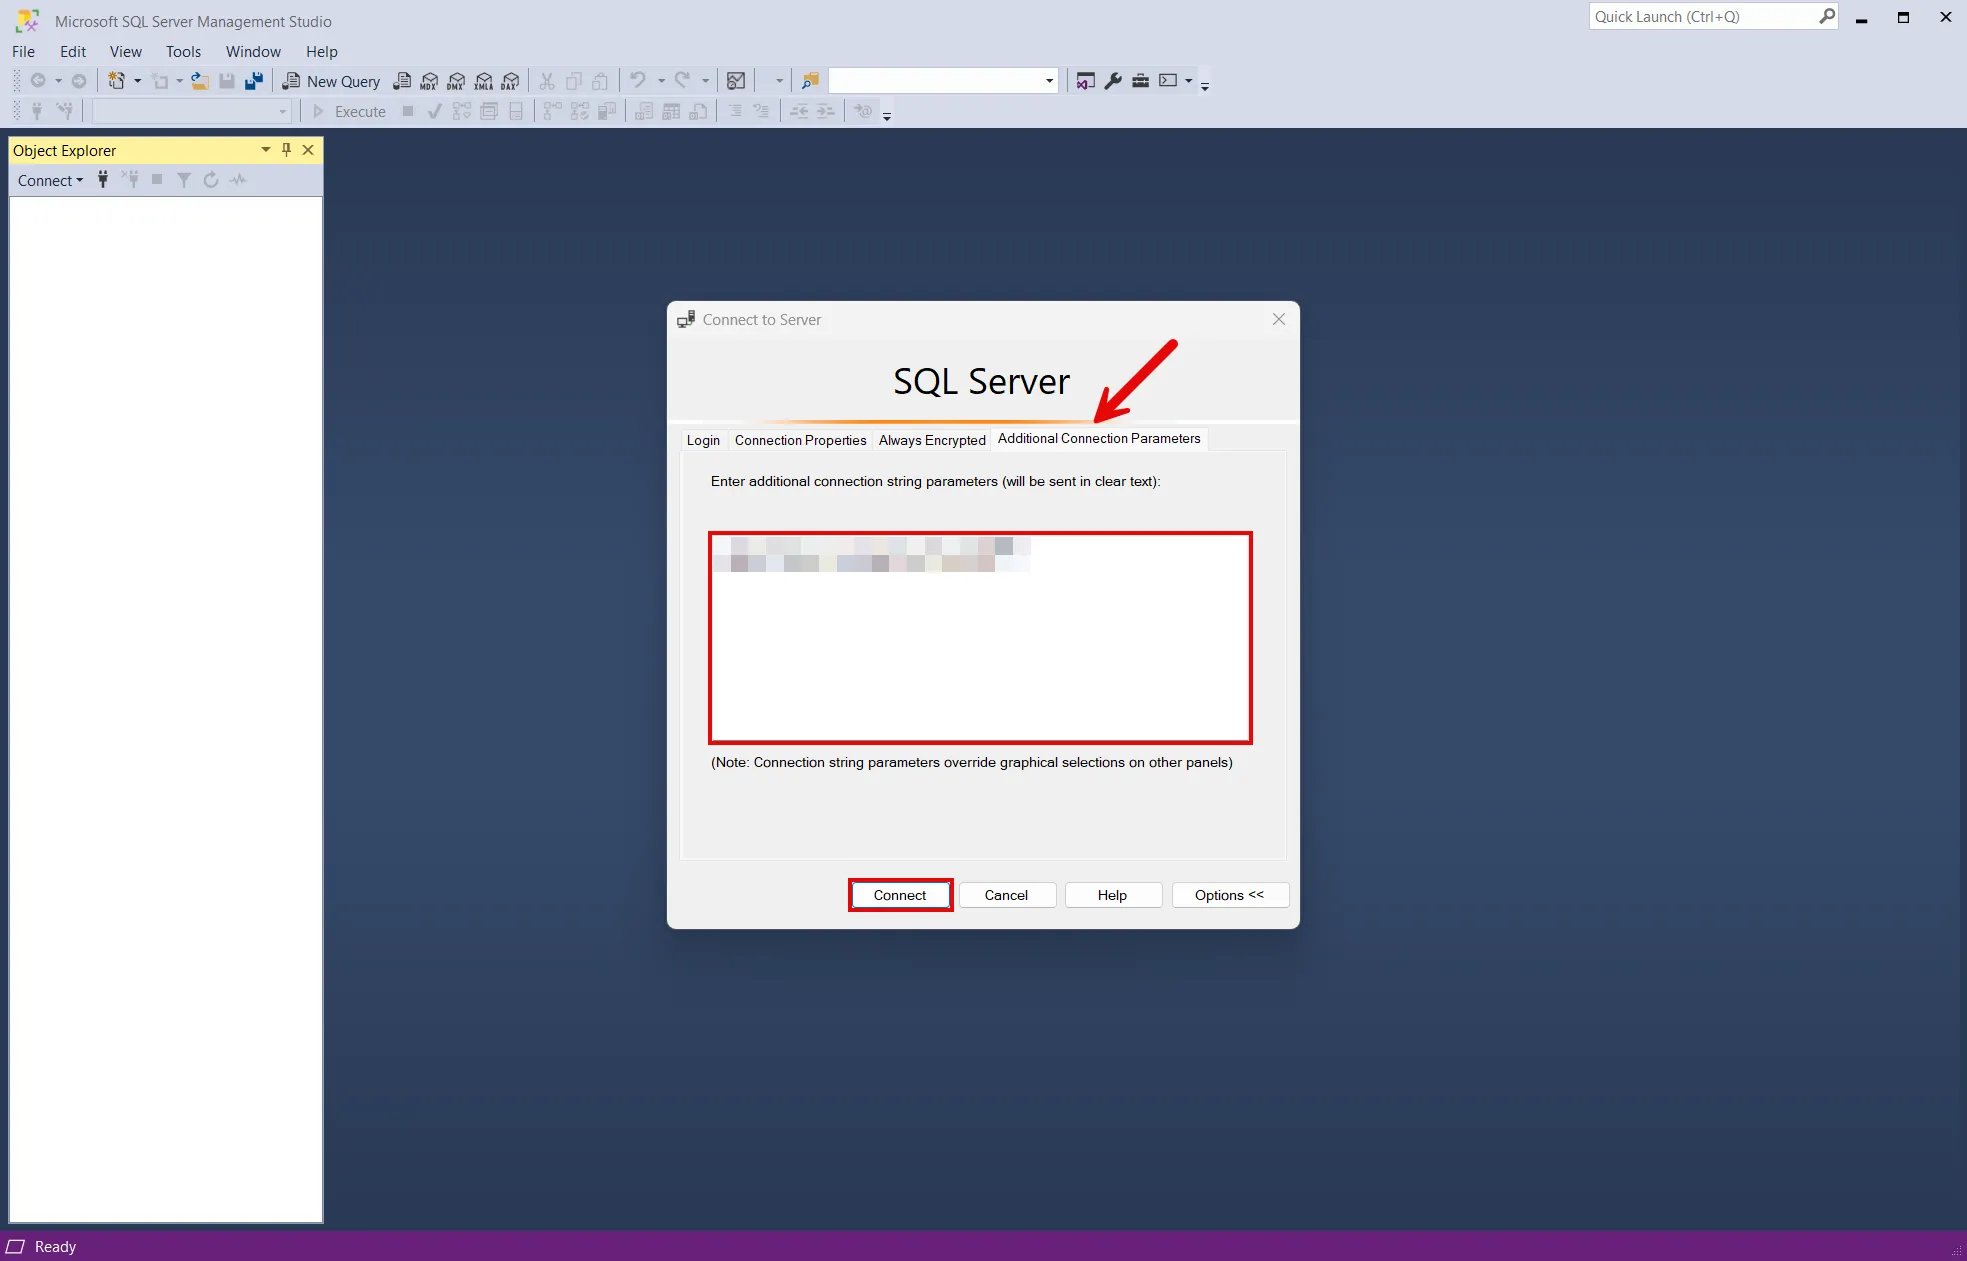
In the Connect to Server dialog, select the Additional Connection Parameters tab.
-
Paste the connection string into the Additional Connection Parameters field and select Connect.
-
If you’re connected, you can see the database resource in the Object Explorer:
For more information, see SQL Server Management Studio: Connect to a server.
To connect to the database resource from MSSQL for Visual Studio Code, follow these steps:
-
Open the SQL SERVER extension.
-
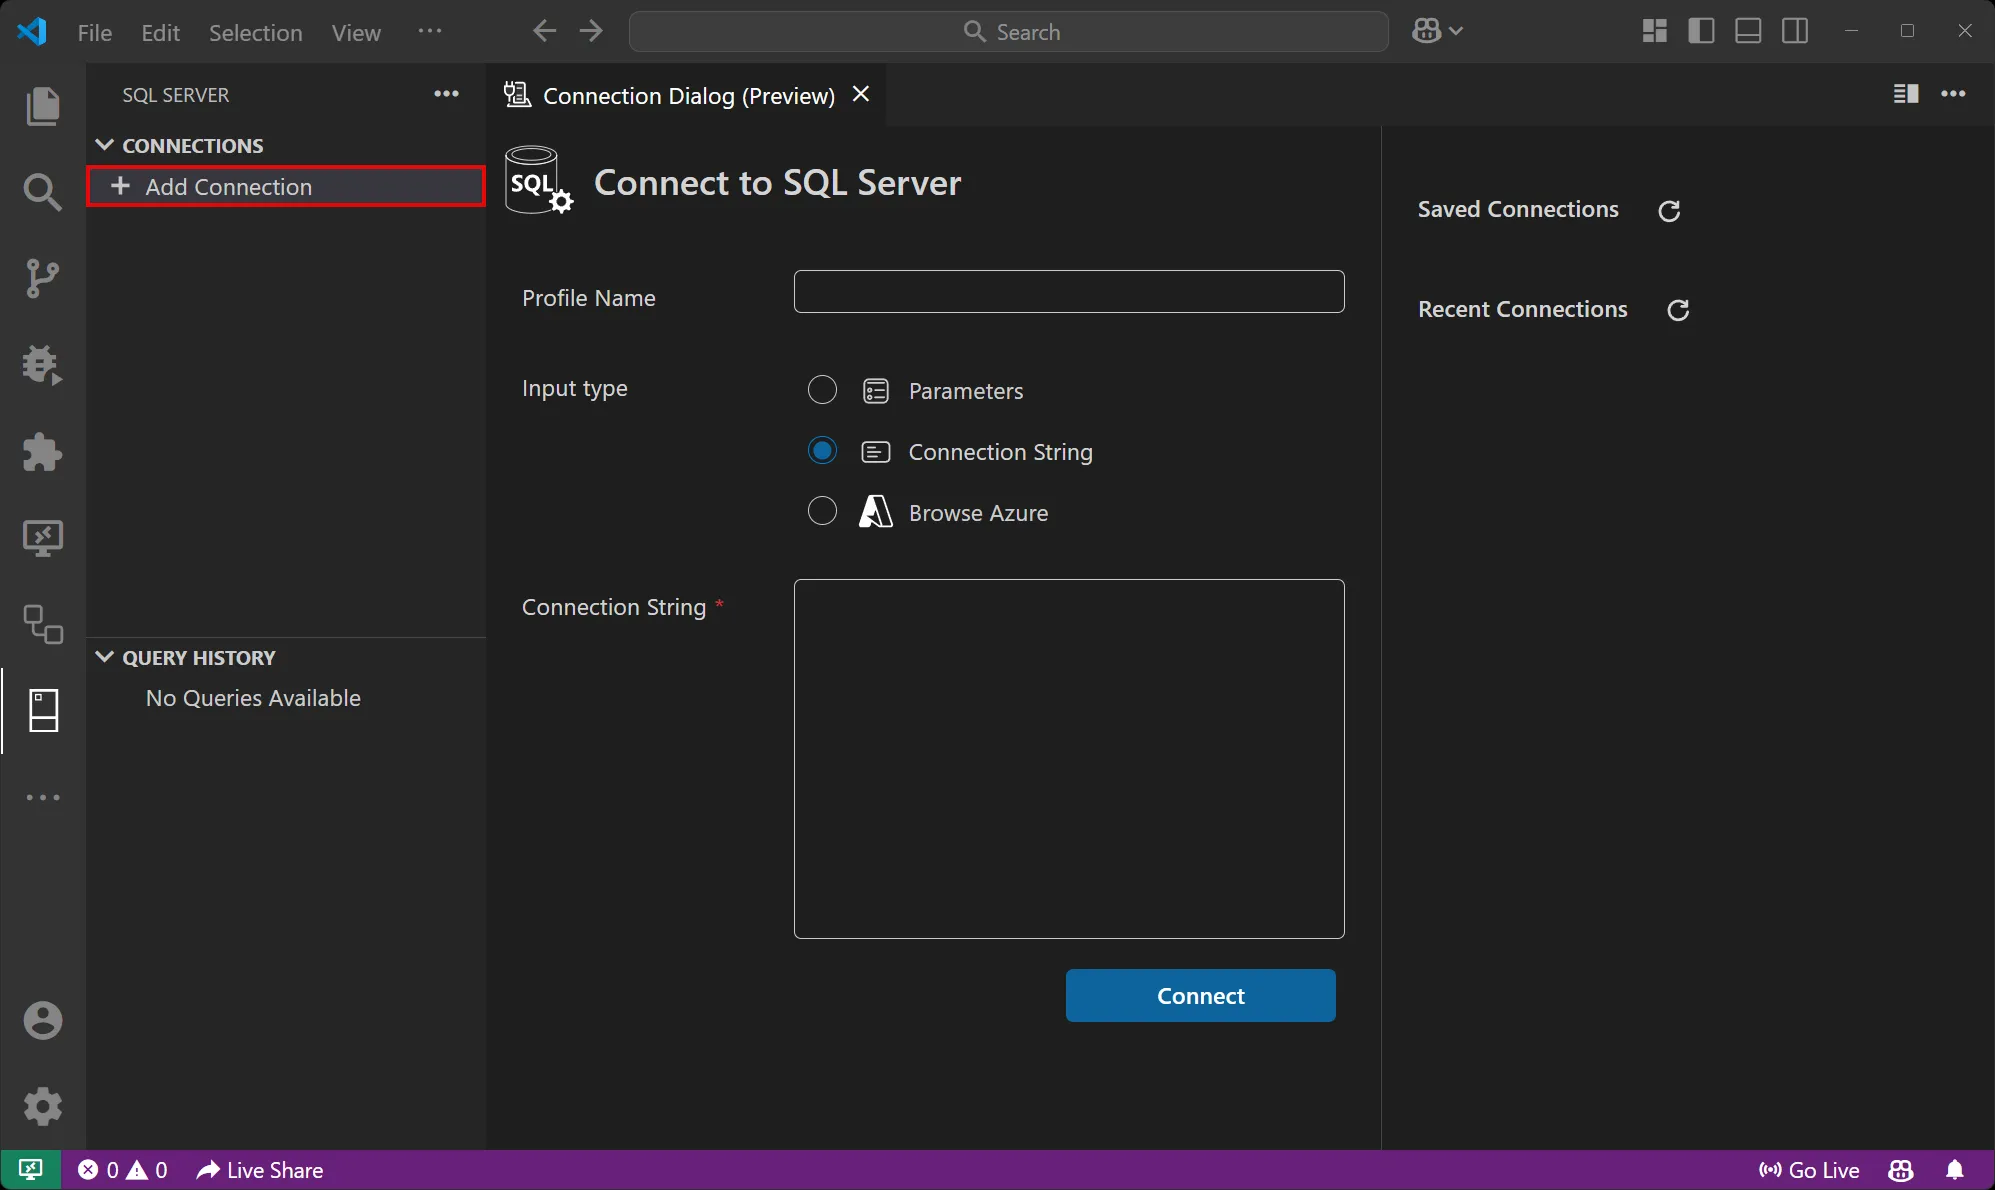
Select the Add Connection option under CONNECTIONS.
-
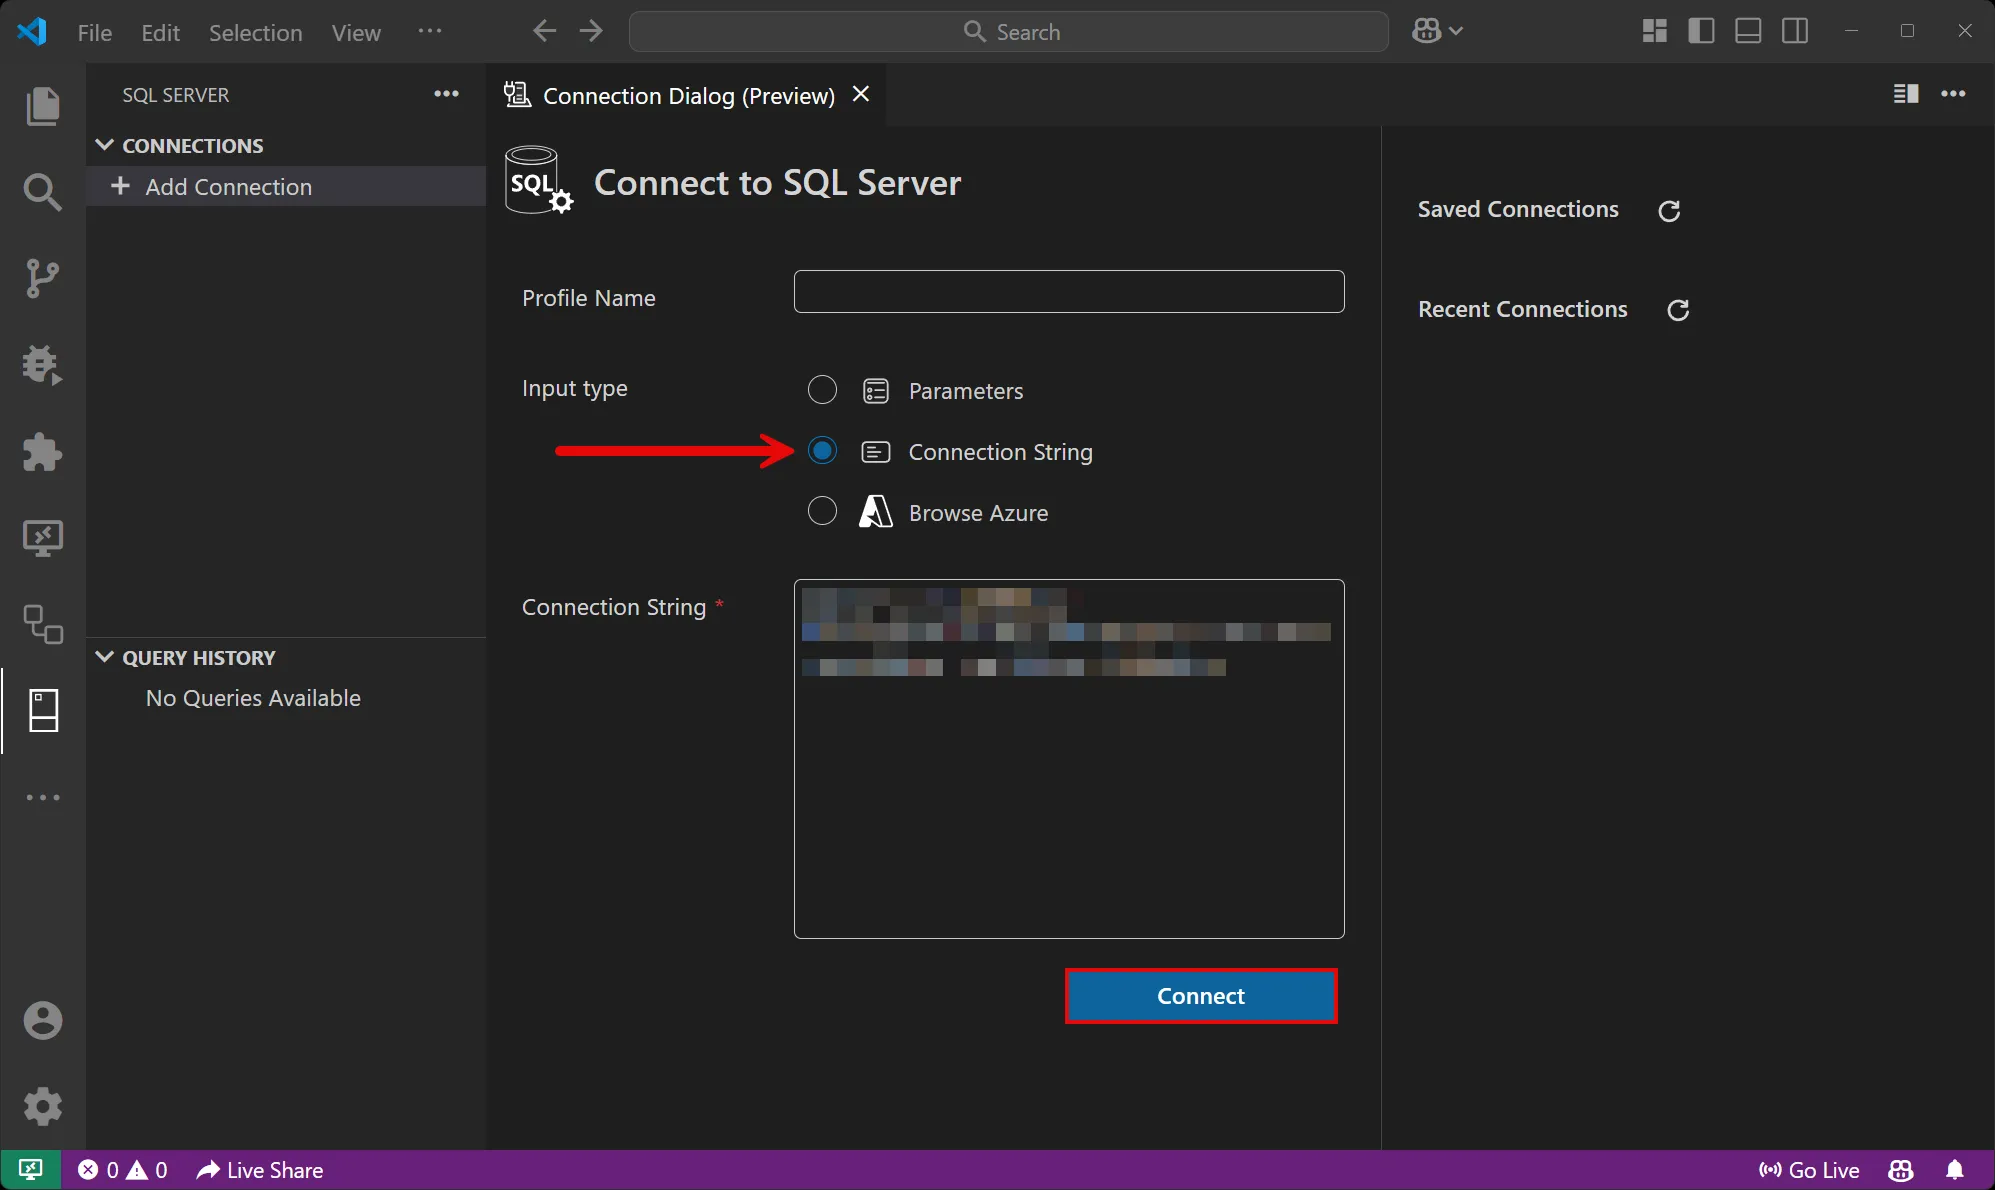
Change the Input type to Connection string and paste the connection string into the Connection string field.
-
Select Connect.
-
Once you’re connected, you can see the database resource in the active tab and run queries against it:
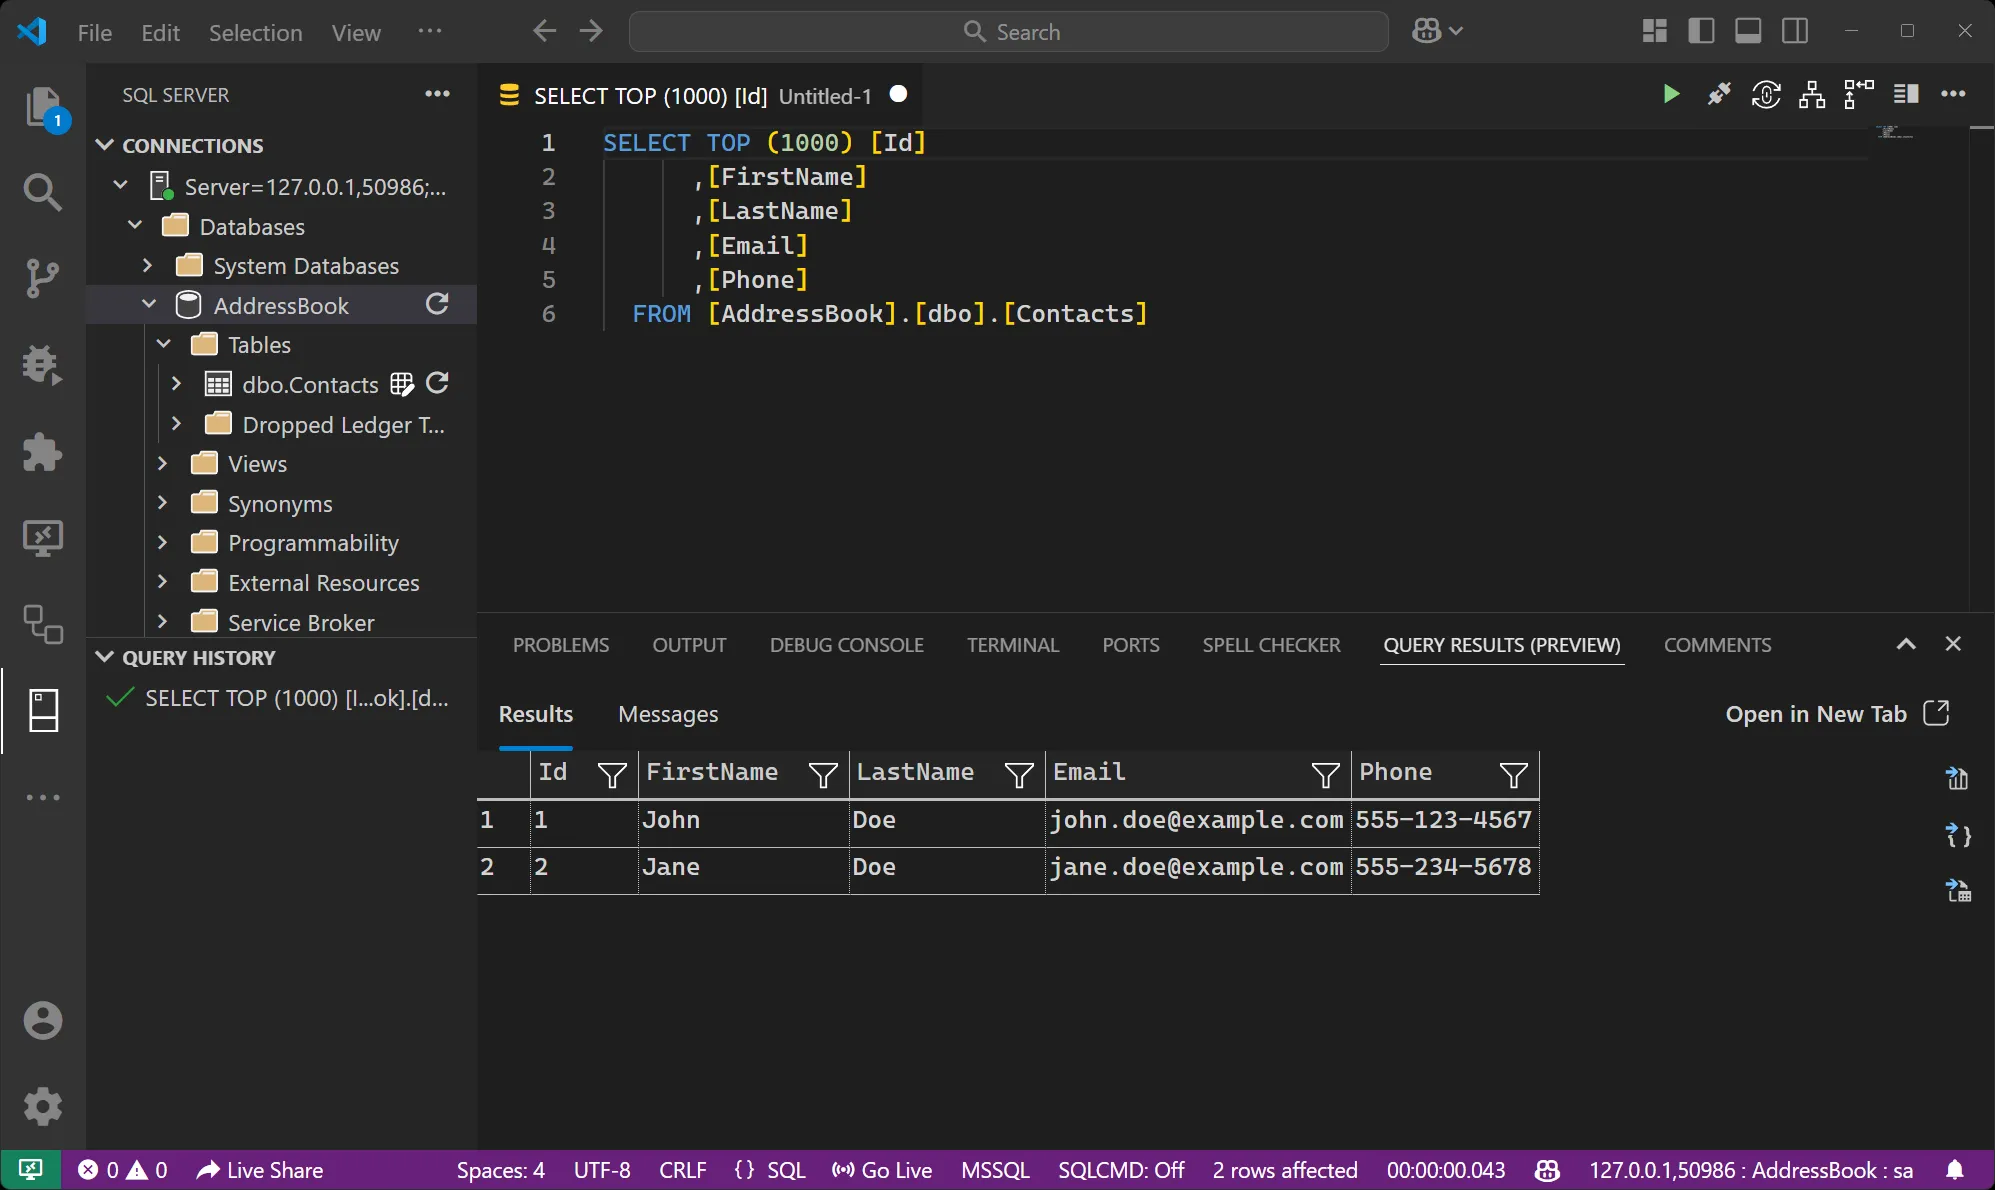
For more information, see MSSQL for Visual Studio Code.
Connection properties
Section titled “Connection properties”When you reference a SQL Server resource using WithReference, the following connection properties are made available to the consuming project:
SQL Server server
Section titled “SQL Server server”The SQL Server server resource exposes the following connection properties:
| Property Name | Description |
|---|---|
Host | The hostname or IP address of the SQL Server |
Port | The port number the SQL Server is listening on |
Username | The username for authentication |
Password | The password for authentication |
Uri | The connection URI in mssql:// format, with the format mssql://{Username}:{Password}@{Host}:{Port} |
JdbcConnectionString | JDBC-format connection string, with the format jdbc:sqlserver://{Host}:{Port};trustServerCertificate=true. User and password credentials are provided as separate Username and Password properties. |
Example connection strings:
Uri: mssql://sa:p%40ssw0rd1@localhost:1433JdbcConnectionString: jdbc:sqlserver://localhost:1433;trustServerCertificate=trueSQL Server database
Section titled “SQL Server database”The SQL Server database resource inherits all properties from its parent SqlServerServerResource and adds:
| Property Name | Description |
|---|---|
Uri | The connection URI in mssql:// format, with the format mssql://{Username}:{Password}@{Host}:{Port}/{DatabaseName} |
JdbcConnectionString | JDBC connection string with database name, with the format jdbc:sqlserver://{Host}:{Port};trustServerCertificate=true;databaseName={DatabaseName}. User and password credentials are provided as separate Username and Password properties. |
DatabaseName | The name of the database |
Example connection strings:
Uri: mssql://sa:p%40ssw0rd1@localhost:1433/catalogJdbcConnectionString: jdbc:sqlserver://localhost:1433;trustServerCertificate=true;databaseName=catalogHosting integration health checks
Section titled “Hosting integration health checks”The SQL Server hosting integration automatically adds a health check for the SQL Server resource. The health check verifies that the SQL Server is running and that a connection can be established to it.
The hosting integration relies on the 📦 AspNetCore.HealthChecks.SqlServer NuGet package.
Using with non-.NET applications
Section titled “Using with non-.NET applications”The SQL Server hosting integration can be used with any application technology, not just C# applications. When you use WithReference to reference a SQL Server resource, connection information is automatically injected as environment variables into the referencing application.
For applications that don’t use the client integration, you can access the connection information through environment variables. Here’s an example of how to configure environment variables for a non-.NET application:
var builder = DistributedApplication.CreateBuilder(args);
var sql = builder.AddSqlServer("sql")    .WithLifetime(ContainerLifetime.Persistent);
var database = sql.AddDatabase("myDatabase");
// Example: Configure a non-.NET application with SQL Server accessvar app = builder.AddExecutable("my-app", "python", "app.py", ".")    .WithReference(database) // Provides ConnectionStrings__myDatabase    .WithEnvironment(context =>    {        // Additional individual connection details as environment variables        context.EnvironmentVariables["SQL_SERVER"] = sql.Resource.PrimaryEndpoint.Property(EndpointProperty.Host);        context.EnvironmentVariables["SQL_PORT"] = sql.Resource.PrimaryEndpoint.Property(EndpointProperty.Port);        context.EnvironmentVariables["SQL_USERNAME"] = "sa";        context.EnvironmentVariables["SQL_PASSWORD"] = sql.Resource.PasswordParameter;        context.EnvironmentVariables["SQL_DATABASE"] = database.Resource.DatabaseName;    });
builder.Build().Run();
This configuration provides the non-.NET application with several environment variables:
ConnectionStrings__myDatabase: The complete SQL Server connection stringSQL_SERVER: The hostname/IP address of the SQL ServerSQL_PORT: The port number the SQL Server is listening onSQL_USERNAME: The username (typicallysafor SQL Server)SQL_PASSWORD: The dynamically generated passwordSQL_DATABASE: The name of the database
Your non-.NET application can then read these environment variables to connect to the SQL Server database using the appropriate database driver for that technology (for example, pyodbc for Python, node-mssql for Node.js, or database/sql with a SQL Server driver for Go).
Client integration
Section titled “Client integration”To get started with the Aspire SQL Server client integration, install the 📦 Aspire.Microsoft.Data.SqlClient NuGet package in the client-consuming project, that is, the project for the application that uses the SQL Server client. The SQL Server client integration registers a SqlConnection instance that you can use to interact with SQL Server.
dotnet add package Aspire.Microsoft.Data.SqlClient#:package Aspire.Microsoft.Data.SqlClient@*<PackageReference Include="Aspire.Microsoft.Data.SqlClient" Version="*" />Add SQL Server client
Section titled “Add SQL Server client”In the Program.cs file of your client-consuming project, call the AddSqlServerClient extension method on any IHostApplicationBuilder to register a SqlConnection for use via the dependency injection container. The method takes a connection name parameter.
builder.AddSqlServerClient(connectionName: "database");You can then retrieve the SqlConnection instance using dependency injection. For example, to retrieve the connection from an example service:
public class ExampleService(SqlConnection connection){ // Use connection...}For more information on dependency injection, see .NET dependency injection.
Add keyed SQL Server client
Section titled “Add keyed SQL Server client”There might be situations where you want to register multiple SqlConnection instances with different connection names. To register keyed SQL Server clients, call the AddKeyedSqlServerClient method:
builder.AddKeyedSqlServerClient(name: "mainDb");builder.AddKeyedSqlServerClient(name: "loggingDb");Then you can retrieve the SqlConnection instances using dependency injection. For example, to retrieve the connection from an example service:
public class ExampleService( [FromKeyedServices("mainDb")] SqlConnection mainDbConnection, [FromKeyedServices("loggingDb")] SqlConnection loggingDbConnection){ // Use connections...}For more information on keyed services, see .NET dependency injection: Keyed services.
Configuration
Section titled “Configuration”The Aspire SQL Server integration provides multiple options to configure the connection based on the requirements and conventions of your project.
Use a connection string
Section titled “Use a connection string”When using a connection string from the ConnectionStrings configuration section, you can provide the name of the connection string when calling the AddSqlServerClient method:
builder.AddSqlServerClient(connectionName: "sql");Then the connection string is retrieved from the ConnectionStrings configuration section:
{ "ConnectionStrings": { "database": "Data Source=myserver;Initial Catalog=master" }}For more information on how to format this connection string, see the ConnectionString.
Use configuration providers
Section titled “Use configuration providers”The Aspire SQL Server integration supports Microsoft.Extensions.Configuration. It loads the MicrosoftDataSqlClientSettings from configuration by using the Aspire:Microsoft:Data:SqlClient key. The following snippet is an example of a appsettings.json file that configures some of the options:
{ "Aspire": { "Microsoft": { "Data": { "SqlClient": { "ConnectionString": "YOUR_CONNECTIONSTRING", "DisableHealthChecks": false, "DisableMetrics": true } } } }}For the complete SQL Server client integration JSON schema, see Aspire.Microsoft.Data.SqlClient/ConfigurationSchema.json.
Use inline delegates
Section titled “Use inline delegates”Also you can pass the Action<MicrosoftDataSqlClientSettings> configureSettings delegate to set up some or all the options inline, for example to disable health checks from code:
builder.AddSqlServerClient( "database", static settings => settings.DisableHealthChecks = true);Client integration health checks
Section titled “Client integration health checks”By default, Aspire integrations enable health checks for all services. For more information, see Aspire integrations overview.
The Aspire SQL Server integration:
- Adds the health check when
MicrosoftDataSqlClientSettings.DisableHealthChecksisfalse, which attempts to connect to the SQL Server. - Integrates with the
/healthHTTP endpoint, which specifies all registered health checks must pass for app to be considered ready to accept traffic.
Observability and telemetry
Section titled “Observability and telemetry”Aspire integrations automatically set up Logging, Tracing, and Metrics configurations, which are sometimes known as the pillars of observability. Depending on the backing service, some integrations may only support some of these features. For example, some integrations support logging and tracing, but not metrics. Telemetry features can also be disabled using the techniques presented in the Configuration section.
Logging
Section titled “Logging”The Aspire SQL Server integration currently doesn’t enable logging by default due to limitations of the SqlClient.
Tracing
Section titled “Tracing”The Aspire SQL Server integration emits the following tracing activities using OpenTelemetry:
OpenTelemetry.Instrumentation.SqlClient
Metrics
Section titled “Metrics”The Aspire SQL Server integration will emit the following metrics using OpenTelemetry:
- Microsoft.Data.SqlClient.EventSource
active-hard-connectionshard-connectshard-disconnectsactive-soft-connectssoft-connectssoft-disconnectsnumber-of-non-pooled-connectionsnumber-of-pooled-connectionsnumber-of-active-connection-pool-groupsnumber-of-inactive-connection-pool-groupsnumber-of-active-connection-poolsnumber-of-inactive-connection-poolsnumber-of-active-connectionsnumber-of-free-connectionsnumber-of-stasis-connectionsnumber-of-reclaimed-connections