

Dev Containers in Visual Studio Code
Konten ini belum tersedia dalam bahasa Anda.
The Dev Containers Visual Studio Code extension provides a way for development teams to work inside a containerized environment where dependencies are defined as part of the repository. Aspire automatically configures forwarded ports in Dev Containers so the dashboard and resource endpoints are easier to open from Visual Studio Code.
Dev Containers vs. GitHub Codespaces
Section titled “Dev Containers vs. GitHub Codespaces”Using Dev Containers in Visual Studio Code is similar to using GitHub Codespaces. Although the experiences are similar, there are some differences. For more information on using Aspire with GitHub Codespaces, see Aspire and GitHub Codespaces.
Quick start using template repository
Section titled “Quick start using template repository”To configure Dev Containers in Visual Studio Code, use the .devcontainer/devcontainer.json file in your repository. The simplest way to get started is by creating a new repository from the Aspire Dev Container template. Consider the following steps:
-
Create a new repository using our template.
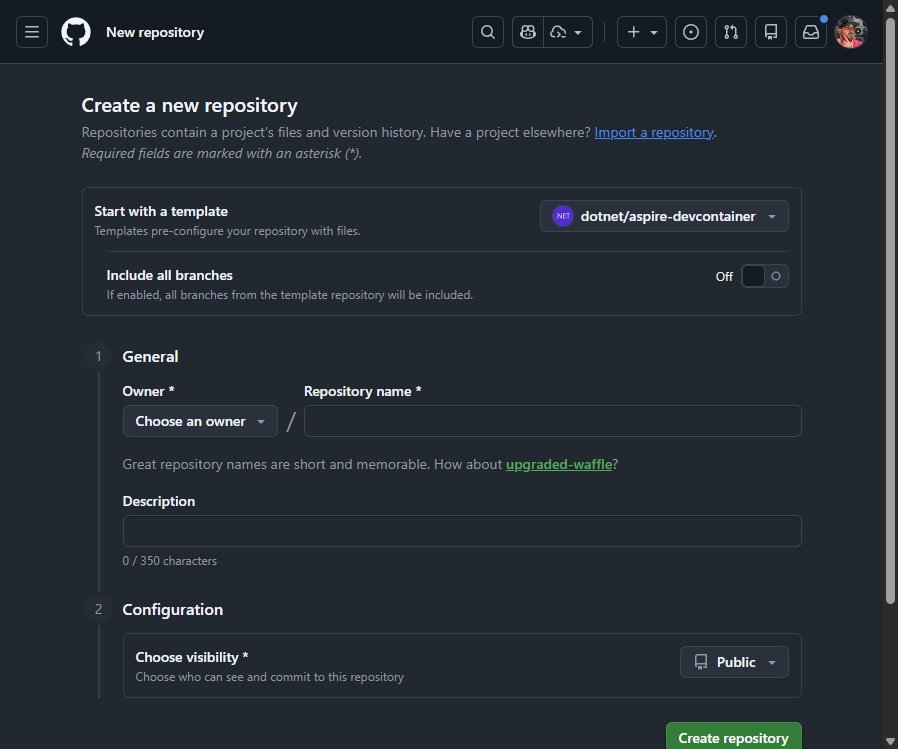
Once you provide the details and select Create repository, the repository is created and shown in GitHub.
-
Clone the repository to your local developer workstation using the following command:
Terminal window git clone https://github.com/<org>/<username>/<repository> -
Open the repository in Visual Studio Code. After a few moments Visual Studio Code detects the
.devcontainer/devcontainer.jsonfile and prompts to open the repository inside a container. Select whichever option is most appropriate for your workflow.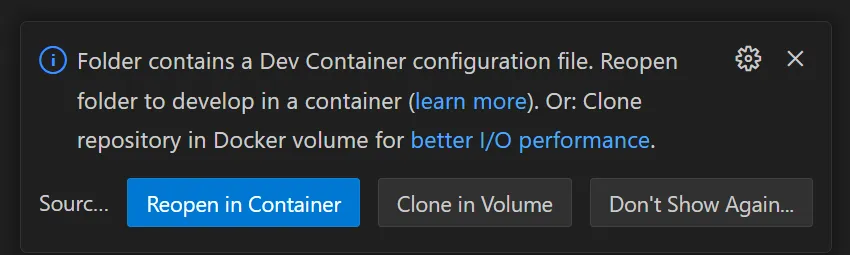
After a few moments, the files become visible and the Dev Container finishes setting up. The template installs the Aspire CLI during setup, so you can create an app immediately without manually installing
Aspire.ProjectTemplates.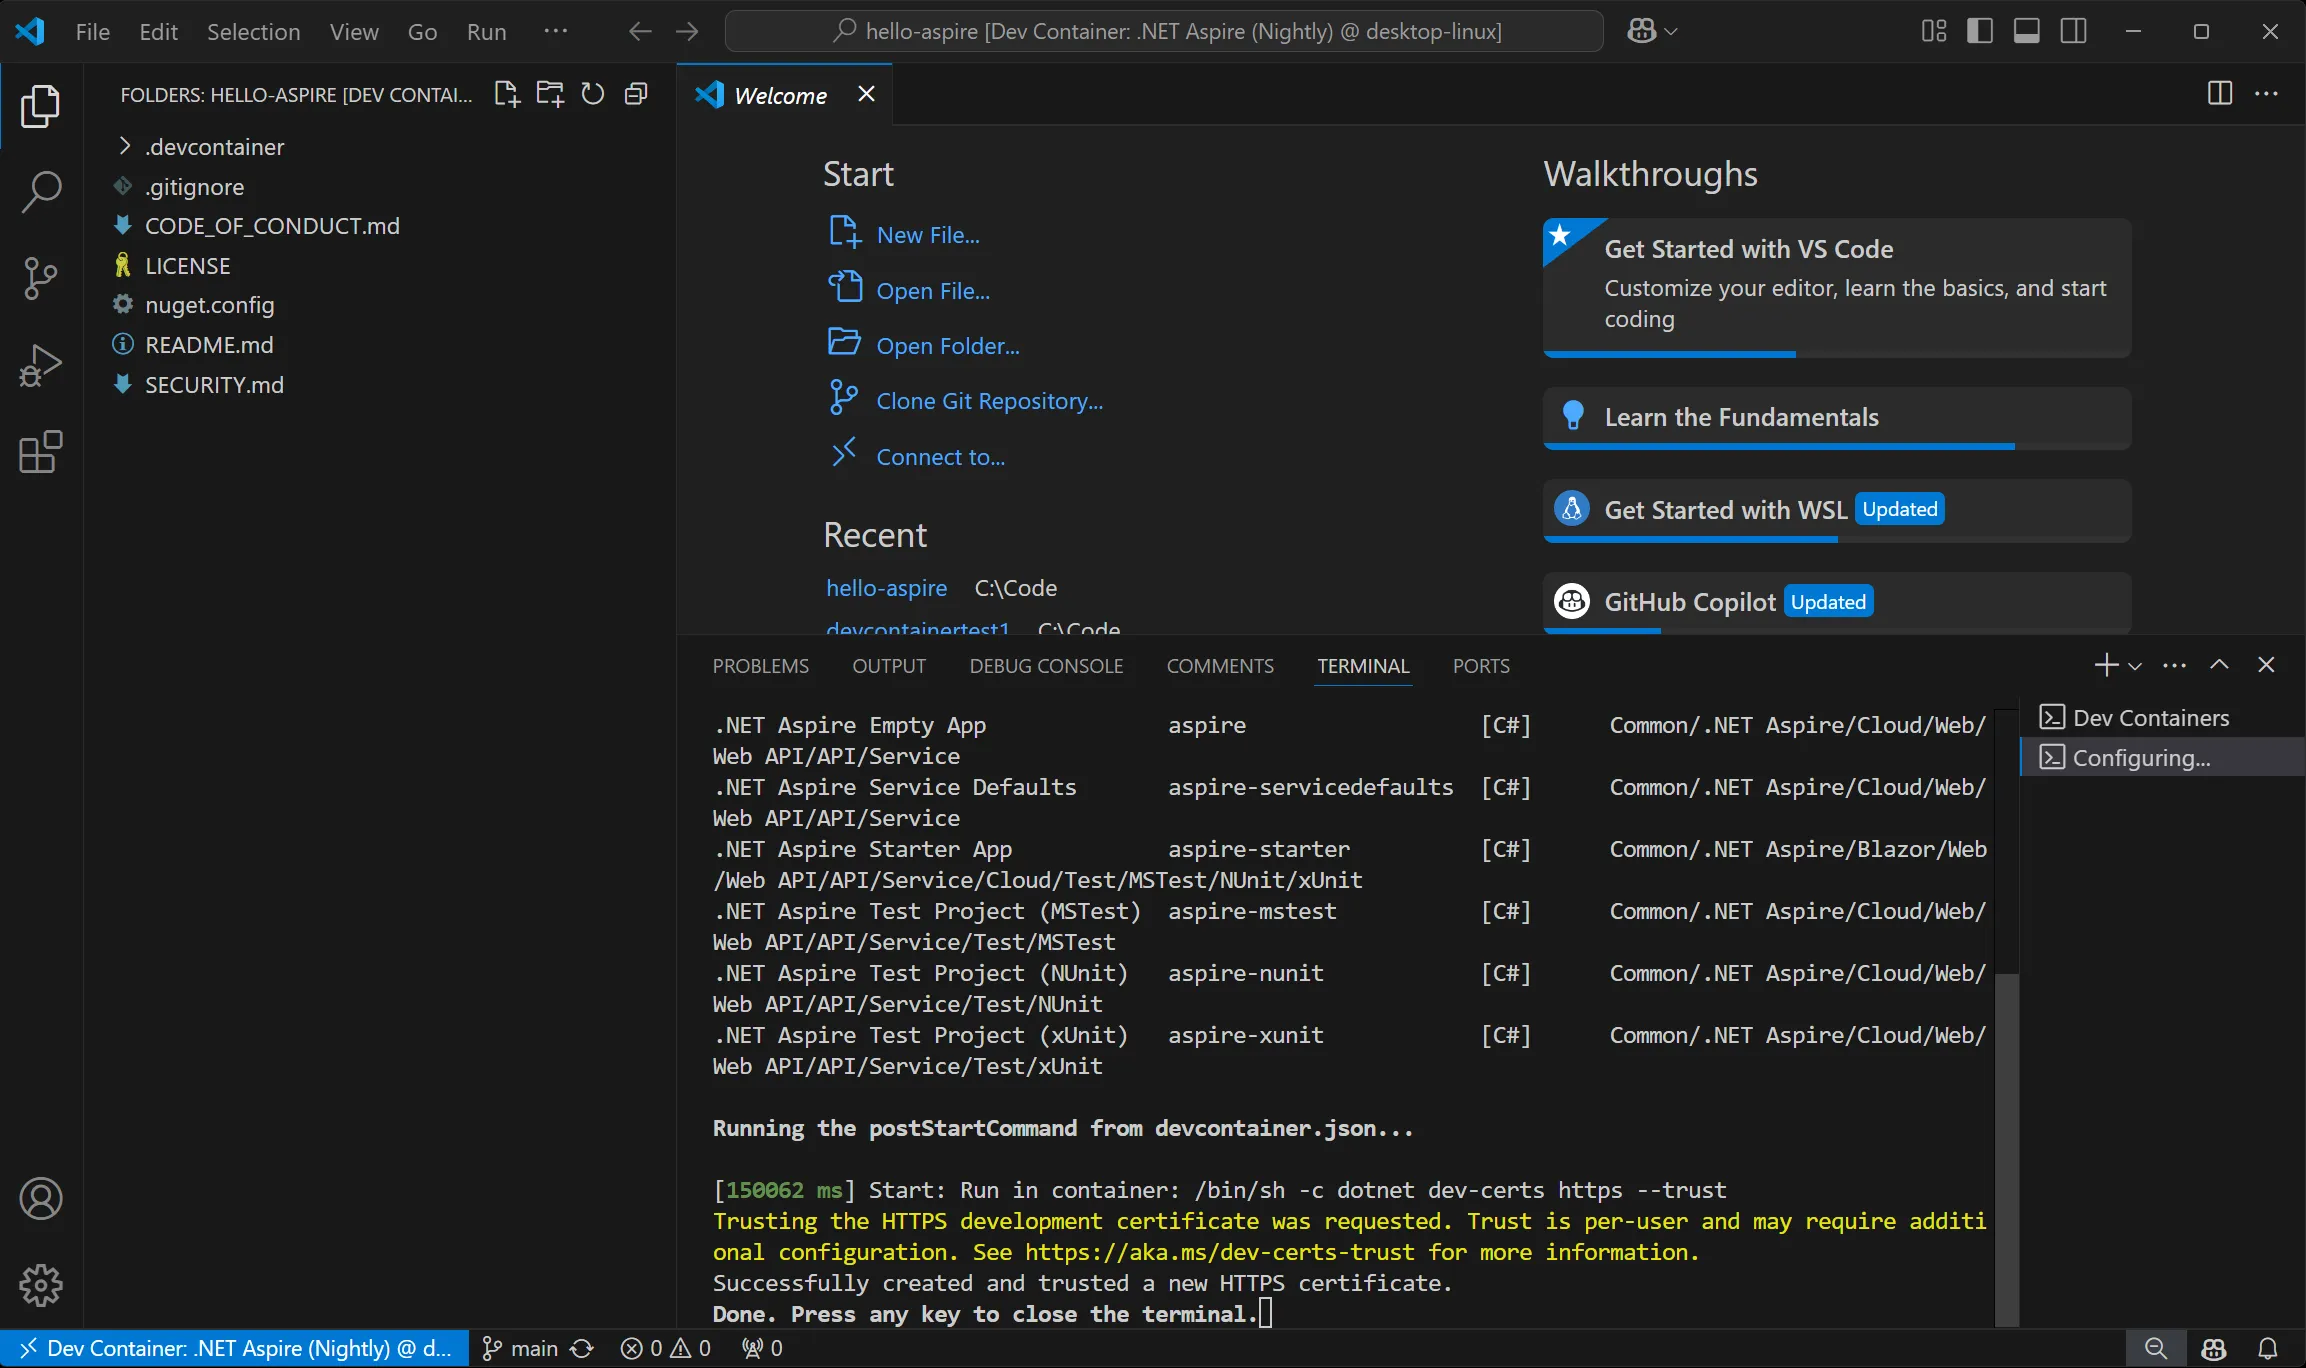
-
Open a new terminal window in Visual Studio Code (
Command + Shift + \\ CmdShift\\ Control + Shift + \\ CtrlShift\\ Control + Shift + \\ CtrlShift\\ ) and create a new Aspire project using the Aspire CLI.Aspire CLI — Create an Aspire starter app aspire new aspire-starter --name HelloAspireAfter a few moments, the project will be created and initial dependencies restored.
-
Open the
HelloAspire.AppHost/AppHost.csfile in the editor and select the run button on the top right corner of the editor window. This run button is provided by the Aspire VS Code extension or C# Dev Kit.
Visual Studio Code builds and starts the Aspire AppHost and automatically opens the Aspire Dashboard. Because the endpoints hosted in the container are using a self-signed certificate the first time, you access an endpoint for a specific Dev Container you’re presented with a certificate error.

The certificate error is expected. Once you’ve confirmed that the URL being requested corresponds to the dashboard in the Dev Container you can ignore this warning.
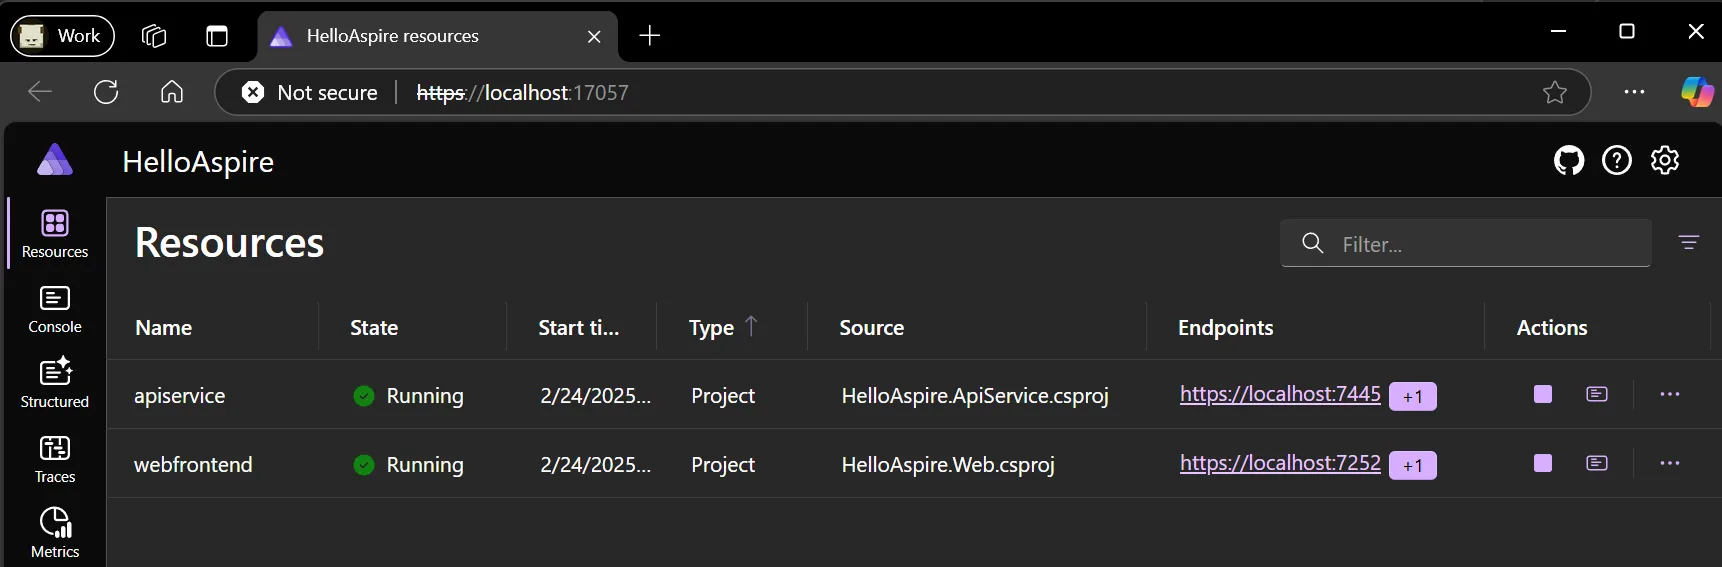
Aspire automatically configures forwarded ports so that when you select the endpoints in the Aspire dashboard they’re tunneled to processes and nested containers within the Dev Container.
-
Commit changes to the GitHub repository.
After successfully creating the Aspire project and verifying that it launches and you can access the dashboard, it’s a good idea to commit the changes to the repository.
Manually configuring devcontainer.json
Section titled “Manually configuring devcontainer.json”The preceding walkthrough demonstrates the streamlined process of creating a Dev Container using the Aspire Dev Container template. If you already have an existing repository and want to use Dev Containers with Aspire, add a devcontainer.json file to the .devcontainer folder within your repository:
Directory.devcontainer
- devcontainer.json
The template repository contains a copy of the devcontainer.json file that you can use as a starting point, which should be sufficient for Aspire.
Dev Container scenarios
Section titled “Dev Container scenarios”The basic Aspire Dev Container template works well for simple scenarios, but you might need additional configuration depending on your specific requirements. The following sections provide examples for various common scenarios.
Stateless .NET apps only
Section titled “Stateless .NET apps only”For simple Aspire projects that only use .NET project resources without external containers or complex orchestration, you can use a minimal Dev Container configuration:
{ "name": "Aspire - Simple", "image": "mcr.microsoft.com/devcontainers/dotnet:dev-10.0-noble", "onCreateCommand": "curl -sSL https://aspire.dev/install.sh | bash", "postStartCommand": "dotnet dev-certs https --trust", "customizations": { "vscode": { "extensions": ["ms-dotnettools.csdevkit"] } }}This minimal configuration is suitable for Aspire apps that orchestrate only .NET services without external dependencies.
Adding Node.js resources
Section titled “Adding Node.js resources”If your Aspire app includes Node.js resources, add the Node.js feature to your Dev Container:
{ "name": "Aspire with Node.js", "image": "mcr.microsoft.com/devcontainers/dotnet:dev-10.0-noble", "features": { "ghcr.io/devcontainers/features/node:1": { "version": "lts" } }, "onCreateCommand": "curl -sSL https://aspire.dev/install.sh | bash", "postStartCommand": "dotnet dev-certs https --trust", "customizations": { "vscode": { "extensions": [ "ms-dotnettools.csdevkit", "ms-vscode.vscode-typescript-next" ] } }}This configuration provides both .NET and Node.js development capabilities within the same container environment.
Container orchestration with Docker-in-Docker
Section titled “Container orchestration with Docker-in-Docker”When your Aspire app orchestrates container resources, you need Docker-in-Docker (DinD) support. Here’s a basic configuration:
{ "name": "Aspire with Containers", "image": "mcr.microsoft.com/devcontainers/dotnet:dev-10.0-noble", "features": { "ghcr.io/devcontainers/features/docker-in-docker:2": { "version": "latest", "enableNonRootDocker": true, "moby": true } }, "hostRequirements": { "cpus": 4, "memory": "16gb", "storage": "32gb" }, "onCreateCommand": "curl -sSL https://aspire.dev/install.sh | bash", "postStartCommand": "dotnet dev-certs https --trust", "customizations": { "vscode": { "extensions": ["ms-dotnettools.csdevkit", "ms-azuretools.vscode-docker"] } }}Advanced container networking
Section titled “Advanced container networking”If you encounter networking issues between containers or need IPv6 support, you can add additional network configuration:
{ "name": "Aspire with Advanced Networking", "image": "mcr.microsoft.com/devcontainers/dotnet:dev-10.0-noble", "features": { "ghcr.io/devcontainers/features/docker-in-docker:2": { "version": "latest", "enableNonRootDocker": true, "moby": true } }, "runArgs": [ "--sysctl", "net.ipv6.conf.all.disable_ipv6=0", "--sysctl", "net.ipv6.conf.default.forwarding=1", "--sysctl", "net.ipv6.conf.all.forwarding=1" ], "hostRequirements": { "cpus": 8, "memory": "32gb", "storage": "64gb" }, "onCreateCommand": "curl -sSL https://aspire.dev/install.sh | bash", "postStartCommand": "dotnet dev-certs https --trust", "customizations": { "vscode": { "extensions": ["ms-dotnettools.csdevkit", "ms-azuretools.vscode-docker"] } }}Dapr integration examples
Section titled “Dapr integration examples”For Aspire apps that integrate with Dapr, you can set up Dapr components in your Dev Container. For more information, see Aspire Dapr integration.
Basic Dapr setup
Section titled “Basic Dapr setup”{ "name": "Aspire with Dapr", "image": "mcr.microsoft.com/devcontainers/dotnet:dev-10.0-noble", "features": { "ghcr.io/devcontainers/features/docker-in-docker:2": { "enableNonRootDocker": true }, "ghcr.io/dapr/cli/dapr-cli:0": {} }, "onCreateCommand": "curl -sSL https://aspire.dev/install.sh | bash", "postCreateCommand": "dotnet dev-certs https --trust && dapr init", "customizations": { "vscode": { "extensions": ["ms-dotnettools.csdevkit", "ms-azuretools.vscode-dapr"] } }}Dapr with external backends
Section titled “Dapr with external backends”For more complex Dapr scenarios that use external backends (Redis, PostgreSQL), you can use Docker Compose:
{ "name": "Aspire with Dapr and Backends", "image": "mcr.microsoft.com/devcontainers/dotnet:dev-10.0-noble", "features": { "ghcr.io/devcontainers/features/docker-in-docker:2": { "enableNonRootDocker": true }, "ghcr.io/dapr/cli/dapr-cli:0": {} }, "runArgs": ["--sysctl", "net.ipv6.conf.all.disable_ipv6=0"], "onCreateCommand": "curl -sSL https://aspire.dev/install.sh | bash", "postCreateCommand": [ "dotnet dev-certs https --trust", "docker compose up -d", "dapr init" ], "customizations": { "vscode": { "extensions": [ "ms-dotnettools.csdevkit", "ms-azuretools.vscode-dapr", "ms-azuretools.vscode-docker" ] } }}Common considerations
Section titled “Common considerations”When using Dev Containers with Aspire, keep the following considerations in mind:
Resource requirements
- Basic .NET apps: Standard Dev Container resources are sufficient for simple scenarios.
- Container orchestration: A minimum of 8 CPUs, 32GB memory, and 64GB storage is recommended.
- Complex scenarios with Dapr/Kubernetes: Higher resource allocation is recommended for optimal performance.
Networking
- IPv6 configuration may be required for container-to-container communication.
- Port forwarding is automatically handled by Aspire.
- External service connectivity depends on your container runtime configuration.
Performance
- Docker-in-Docker scenarios incur performance overhead compared to native Docker.
- Consider using Docker outside of Docker (DooD) for production workflows.
- Local development and deployment scenarios may require different configurations.
Security
- Dev Containers run with elevated privileges when using Docker-in-Docker.
- The development certificate is created and trusted in the container, but your browser might still show a warning the first time you open a forwarded HTTPS endpoint from the host.
- Consider security implications when exposing ports in cloud environments.