Apply EF Core migrations in Aspire
Konten ini belum tersedia dalam bahasa Anda.
Since Aspire projects use a containerized architecture, databases are ephemeral and can be recreated at any time. Entity Framework Core (EF Core) uses a feature called migrations to create and update database schemas. Since databases are recreated when the app starts, you need to apply migrations to initialize the database schema each time your app starts. This is accomplished by registering a migration service project in your app that runs migrations during startup.
In this tutorial, you learn how to configure Aspire projects to run EF Core migrations during app startup.
Please be sure that you’re already setup your development environment, see Prerequisites.
Obtain the starter app
Section titled “Obtain the starter app”This tutorial uses a sample app that demonstrates how to apply EF Core migrations in Aspire. Use Visual Studio to clone the sample app from GitHub or use the following command:
git clone https://github.com/MicrosoftDocs/aspire-docs-samples/The sample app is in the SupportTicketApi folder. Open the solution in Visual Studio or VS Code and take a moment to review the sample app and make sure it runs before proceeding. The sample app is a rudimentary support ticket API, and it contains the following projects:
- SupportTicketApi.Api: The ASP.NET Core project that hosts the API.
- SupportTicketApi.AppHost: Contains the Aspire AppHost and configuration.
- SupportTicketApi.Data: Contains the EF Core contexts and models.
- SupportTicketApi.ServiceDefaults: Contains the default service configurations.
Run the app to ensure it works as expected. In the Aspire dashboard, wait until all resources are running and healthy. Then select the https Swagger endpoint and test the API’s:
GET /api/SupportTickets/1 HTTP/1.1Host: example.comAccept: application/jsonTo do this, expand the GET /api/SupportTickets/1 endpoint by expanding the operation and selecting Try it out. Select Execute to send the request and view the response:
[ { "id": 1, "title": "Initial Ticket", "description": "Test ticket, please ignore." }]Close the browser tabs that display the Swagger endpoint and the Aspire dashboard and then stop debugging.
Create migrations
Section titled “Create migrations”Start by creating some migrations to apply.
-
Open a terminal (
⌘+` ⌘+` Control + Backtick Ctrl` Control + Backtick Ctrl` in Visual Studio Code). -
Set
SupportTicketApi/SupportTicketApi.Apias the current directory. -
Use the
dotnet efcommand-line tool to create a new migration to capture the initial state of the database schema:.NET CLI dotnet ef migrations add InitialCreate --project ../SupportTicketApi.Data/SupportTicketApi.Data.csprojThe proceeding command:
- Runs EF Core migration command-line tool in the SupportTicketApi.Api directory.
dotnet efis run in this location because the API service is where the DB context is used. - Creates a migration named InitialCreate.
- Creates the migration in the in the Migrations folder in the SupportTicketApi.Data project.
- Runs EF Core migration command-line tool in the SupportTicketApi.Api directory.
If you prefer using Visual Studio’s Package Manager Console instead of the command line:
-
Open the Package Manager Console in Visual Studio by selecting Tools > NuGet Package Manager > Package Manager Console.
-
Set the Default project dropdown to SupportTicketApi.Data.
-
Set the Startup project to SupportTicketApi.Api using the dropdown in the toolbar or by right-clicking the project in Solution Explorer and selecting Set as Startup Project.
-
Run the migration command:
Terminal window Add-Migration InitialCreate
-
Modify the model so that it includes a new property. Open
SupportTicketApi.Data/Models/SupportTicket.csand add a new property to theSupportTicketclass:C# — SupportTicket.cs using System.ComponentModel.DataAnnotations;namespace SupportTicketApi.Data.Models;public sealed class SupportTicket{public int Id { get; set; }[Required]public string Title { get; set; } = string.Empty;[Required]public string Description { get; set; } = string.Empty;public bool Completed { get; set; }} -
Create another new migration to capture the changes to the model:
.NET CLI dotnet ef migrations add AddCompleted --project ../SupportTicketApi.Data/SupportTicketApi.Data.csprojPackage Manager Console Add-Migration AddCompleted
Now you’ve got some migrations to apply. Next, you’ll create a migration service that applies these migrations during app startup.
Troubleshoot migration issues
Section titled “Troubleshoot migration issues”When working with EF Core migrations in Aspire projects, you might encounter some common issues. Here are solutions to the most frequent problems:
“No database provider has been configured” error
Section titled ““No database provider has been configured” error”If you get an error like “No database provider has been configured for this DbContext” when running migration commands, it’s because the EF tools can’t find a connection string or database provider configuration. This happens because Aspire projects use service discovery and orchestration that’s only available at runtime.
Solution: Temporarily add a connection string to your project’s appsettings.json file:
-
In your API project (where the DbContext is registered), open or create an
appsettings.jsonfile. -
Add a connection string with the same name used in your Aspire AppHost:
JSON — appsettings.json {"ConnectionStrings": {"ticketdb": "Server=(localdb)\\mssqllocaldb;Database=TicketDb;Trusted_Connection=true"}} -
Run your migration commands as normal.
-
Remove the connection string from
appsettings.jsonwhen you’re done, as Aspire will provide it at runtime.
Multiple databases in one solution
Section titled “Multiple databases in one solution”When your Aspire solution has multiple services with different databases, create migrations for each database separately:
-
Navigate to each service project directory that has a DbContext.
-
Run migration commands with the appropriate project reference:
.NET CLI # For the first service/databasedotnet ef migrations add InitialCreate --project ../FirstService.Data/FirstService.Data.csproj# For the second service/databasedotnet ef migrations add InitialCreate --project ../SecondService.Data/SecondService.Data.csproj -
Create separate migration services for each database, or handle multiple DbContexts in a single migration service.
Startup project configuration
Section titled “Startup project configuration”Ensure you’re running migration commands from the correct project:
- CLI: Navigate to the project directory that contains the DbContext registration (usually your API project)
- Package Manager Console: Set the startup project to the one that configures the DbContext, and the default project to where migrations should be created
Create the migration service
Section titled “Create the migration service”To execute migrations, call the EF Core Microsoft.EntityFrameworkCore.Migrations.IMigrator.Migrate method or the IMigrator.MigrateAsync method. In this tutorial, you’ll create a separate worker service to apply migrations. This approach separates migration concerns into a dedicated project, which is easier to maintain and allows migrations to run before other services start.
To create a service that applies the migrations:
-
Add a new Worker Service project to the solution. If using Visual Studio, right-click the solution in Solution Explorer and select
Add > New Project. SelectWorker Service, name the projectSupportTicketApi.MigrationServiceand target .NET 10.0. If using the command line, use the following commands from the solution directory:.NET CLI dotnet new worker -n SupportTicketApi.MigrationService -f "net10.0"dotnet sln add SupportTicketApi.MigrationService -
Add the SupportTicketApi.Data
andSupportTicketApi.ServiceDefaultsproject references to theSupportTicketApi.MigrationService` project using Visual Studio or the command line:.NET CLI dotnet add SupportTicketApi.MigrationService reference SupportTicketApi.Datadotnet add SupportTicketApi.MigrationService reference SupportTicketApi.ServiceDefaults -
Add the 📦 Aspire.Microsoft.EntityFrameworkCore.SqlServer NuGet package reference to the
SupportTicketApi.MigrationServiceproject using Visual Studio or the command line:.NET CLI cd SupportTicketApi.MigrationServicedotnet add package Aspire.Microsoft.EntityFrameworkCore.SqlServer -v "13.1.0" -
Add the highlighted lines to the
Program.csfile in theSupportTicketApi.MigrationServiceproject:C# — Program.cs using SupportTicketApi.Data.Contexts;using SupportTicketApi.MigrationService;var builder = Host.CreateApplicationBuilder(args);builder.AddServiceDefaults();builder.Services.AddHostedService<Worker>();builder.Services.AddOpenTelemetry().WithTracing(tracing => tracing.AddSource(Worker.ActivitySourceName));builder.AddSqlServerDbContext<TicketContext>("sqldata");var host = builder.Build();host.Run();In the preceding code:
- The
AddServiceDefaultsextension method adds service defaults functionality. - The
AddOpenTelemetryextension method configures OpenTelemetry functionality. - The
AddSqlServerDbContextextension method adds theTicketContextservice to the service collection. This service is used to run migrations and seed the database.
- The
-
Replace the contents of the
Worker.csfile in theSupportTicketApi.MigrationServiceproject with the following code:C# — Worker.cs using System.Diagnostics;using Microsoft.EntityFrameworkCore;using Microsoft.EntityFrameworkCore.Infrastructure;using Microsoft.EntityFrameworkCore.Storage;using OpenTelemetry.Trace;using SupportTicketApi.Data.Contexts;using SupportTicketApi.Data.Models;namespace SupportTicketApi.MigrationService;public class Worker(IServiceProvider serviceProvider,IHostApplicationLifetime hostApplicationLifetime) : BackgroundService{public const string ActivitySourceName = "Migrations";private static readonly ActivitySource s_activitySource = new(ActivitySourceName);protected override async Task ExecuteAsync(CancellationToken cancellationToken){using var activity = s_activitySource.StartActivity("Migrating database", ActivityKind.Client);try{using var scope = serviceProvider.CreateScope();var dbContext = scope.ServiceProvider.GetRequiredService<TicketContext>();await RunMigrationAsync(dbContext, cancellationToken);await SeedDataAsync(dbContext, cancellationToken);}catch (Exception ex){activity?.AddException(ex);throw;}hostApplicationLifetime.StopApplication();}private static async Task RunMigrationAsync(TicketContext dbContext, CancellationToken cancellationToken){var strategy = dbContext.Database.CreateExecutionStrategy();await strategy.ExecuteAsync(async () =>{// Run migration in a transaction to avoid partial migration if it fails.await dbContext.Database.MigrateAsync(cancellationToken);});}private static async Task SeedDataAsync(TicketContext dbContext, CancellationToken cancellationToken){SupportTicket firstTicket = new(){Title = "Test Ticket",Description = "Default ticket, please ignore!",Completed = true};var strategy = dbContext.Database.CreateExecutionStrategy();await strategy.ExecuteAsync(async () =>{// Seed the databaseawait using var transaction = await dbContext.Database.BeginTransactionAsync(cancellationToken);await dbContext.Tickets.AddAsync(firstTicket, cancellationToken);await dbContext.SaveChangesAsync(cancellationToken);await transaction.CommitAsync(cancellationToken);});}}In the preceding code:
- The
ExecuteAsyncmethod is called when the worker starts. It in turn performs the following steps:- Gets a reference to the
TicketContextservice from the service provider. - Calls
RunMigrationAsyncto apply any pending migrations. - Calls
SeedDataAsyncto seed the database with initial data. - Stops the worker with
StopApplication.
- Gets a reference to the
- The
RunMigrationAsyncandSeedDataAsyncmethods both encapsulate their respective database operations using execution strategies to handle transient errors that may occur when interacting with the database. To learn more about execution strategies, see Connection Resiliency.
- The
Add the migration service to the orchestrator
Section titled “Add the migration service to the orchestrator”The migration service is created, but it needs to be added to the Aspire AppHost so that it runs when the app starts.
-
In the
SupportTicketApi.AppHostproject, open theAppHost.csfile. -
Add the following highlighted code:
C# — AppHost.cs var builder = DistributedApplication.CreateBuilder(args);var sql = builder.AddSqlServer("sql").AddDatabase("sqldata");var migrations = builder.AddProject<Projects.SupportTicketApi_MigrationService>("migrations").WithReference(sql).WaitFor(sql);builder.AddProject<Projects.SupportTicketApi_Api>("api").WithReference(sql).WithReference(migrations).WaitForCompletion(migrations);builder.Build().Run();This code enlists the
SupportTicketApi.MigrationServiceproject as a service in the Aspire AppHost. It also ensures that the API resource doesn’t run until the migrations are complete. -
If the code cannot resolve the migration service project, add a reference to the migration service project in the AppHost project:
.NET CLI dotnet add SupportTicketApi.AppHost reference SupportTicketApi.MigrationService
Multiple databases scenario
Section titled “Multiple databases scenario”If your Aspire solution uses multiple databases, you have two options for managing migrations:
Option 1: Separate migration services (Recommended)
Section titled “Option 1: Separate migration services (Recommended)”Create a dedicated migration service for each database. This approach provides better isolation and makes it easier to manage different database schemas independently.
-
Create separate migration service projects for each database:
.NET CLI dotnet new worker -n FirstService.MigrationService -f "net8.0"dotnet new worker -n SecondService.MigrationService -f "net8.0" -
Configure each migration service to handle its specific database context.
-
Add both migration services to your AppHost:
C# — AppHost.cs var firstDb = sqlServer.AddDatabase("firstdb");var secondDb = postgres.AddDatabase("seconddb");var firstMigrations = builder.AddProject<Projects.FirstService_MigrationService>().WithReference(firstDb);var secondMigrations = builder.AddProject<Projects.SecondService_MigrationService>().WithReference(secondDb);// Ensure services wait for their respective migrationsbuilder.AddProject<Projects.FirstService_Api>().WithReference(firstDb).WaitFor(firstMigrations);builder.AddProject<Projects.SecondService_Api>().WithReference(secondDb).WaitFor(secondMigrations);
Option 2: Single migration service with multiple contexts
Section titled “Option 2: Single migration service with multiple contexts”Alternatively, you can create one migration service that handles multiple database contexts:
-
Add references to all data projects in the migration service.
-
Register all DbContexts in the migration service’s
Program.cs. -
Modify the
Worker.csto apply migrations for each context:C# — Worker.cs public async Task<bool> RunMigrationAsync(IServiceProvider serviceProvider){await using var scope = serviceProvider.CreateAsyncScope();var firstContext = scope.ServiceProvider.GetRequiredService<FirstDbContext>();var secondContext = scope.ServiceProvider.GetRequiredService<SecondDbContext>();await firstContext.Database.MigrateAsync();await secondContext.Database.MigrateAsync();return true;}
Remove existing seeding code
Section titled “Remove existing seeding code”Since the migration service seeds the database, you should remove the existing data seeding code from the API project.
-
In the
SupportTicketApi.Apiproject, open theProgram.csfile. -
Delete the highlighted lines.
C# — Program.cs if (app.Environment.IsDevelopment()){app.UseSwagger();app.UseSwaggerUI();using (var scope = app.Services.CreateScope()){var context = scope.ServiceProvider.GetRequiredService<TicketContext>();context.Database.EnsureCreated();if(!context.Tickets.Any()){context.Tickets.Add(new SupportTicket{Title = "Initial Ticket",Description = "Test ticket, please ignore."});context.SaveChanges();}}}
Test the migration service
Section titled “Test the migration service”Now that the migration service is configured, run the app to test the migrations.
-
Run the app and observe the
SupportTicketApidashboard. -
After a short wait, the
migrationsservice state will display Finished.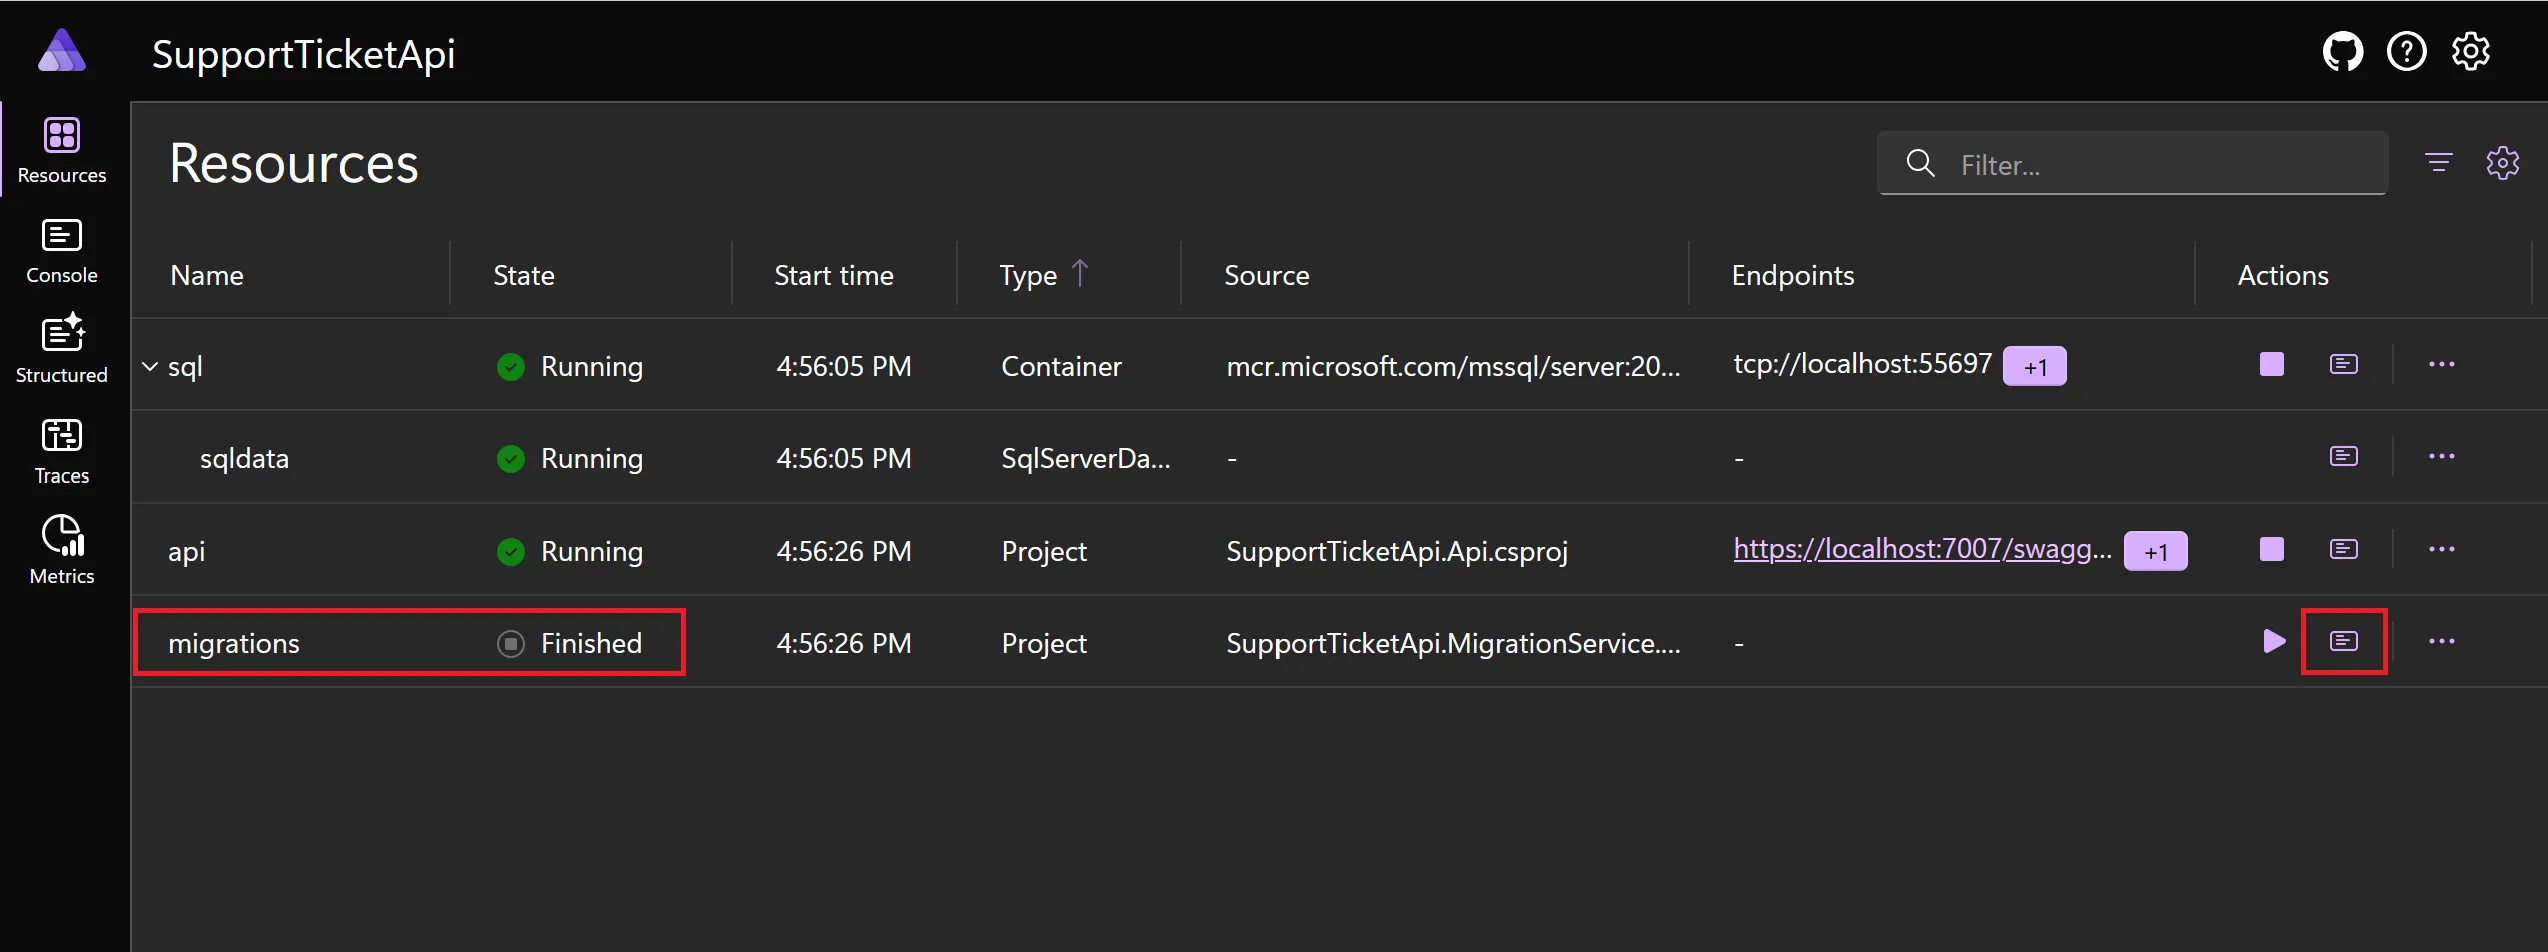
-
Select the
Console logsicon on the migration service to investigate the logs showing the SQL commands that were executed.
Get the code
Section titled “Get the code”You can find the completed sample app on GitHub.
More sample code
Section titled “More sample code”The Aspire Shop sample app uses this approach to apply migrations. See the AspireShop.CatalogDbManager project for the migration service implementation.