What's new in Aspire 9.3
Esta página aún no está disponible en tu idioma.
📢 Aspire 9.3 is the next minor version release of Aspire. It supports:
- .NET 8.0 Long Term Support (LTS)
- .NET 9.0 Standard Term Support (STS)
If you have feedback, questions, or want to contribute to Aspire, collaborate with us on GitHub or join us on Discord to chat with team members.
It’s important to note that Aspire releases out-of-band from .NET releases. While major versions of Aspire align with major .NET versions, minor versions are released more frequently. For more information on .NET and Aspire version support, see:
- .NET support policy: Definitions for LTS and STS.
- Aspire support policy: Important unique product life cycle details.
🖥️ App model enhancements
Section titled “🖥️ App model enhancements”✨ Zero-friction container configuration
Section titled “✨ Zero-friction container configuration”Many container integrations now expose first-class helpers to set ports, usernames, and passwords without digging through internal properties. All three settings can be supplied securely via parameters, keeping secrets out of source:
var pgPwd = builder.AddParameter("pg-pwd", secret: true);
builder.AddPostgres("pg")       .WithHostPort(6045)          // choose the host-side port       .WithPassword(pgPwd)         // reference a secret parameter
The new WithHostPort, WithPassword, and WithUserName (or equivalent per-service) extension methods are available on PostgreSQL, SQL Server, Redis, and several other container resources, giving you consistent, declarative control across the stack.
🔗 Streamlined custom URLs
Section titled “🔗 Streamlined custom URLs”9.3 makes resource links both smarter and easier to place:
- Pick where a link appears – each link now carries a
UrlDisplayLocation(SummaryAndDetailsorDetailsOnly), so you can keep diagnostic links out of the main grid yet still see them in the details pane. - Relative paths are auto-resolved – hand the helper
"/health"and Aspire rewrites it to the full host-qualified URL when the endpoint is allocated. - Multiple links per endpoint – an overload of
WithUrlForEndpointlets you attach extra URLs (docs, admin UIs, probes) to the same endpoint without redefining it. - Endpoint helper inside callbacks –
context.GetEndpoint("https")fetches the fully-resolved endpoint so you can build custom links programmatically. - Custom URLs for any resource –
WithUrl*also works for custom resources.
var frontend = builder.AddProject<Projects.Frontend>("frontend")
    // Hide the plain-HTTP link from the Resources grid    .WithUrlForEndpoint("http",        url => url.DisplayLocation = UrlDisplayLocation.DetailsOnly)
    // Add an extra link under the HTTPS endpoint that points to /health    .WithUrlForEndpoint("https", ep => new()    {        Url            = "/health",                  // relative path supported        DisplayText    = "Health",        DisplayLocation = UrlDisplayLocation.DetailsOnly    });
With these tweaks you can further customize your local dev stack by surfacing the right links in the right place.
🙈 Hide resources without “faking” their state
Section titled “🙈 Hide resources without “faking” their state”Historically the only way to keep a resource out of the Dashboard was to put it in the Hidden state—a hack that also made the resource look “terminal” to APIs such as WaitForResourceAsync. In 9.3 every snapshot now carries a boolean IsHidden flag, completely decoupling visibility from lifecycle state.
-
Cleaner defaults – low-level helpers like
AddParameterandAddConnectionStringmark themselves hidden so they don’t clutter the UI:var apiKey = builder.AddParameter("api-key", secret: true); // IsHidden = true ✔ -
Accurate waits & health flows –
WaitForResourceAsyncwas updated to treatIsHiddenas a separate predicate, so hidden resources can still be awaited or surfaced programmatically without special-casing states.
This small change removes ambiguity in the model while giving you precise control over what shows up in the Dashboard.
🔔 New lifecycle events
Section titled “🔔 New lifecycle events”Aspire 9.3 introduces two new lifecycle events that make it easier to build custom resources with predictable behavior—without relying on hacks like System.Threading.Tasks.Task.Run*?displayProperty=nameWithType or polling:
InitializeResourceEvent
Section titled “InitializeResourceEvent”This event fires after a resource is added, but before endpoints are allocated. It’s especially useful for custom resources that don’t have a built-in lifecycle (like containers or executables), giving you a clean place to kick off background logic, set default state, or wire up behavior.
For example, this minimal custom resource publishes a running state when initialized:
var myCustom = new MyCustomResource("my-resource");
builder.AddResource(myCustom);builder.Eventing.Subscribe<InitializeResourceEvent>(myCustom, async (e, ct) =>{    await e.Notifications.PublishUpdateAsync(e.Resource,        s => s with { State = KnownResourceStates.Running });});
This replaces awkward patterns like Task.Run inside constructors or Configure() methods. You can see a more complex version in the TalkingClock sample in the official Aspire samples repo.
ResourceEndpointsAllocatedEvent
Section titled “ResourceEndpointsAllocatedEvent”This event fires once a resource’s endpoints have been assigned (e.g., after port resolution or container allocation). It’s scoped per resource, so you can safely get an Aspire.Hosting.ApplicationModel.EndpointReference and build derived URLs or diagnostics.
builder.Eventing.Subscribe<ResourceEndpointsAllocatedEvent>((e, ct) =>{    if (e.Resource is IResourceWithEndpoints resource)    {        var http = resource.GetEndpoint("http");
        Console.WriteLine($"Endpoint http - Allocated {http.IsAllocated}, Port: {http.Port}");    }
    return Task.CompletedTask;});
These events make resource authoring smoother, safer, and more deterministic—no lifecycle guesswork needed.
🌐 YARP Integration (Preview)
Section titled “🌐 YARP Integration (Preview)”Aspire 9.3 introduces preview support for YARP (Yet Another Reverse Proxy)—a long-requested addition that brings reverse proxying into the Aspire application model.
This integration makes it easy to add a lightweight proxy container to your distributed app, powered by the official YARP container image. It currently supports configuration-based routing only, using a JSON file you supply.
Add a reverse proxy to your Aspire app:
Section titled “Add a reverse proxy to your Aspire app:”builder.AddYarp("apigateway") .WithConfigFile("yarp.json") .WithReference(basketService) .WithReference(catalogService);The config file is mounted into the container and used as the runtime YARP configuration.
Example yarp.json:
Section titled “Example yarp.json:”{ "ReverseProxy": { "Routes": { "catalog": { "ClusterId": "catalog", "Match": { "Path": "/catalog/{**catch-all}" } }, "basket": { "ClusterId": "basket", "Match": { "Path": "/basket/{**catch-all}" } } }, "Clusters": { "catalog": { "Destinations": { "catalog/d1": { "Address": "http://catalog/" } } }, "basket": { "Destinations": { "basket/d1": { "Address": "http://basket/" } } } } }}The .WithReference(...) calls automatically ensure that the proxy container can resolve the referenced services by name (catalog, basket), using Aspire’s internal network graph.
⚠️ Known limitations in this preview
Section titled “⚠️ Known limitations in this preview”- Only configuration-based routing is supported. Code-based or programmatic route generation is not available yet.
- The configuration file is not deployed as part of publish operations—you must manage the file manually.
- Routing from containers to projects will not work on Podman, due to host-to-container networking limitations.
🐬 MySQL AddDatabase now creates the database
Section titled “🐬 MySQL AddDatabase now creates the database”In Aspire 9.3, the MySQL integration now supports automatic database creation via the AddDatabase API—matching the behavior already available for SQL Server and PostgreSQL.
Previously, calling .AddDatabase("dbname") on a MySQL resource only created a logical reference in Aspire’s app model—it did not create the database on the server. This mismatch caused confusion, especially when users expected Aspire to provision the database like it does for other integrations.
✅ New behavior in 9.3:
Section titled “✅ New behavior in 9.3:”var mysql = builder.AddMySql("db");
mysql.AddDatabase("appdb");At runtime, Aspire now executes a CREATE DATABASE command for "appdb" against the running MySQL container or server. If the database already exists, the command is skipped safely.
This brings MySQL in line with the broader Aspire database ecosystem:
| Integration | Automatically creates database? |
|---|---|
| SQL Server | ✅ Yes |
| PostgreSQL | ✅ Yes |
| MySQL | ✅ Yes (new in 9.3) |
| MongoDB | ❌ No (not needed; created on first write) |
| Oracle | ❌ No (not supported yet) |
No additional configuration is required—the same AddDatabase call you already use now provisions the database for you behind the scenes.
📊 Dashboard delights
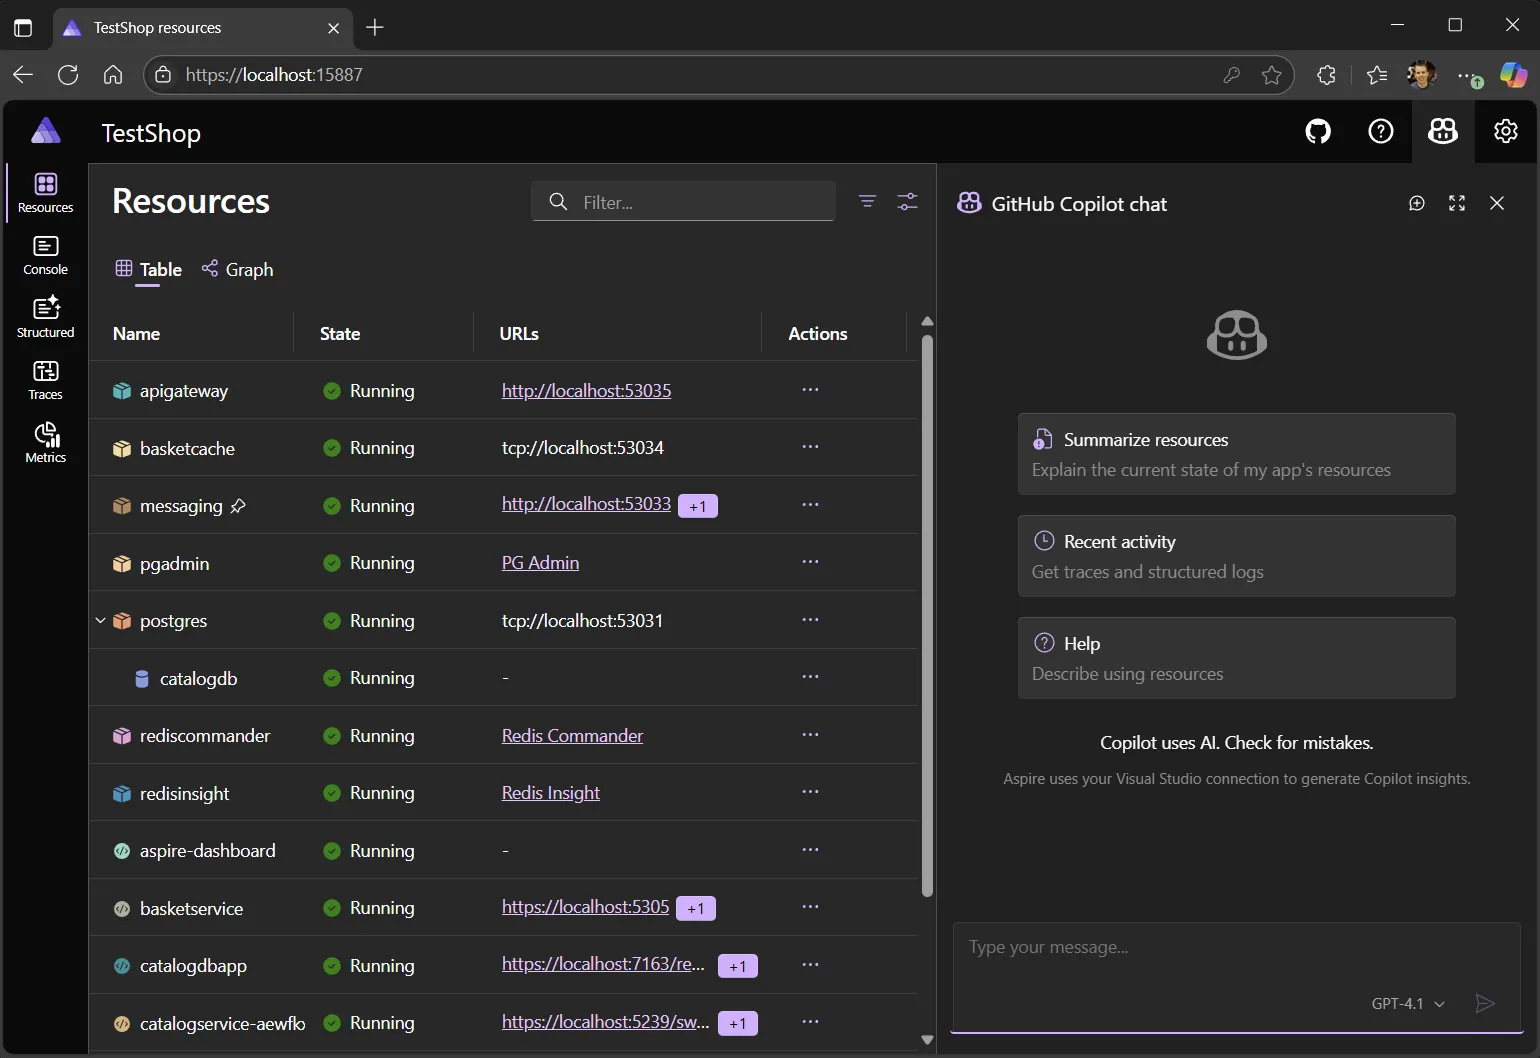
Section titled “📊 Dashboard delights”✨ GitHub Copilot in the dashboard
Section titled “✨ GitHub Copilot in the dashboard”Introducing GitHub Copilot in the Aspire dashboard! GitHub Copilot is your new AI debugging assistant.
GitHub Copilot supercharges the dashboard’s OpenTelemetry debugging and diagnostics experience. With AI, you can:
- Review hundreds of log messages with a single click
- Investigate the root cause of errors across multiple apps
- Highlight performance issues in traces
- Explain obscure error codes using AI’s huge knowledge repository
You’ll have access to Copilot in the dashboard when you launch your app from VS Code or Visual Studio.
For more details on requirements and how to get started, see GitHub Copilot in the Aspire dashboard.
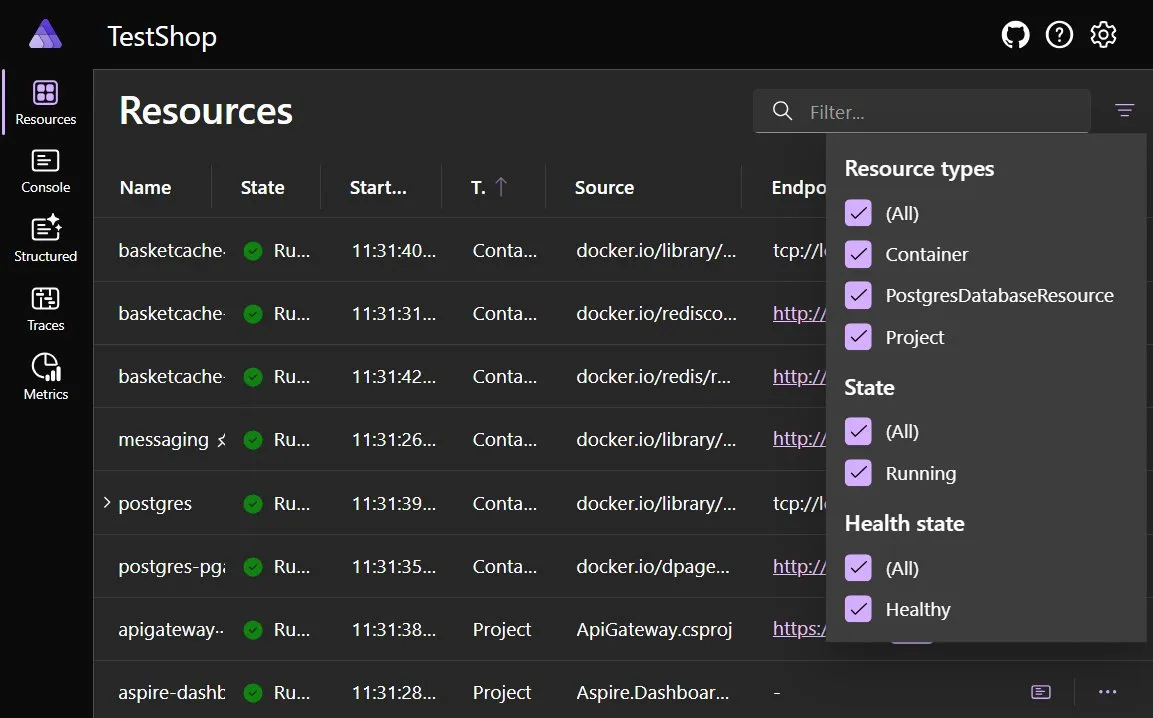
🧠 Remembers your filter settings
Section titled “🧠 Remembers your filter settings”The Aspire dashboard now remembers your resource filter settings between sessions. Previously, if you filtered the Resources view (for example, to hide support services or highlight only frontend apps), those filters were reset on page reload.
As of 9.3, filter state is persisted in local storage, so your selections stick across refreshes and restarts. This small improvement makes it easier to focus on the parts of your app that matter most—especially in large graphs with many supporting services like Redis, SQL, or queues.
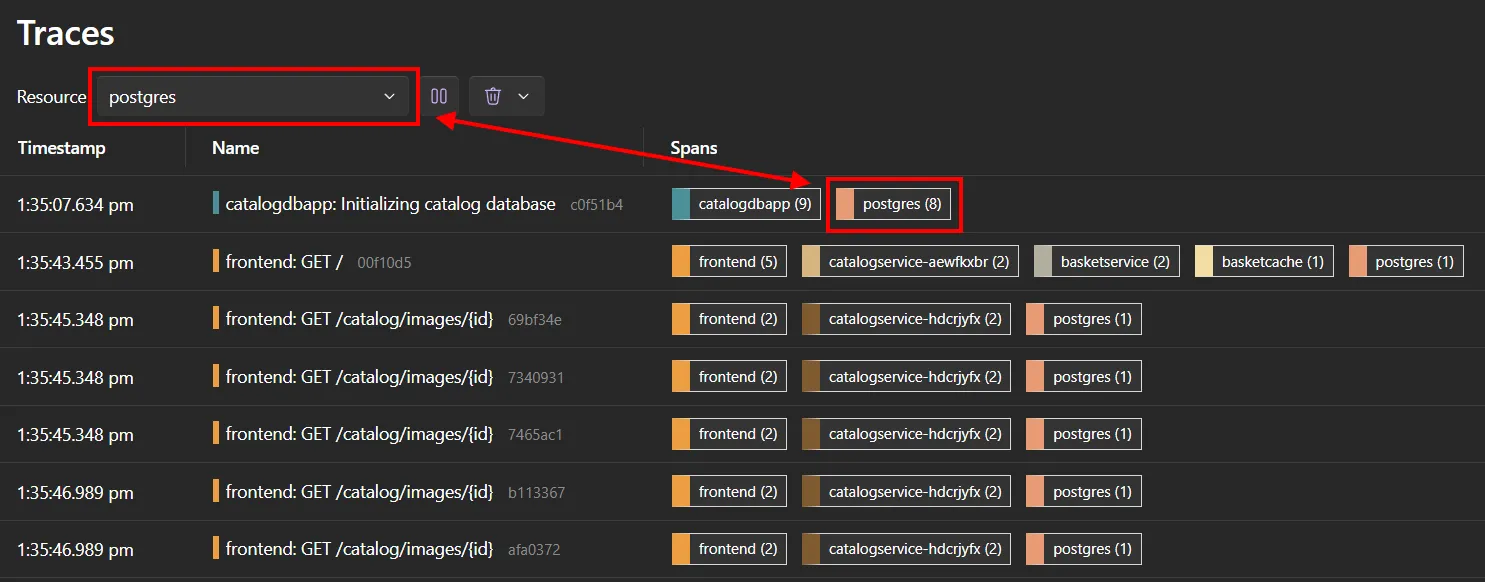
🧵 Uninstrumented resources now appear in Traces
Section titled “🧵 Uninstrumented resources now appear in Traces”In 9.3, the dashboard can now visualize outgoing calls to resources that don’t emit their own telemetry—such as databases, caches, and other infrastructure components that lack built-in tracing.
Previously, these dependencies were invisible in the Traces view unless they were emitting OTLP traces. Now, if your app makes an HTTP, SQL, or Redis call to a modeled Aspire resource that doesn’t emit spans itself, Aspire still shows it as a referenced peer in the trace timeline.
This helps you:
- Understand the full chain of dependencies—even if some components are passive
- Debug latency or failures in calls to uninstrumented services
- Keep the trace UI consistent across infrastructure types
🧪 No instrumentation changes are needed—Aspire infers the mapping based on resource references.
🖱️ Resource context menus & quick-launch actions
Section titled “🖱️ Resource context menus & quick-launch actions”Aspire 9.3 makes the dashboard more interactive and easier to navigate by introducing new context menus and enhancing how resource URLs are surfaced across views.
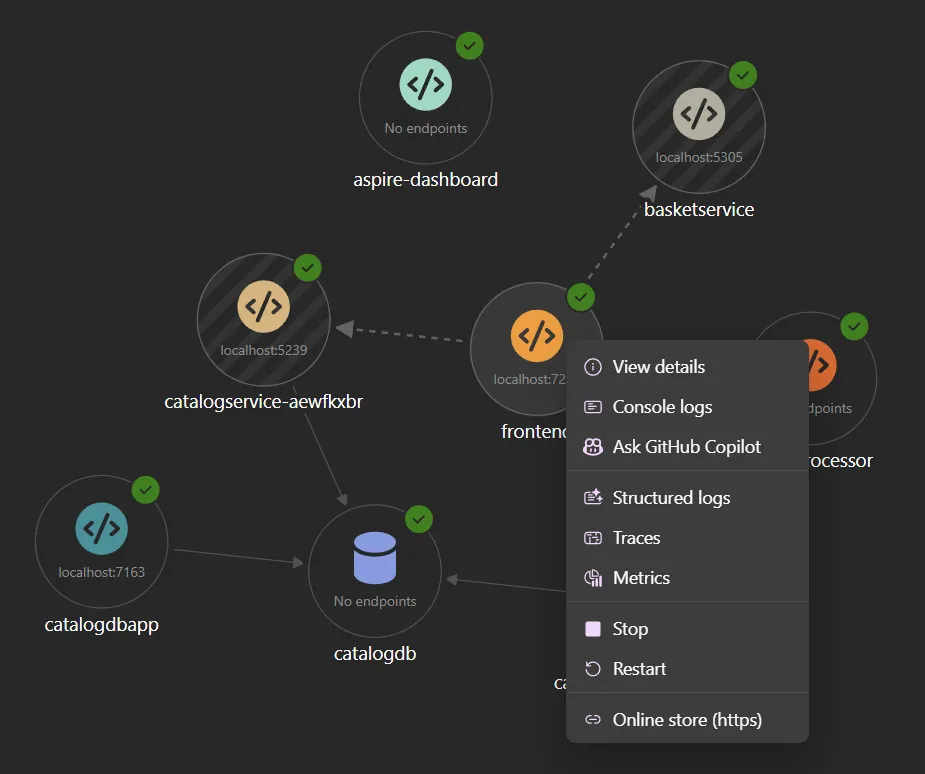
🧭 Right-click context menus in the graph
Section titled “🧭 Right-click context menus in the graph”You can now right-click any resource node in the Resource Graph view to bring up a context menu with quick actions:
- Open structured logs, console logs, traces, or metrics for that resource
- Launch external URLs associated with the resource (like PGAdmin, Swagger, or Grafana)
- Jump directly to the resource’s detail pane
This reduces the number of clicks and lets you stay in the graph while investigating specific services.
🔗 Resource URLs in console log actions
Section titled “🔗 Resource URLs in console log actions”Resource URLs defined via WithUrlForEndpoint(...) are now more prominently integrated into the dashboard UI. They appear:
- In the console logs view action bar
- In the new right-click menus
- On the resource detail pane, as before
This makes common destinations—like admin UIs, health checks, and docs—instantly accessible wherever you’re working.
Together, these improvements turn the Aspire dashboard into a true control plane for navigating your distributed app—less friction, more focus.
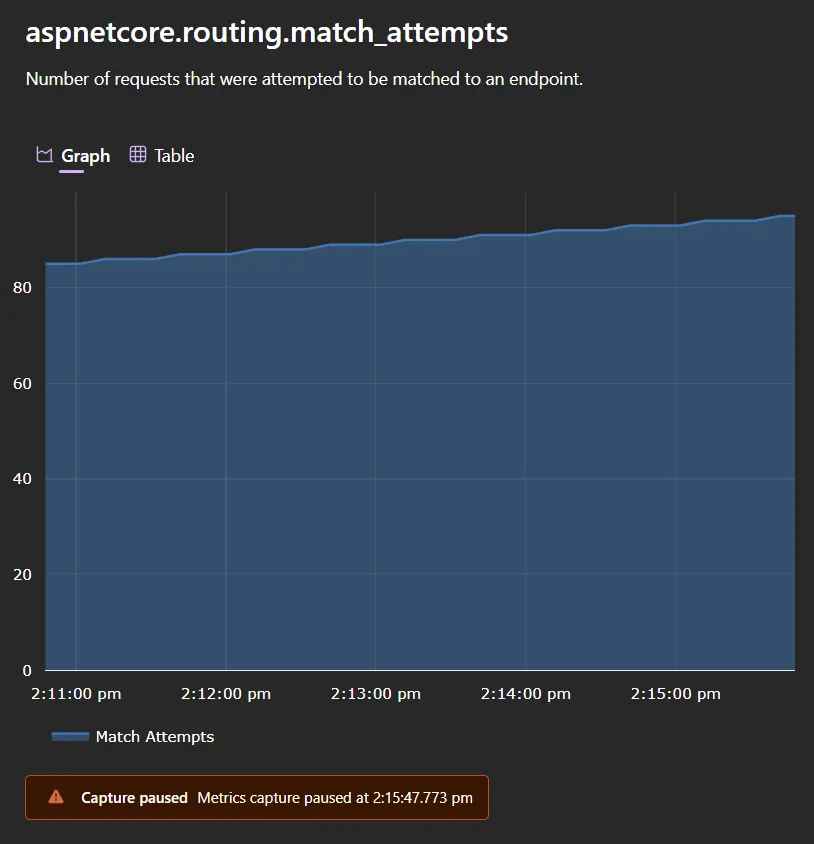
⏸️ Metrics pause warning
Section titled “⏸️ Metrics pause warning”The dashboard now shows a warning banner when metrics collection is paused. This makes it clear that data may be stale if you’ve temporarily halted telemetry.
📝 Friendly names in console logs
Section titled “📝 Friendly names in console logs”When a resource has only one replica, the Aspire dashboard now uses the friendly resource name (like frontend, apigateway, or redis) instead of the replica ID (like frontend-0) in the console logs view.
This small change makes logs easier to read and reduces visual noise—especially in common single-instance setups during development.
🚀 Deployment & publish
Section titled “🚀 Deployment & publish”🏗️ Improvements to in-preview publisher model & compute environment support
Section titled “🏗️ Improvements to in-preview publisher model & compute environment support”In 9.2, we shipped our first iteration of “publishers”, a flexible way to configure deployments to any cloud in the AppHost. To ensure more flexibility, Aspire 9.3 includes a new and improved publisher model that distributes publishing behavior across your application graph instead of relying on a single top-level publisher.
Rather than selecting a target environment (like Docker or Azure) by calling AddDockerComposePublisher() or similar, Aspire now includes a built-in publisher that looks for a PublishingCallbackAnnotation on each resource. This annotation describes how that resource should be published—for example, as a Docker Compose service, Kubernetes manifest, or Azure Bicep module.
Most apps only need one environment
Section titled “Most apps only need one environment”In typical apps, you only need to add a single compute environment, like:
builder.AddAzureContainerAppEnvironment("env");In this case, Aspire applies the correct publishing behavior to all compute resources in your app model—no extra configuration needed.
Multiple environments require disambiguation
Section titled “Multiple environments require disambiguation”If you add multiple compute environments, Aspire needs to know which resource goes where. Compute environments apply their transformations to all applicable compute resources (projects, containers, executables). If more than one environment matches a given resource, Aspire throws an ambiguous environment exception at publish time.
You can resolve this by using WithComputeEnvironment(...):
var k8s = builder.AddKubernetesEnvironment("k8s-env");var compose = builder.AddDockerComposeEnvironment("docker-env");
builder.AddProject<Projects.Api>("api")       .WithComputeEnvironment(compose);
builder.AddProject<Projects.Frontend>("frontend")       .WithComputeEnvironment(k8s);
This (contrived) example shows how you could explicitly map services to different compute targets—modeling, for example, a frontend in Kubernetes and a backend in Docker Compose.
⚠️ All previous publisher registration APIs (like AddDockerComposePublisher()) have been removed in favor of this new model.
Supported compute environments
Section titled “Supported compute environments”Aspire 9.3 has preview support for the following environment resources:
AddDockerComposeEnvironment(...)AddKubernetesEnvironment(...)AddAzureContainerAppEnvironment(...)AddAzureAppServiceEnvironment(...)— see new App Service support →
These represent deployment targets that can transform and emit infrastructure-specific artifacts from your app model.
🐳 Docker Compose enhancements
Section titled “🐳 Docker Compose enhancements”Aspire 9.3 introduces powerful new capabilities for customizing Docker Compose output using strongly typed, C#-based configuration. You can now declaratively configure both the global Compose file and individual services directly from the Aspire app model—making your deployment output easy to reason about, customize, and automate.
🛠️ Customize the Compose file and service definitions
Section titled “🛠️ Customize the Compose file and service definitions”You can now programmatically configure the top-level Compose file and the behavior of each individual service using two new APIs:
ConfigureComposeFile(...)— customize thedocker-compose.ymlmetadataPublishAsDockerComposeService(...)— modify the generated service for any compute resource (like a container or project)
builder.AddDockerComposeEnvironment("env")       .WithProperties(env =>       {           env.BuildContainerImages = false; // skip image build step       })       .ConfigureComposeFile(file =>       {           file.Name = "aspire-ai-chat"; // sets the file name       });
// Add a container to the appbuilder.AddContainer("service", "nginx")       .WithEnvironment("ORIGINAL_ENV", "value")       .PublishAsDockerComposeService((resource, service) =>       {           service.Labels["custom-label"] = "test-value";           service.AddEnvironmentalVariable("CUSTOM_ENV", "custom-value");           service.Restart = "always";       });
These APIs give you a structured, strongly typed way to mutate the generated output—enabling richer CI automation, custom tooling, and environment-specific adjustments without editing YAML manually.
🔗 Map parameters and expressions into Docker Compose
Section titled “🔗 Map parameters and expressions into Docker Compose”Aspire now supports binding values from the app model—like parameters and references—into the Docker Compose definition via environment variable placeholders.
This makes it easy to flow dynamic configuration (e.g., from the CI pipeline or secret store) directly into the final output.
builder.AddDockerComposeEnvironment("docker-compose");
var containerNameParam = builder.AddParameter("param-1", "default-name", publishValueAsDefault: true);
builder.AddContainer("service", "nginx")       .WithEnvironment("ORIGINAL_ENV", "value")       .PublishAsDockerComposeService((resource, service) =>       {           service.ContainerName = containerNameParam.AsEnvironmentPlaceholder(resource);       });
The key API here is .AsEnvironmentPlaceholder(...), which tells Aspire to emit a Compose variable like ${PARAM_1} and register the mapping so the .env file is updated accordingly.
These enhancements make Docker Compose a fully programmable publishing target, ideal for local development, container-based CI workflows, and teams that need structured control without brittle YAML overlays.
☸️ Kubernetes manifest customization
Section titled “☸️ Kubernetes manifest customization”Aspire 9.3 adds support for programmatically customizing generated Kubernetes manifests as part of the publish process. This gives you fine-grained control over the YAML artifacts Aspire emits—without writing raw manifest overlays or patches.
Like Docker Compose, Aspire now supports both global environment-level settings and per-resource customization.
🛠️ Configure global and per-resource settings
Section titled “🛠️ Configure global and per-resource settings”You can use the following APIs to configure Kubernetes output in C#:
WithProperties(...)on the compute environment to set global behaviorsPublishAsKubernetesService(...)on compute resources to modify their specific Kubernetes resources
builder.AddKubernetesEnvironment("env")       .WithProperties(env =>       {           env.DefaultImagePullPolicy = "Always"; // e.g., Always, IfNotPresent       });
builder.AddContainer("service", "nginx")       .WithEnvironment("ORIGINAL_ENV", "value")       .PublishAsKubernetesService(resource =>       {           // Add custom deployment-level settings           resource.Deployment!.Spec.RevisionHistoryLimit = 5;       });
This gives you fully typed access to the Kubernetes object model, enabling powerful modifications like:
- Overriding container image pull policies
- Customizing replica counts or deployment strategies
- Injecting labels or annotations into Services, Deployments, or ConfigMaps
🖥️ Aspire CLI enhancements
Section titled “🖥️ Aspire CLI enhancements”🧪 The Aspire CLI is still in preview and under active development. Expect more features and polish in future releases.
📦 To install:
dotnet tool install --global aspire.cli --prerelease🔍 Smarter AppHost discovery
Section titled “🔍 Smarter AppHost discovery”The CLI now walks upward from your current directory, recursively searching each level for the AppHost project. Once located, it caches the result in a .aspire folder to speed up future commands.
You can now run commands like aspire run, aspire add, or aspire publish from any directory within your solution, and the CLI will resolve the AppHost automatically.
For example:
cd src/frontendaspire run⏳ Health-aware dashboard launch
Section titled “⏳ Health-aware dashboard launch”The CLI now waits for the dashboard to become responsive before printing its URL to the terminal. This ensures the link works immediately when opened—no more blank pages or retry loops.
These updates make the Aspire CLI more reliable, script-friendly, and aligned with how developers move across folders and projects during daily development.
☁️ Azure goodies
Section titled “☁️ Azure goodies”🌐 Azure App Service (Preview support)
Section titled “🌐 Azure App Service (Preview support)”Aspire 9.3 introduces preview support for deploying .NET projects to Azure App Service—one of the most requested features from developers using Aspire with existing Azure environments.
This integration lets you deploy your project as a containerized Linux Web App, modeled directly in your Aspire AppHost using a new AddAzureAppServiceEnvironment(...) API.
🚧 Current limitations (Preview)
Section titled “🚧 Current limitations (Preview)”This first release is scoped to the most common use cases:
- Supports .NET projects only (via
AddProject(...)) - Each project must expose a single public HTTP endpoint
- Projects are published as containers to Azure Container Registry
- Containers within the AppHost are not supported
- Existing App Service Plans are not supported
- The Aspire dashboard is not hosted in App Service yet
Example: Deploy to Azure App Service
Section titled “Example: Deploy to Azure App Service”builder.AddAzureAppServiceEnvironment("env");
builder.AddProject<Projects.Api>("api") .WithExternalHttpEndpoints() .PublishAsAzureAppServiceWebsite((infra, site) => { site.SiteConfig.IsWebSocketsEnabled = true; });In this example:
- Aspire provisions an App Service Plan and a Web App
- Your project is built as a container and published to Azure Container Registry
- The container is deployed to App Service with the configuration you provide
🧠 Use
PublishAsAzureAppServiceWebsite(...)to customize settings like site config, authentication, or SKU.
💬 This feature is in preview—we’re looking for your feedback as we expand support!
📤 Use an existing Azure Container Registry (ACR)
Section titled “📤 Use an existing Azure Container Registry (ACR)”Aspire 9.3 adds support for modeling an existing Azure Container Registry (ACR) using the new AddAzureContainerRegistry(...) API. This enables you to push images to an ACR you already manage—without Aspire provisioning a new one.
This is ideal for teams that:
- Share a centralized registry across environments
- Integrate with existing CI/CD pipelines and promotion workflows
- Require fine-grained control over image publishing
Example: associate ACR with an Azure Container Apps environment
Section titled “Example: associate ACR with an Azure Container Apps environment”var acr = builder.AddAzureContainerRegistry("my-acr");
builder.AddAzureContainerAppEnvironment("env") .WithAzureContainerRegistry(acr);
builder.AddProject<Projects.Api>("api") .WithExternalHttpEndpoints();In this example:
- The ACR is modeled in Aspire and used by the container apps environment
- Aspire publishes the built image to
my-acrand configures Azure Container Apps to pull from it
ACR works with multiple compute environments
Section titled “ACR works with multiple compute environments”You can associate an AzureContainerRegistryResource with:
AddAzureContainerAppEnvironment(...)AddAzureAppServiceEnvironment(...)
This gives you consistent control over where images are published, even across different compute targets.
💡 Use
.RunAsExisting()or.PublishAsExisting()on the ACR resource to reference an existing registry without provisioning one.
🖇️ Resource Deep Linking for Blob Containers
Section titled “🖇️ Resource Deep Linking for Blob Containers”Aspire 9.3 expands resource deep linking to include Azure Blob Storage containers, building on the model already used for Cosmos DB, Event Hubs, Service Bus, and Azure OpenAI.
You can now model individual blob containers directly in your AppHost, then inject scoped BlobContainerClient instances into your services—making it easy to read or write blobs without manually configuring connection strings or access.
AppHost:
var builder = DistributedApplication.CreateBuilder(args);
// Add Azure Storage Emulatorvar storage = builder.AddAzureStorage("storage").RunAsEmulator();
// Add a blob group and a containervar blobs = storage.AddBlobs("blobs");var container = blobs.AddBlobContainer("images", blobContainerName: "image-uploads");
// Add the API project and reference the containerbuilder.AddProject<Projects.my94app_ApiService>("api")       .WithExternalHttpEndpoints()       .WithReference(container);
builder.Build().Run();
In the API project:
using Azure.Storage.Blobs;
var builder = WebApplication.CreateBuilder(args);
// Register the blob container clientbuilder.AddAzureBlobContainerClient("images");
var app = builder.Build();
// Minimal POST endpoint for image uploadapp.MapPost("/upload", async (    IFormFile file,    BlobContainerClient container) =>{    await container.CreateIfNotExistsAsync();
    var blob = container.GetBlobClient(file.FileName);    using var stream = file.OpenReadStream();    await blob.UploadAsync(stream, overwrite: true);
    return Results.Ok(new { Url = blob.Uri });});
app.Run();
This pattern provides clean separation of concerns, secure container scoping, and minimal ceremony—ideal for microservices that interact with specific blob containers.
🔐 Expanded Azure Key Vault client integrations
Section titled “🔐 Expanded Azure Key Vault client integrations”Aspire 9.3 expands Azure Key Vault support with new client integration APIs for keys and certificates, allowing you to inject typed Azure SDK clients directly into your services:
AddAzureKeyVaultKeyClient(...)AddAzureKeyVaultCertificateClient(...)AddKeyedAzureKeyVaultKeyClient(...)AddKeyedAzureKeyVaultCertificateClient(...)
These APIs complement the existing AddAzureKeyVaultClient(...) and provide easy access to KeyClient and CertificateClient from the Azure SDK for .NET.
var builder = WebApplication.CreateBuilder(args);
// Register default clientsbuilder.AddAzureKeyVaultKeyClient("kv");builder.AddAzureKeyVaultCertificateClient("kv");
// Register named (keyed) clientsbuilder.AddKeyedAzureKeyVaultCertificateClient("kv", "signing-cert");
The keyed overloads allow you to register multiple clients scoped to the same Key Vault resource—useful when accessing multiple certificates or keys by purpose.
🙌 This feature was contributed by @james-gould. Thank you!
🔑 Use Key Vault secrets in environment variables
Section titled “🔑 Use Key Vault secrets in environment variables”Aspire 9.3 adds support for wiring Key Vault secrets directly into environment variables using a new overload of WithEnvironment(...) that accepts an IAzureKeyVaultSecretReference.
This makes it easy to securely reference secrets from a modeled Key Vault without hardcoding secret values—and ensures those references flow correctly into deployment outputs like Azure Bicep.
var kv = builder.AddAzureKeyVault("myKeyVault");
var secretRef = kv.Resource.GetSecret("mySecret");
builder.AddContainer("myContainer", "nginx")       .WithEnvironment("MY_SECRET", secretRef);
🧩 Reference secrets from existing Key Vaults
Section titled “🧩 Reference secrets from existing Key Vaults”You can also use this with existing Azure Key Vaults by marking the resource with AsExisting(...), RunAsExisting(...), or PublishAsExisting(...). This lets you consume secrets from already-provisioned vaults—perfect for shared environments or team-managed infrastructure.
var keyVaultNameParam = builder.AddParameter("key-vault-name");var keyVaultResourceGroupParam = builder.AddParameter("key-vault-rg");
var existingVault = builder.AddAzureKeyVault("sharedVault")                           .AsExisting(keyVaultNameParam, keyVaultResourceGroupParam);
var apiKey = existingVault.Resource.GetSecret("stripe-api-key");
builder.AddContainer("billing", "mycompany/billing")       .WithEnvironment("STRIPE_API_KEY", apiKey);
This pattern ensures Aspire:
- Doesn’t attempt to re-provision the Key Vault
- Emits references to the correct existing resources in publish mode
- Still enables secret injection and secure scoping via environment variables
📖 See also: Use existing Azure resources.
🧠 Azure AI Inference client integration (Preview)
Section titled “🧠 Azure AI Inference client integration (Preview)”Aspire 9.3 adds client-only support for Azure-hosted Chat Completions endpoints using the Azure.AI.Inference library and the Microsoft.Extensions.AI abstractions.
This integration simplifies calling Azure OpenAI or Azure AI Inference services from your application—whether you prefer working directly with the SDK or using abstraction-friendly interfaces.
Use ChatCompletionsClient with the Azure SDK
Section titled “Use ChatCompletionsClient with the Azure SDK”builder.AddAzureChatCompletionsClient("connectionName");
app.MapPost("/chat-raw", ( ChatCompletionsClient client, ChatRequest message) =>{ // Use the client});Use IChatClient via Microsoft.Extensions.AI
Section titled “Use IChatClient via Microsoft.Extensions.AI”builder.AddAzureChatCompletionsClient("inference") .AddChatClient();Once registered, you can inject Microsoft.Extensions.AI.IChatClient using standard dependency injection:
app.MapPost("/chat", async ( IChatClient chatClient, ChatRequest message) =>{ var result = await chatClient.GetResponseAsync(message.Input); return result;});This setup integrates seamlessly with frameworks like Semantic Kernel, and works well in modular or pluggable AI systems.
🔗 Learn more about Microsoft.Extensions.AI and ChatCompletionsClient.
⚙️ Azure App Configuration client integration
Section titled “⚙️ Azure App Configuration client integration”Aspire 9.3 adds support for Azure App Configuration via a new client integration, 📦 Aspire.Microsoft.Extensions.Configuration.AzureAppConfiguration NuGet package.
This makes it easy to connect to centralized configuration using the official Azure SDK and the Microsoft.Extensions.Configuration.AzureAppConfiguration provider—no manual setup required.
builder.AddAzureAppConfiguration("appconfig");Once registered, Aspire automatically wires Azure App Configuration into your application’s configuration pipeline.
Example: bind Azure App Configuration to app settings
Section titled “Example: bind Azure App Configuration to app settings”var builder = WebApplication.CreateBuilder(args);
builder.AddAzureAppConfiguration("appconfig");
var app = builder.Build();
app.MapGet("/feature", (IConfiguration config) =>{ var isEnabled = config.GetValue<bool>("FeatureFlag:Enabled"); return Results.Ok(new { Enabled = isEnabled });});
app.Run();This enables:
- Dynamic feature flag evaluation
- Centralized configuration management across environments
- Secure integration into the Aspire hosting model
🔐 Like all Azure integrations in Aspire, the App Configuration client defaults to using Managed Identity for secure access—no connection strings required.
📦 NuGet package: Aspire.Microsoft.Extensions.Configuration.AzureAppConfiguration
🔗 Learn more about Azure App Configuration
🛡️ Secure multi-app access to Azure SQL (Breaking change)
Section titled “🛡️ Secure multi-app access to Azure SQL (Breaking change)”In Aspire 9.2, using multiple projects with the same Azure SQL Server inside an Azure Container Apps environment could silently break your app’s identity model.
Each app was assigned its own managed identity, but Aspire granted admin access to the last app deployed—overwriting access for any previously deployed apps. This led to confusing failures where only one app could talk to the database at a time.
✅ New behavior in 9.3
Section titled “✅ New behavior in 9.3”Aspire 9.3 fixes this by:
-
Assigning one identity as the SQL Server administrator
-
Emitting a SQL script that:
- Creates a user for each additional managed identity
- Assigns each user the
db_ownerrole on the target database
This ensures every app that references the database gets full access without conflicting with other apps.
Why this matters
Section titled “Why this matters”- Supports multiple apps accessing the same SQL Server securely
- Preserves least-privilege separation across app identities
- Avoids the brittle “last one wins” admin behavior from earlier releases
- Enables richer deployment scenarios in cloud-native environments like Azure Container Apps
⚠️ Breaking change
Section titled “⚠️ Breaking change”If your deployment relied on Aspire setting the managed identity as the SQL Server admin, you’ll need to review your access model. Apps now receive explicit role-based access (db_owner) instead of broad admin rights.
📖 Related: dotnet/aspire#8381 and dotnet/aspire#8389
💸 Default Azure SQL SKU now uses the Free Offer (Breaking change)
Section titled “💸 Default Azure SQL SKU now uses the Free Offer (Breaking change)”Aspire 9.3 changes the default SKU used when provisioning Azure SQL databases to the GP_S_Gen5_2 (General Purpose Serverless) tier with the Free Offer. This helps reduce unexpected costs during development and experimentation.
Previously, Aspire defaulted to the General Purpose (GP) tier without the Free Offer, which could incur charges even for small or test apps.
What’s new
Section titled “What’s new”When you provision a SQL database like this:
var sql = builder.AddAzureSqlServer("sqlserver");
sql.AddDatabase("appdb");
Aspire now automatically uses the Free Offer for appdb, which will deploy a GP_S_Gen5_2 (General Purpose Serverless), unless you override it.
How to restore the previous behavior
Section titled “How to restore the previous behavior”If your app requires the performance or features of the General Purpose paid tier, you can opt out of the new default using:
sql.AddDatabase("appdb") .WithDefaultAzureSku(); // Uses the previous (General Purpose) defaultIf you want to specify what SKU to use, you the ConfigureInfrastructure method as explained here: Setting a specific SKU.
⚠️ Breaking change
Section titled “⚠️ Breaking change”This change affects cost, performance, and available features in new deployments. If your app depends on higher-tier capabilities, be sure to configure the SKU accordingly.
🔧 Use .WithDefaultAzureSku() on the database to revert to the old behavior
🚀 AZD: Major Improvements to CI/CD for Aspire Apps
Section titled “🚀 AZD: Major Improvements to CI/CD for Aspire Apps”We’ve dramatically improved how azd configures CI/CD pipelines for Aspire-based applications. These updates directly address one of the most frustrating pain points reported by the community: managing environment parameters and secrets securely and predictably across environments.
Aspire apps are increasingly parameter-driven — using infrastructure-defined settings like connection strings, runtime versions, API keys, and feature flags. Getting those values safely and consistently into CI pipelines like GitHub Actions has historically been difficult. This release fixes that.
🧠 Smarter Parameter Handling — No More AZD_INITIAL_ENVIRONMENT_CONFIG
Section titled “🧠 Smarter Parameter Handling — No More AZD_INITIAL_ENVIRONMENT_CONFIG”Previously, Aspire apps that required infrastructure parameters relied on a hidden environment variable called AZD_INITIAL_ENVIRONMENT_CONFIG. This variable was a large JSON blob containing all local environment configuration. It had to be passed manually into CI pipelines, was difficult to inspect, and introduced friction when sharing or updating environments.
Now: azd extracts Aspire parameters directly from your infrastructure definitions and exposes them as named environment variables or secrets in your pipeline — securely and explicitly.
For example:
param openaiKey stringparam dbPassword stringbecome:
AZURE_OPENAI_KEY: ${{ secrets.AZURE_OPENAI_KEY }}AZURE_DB_PASSWORD: ${{ secrets.AZURE_DB_PASSWORD }}This means no more bundling, no more fragile config hacks, and no more guessing how your environment is configured in CI.
🔤 Consistent, Predictable Parameter Naming
Section titled “🔤 Consistent, Predictable Parameter Naming”Aspire parameters are mapped to environment variable names using a clear rule:
- Convert
camelCasetoSNAKE_CASE - Replace dashes (
-) with underscores (_) - Uppercase everything
- Prefix with
AZURE_
| Parameter name | Env var vame |
|---|---|
openaiKey | AZURE_OPENAI_KEY |
dbPassword | AZURE_DB_PASSWORD |
storage-account-name | AZURE_STORAGE_ACCOUNT_NAME |
This naming consistency means Aspire deployment targets like Azure Container Apps can resolve configuration without custom mappings — locally or in the cloud.
📦 Aspire Parameters Automatically Exported to CI
Section titled “📦 Aspire Parameters Automatically Exported to CI”Aspire apps often define required parameters in Bicep or infrastructure modules — including things like API keys, credentials, or runtime configuration. These are now automatically exported to your pipeline configuration using the naming rules above.
You no longer need to:
- Manually configure these in .azure/env-name/config.json
- Inject them into CI via complex JSON blobs
- Worry about missing or mismatched configuration between local and cloud
Secure parameters (like openaiKey or dbPassword) are automatically treated as CI secrets, while others are injected as variables — all handled by azd.
🧼 Interactive Secret Management in GitHub Actions
Section titled “🧼 Interactive Secret Management in GitHub Actions”When you run azd pipeline config, azd will now detect and prompt you if a secret already exists in your GitHub repo or if a secret is no longer used:
Existing Secret Prompt:
Section titled “Existing Secret Prompt:”The secret AZURE_OPENAI_KEY already exists. What would you like to do? [1] Keep it [2] Keep ALL existing secrets [3] Overwrite it [4] Overwrite ALL secretsUnused Secret Prompt:
Section titled “Unused Secret Prompt:”The secret AZURE_OLD_SECRET is no longer used. What would you like to do? [1] Keep it [2] Keep ALL unused secrets [3] Delete it [4] Delete ALL unused secretsThis ensures:
- You’re never surprised by secret overwrites
- You can keep your repo clean of stale configuration
- CI reflects your actual infrastructure setup
🔄 End-to-End, Repeatable Aspire Deployment
Section titled “🔄 End-to-End, Repeatable Aspire Deployment”With these changes, the local-to-cloud workflow for Aspire apps is now consistent and automated:
- You define infrastructure parameters as part of your Aspire app.
azdcaptures them during provisioning.azd pipeline configmaps them into your GitHub Actions or Azure DevOps pipeline.- Your pipeline runs securely with all the same inputs as your local environment — no manual steps required.
No more AZD_INITIAL_ENVIRONMENT_CONFIG. No more brittle overrides. Just clear, secure, parameterized deployment.
These changes unlock a smoother, safer CI/CD experience for Aspire projects — reducing manual configuration, improving security, and aligning your local development setup with your production pipeline.
💔 Breaking changes
Section titled “💔 Breaking changes”With every release, we strive to make Aspire better. However, some changes may break existing functionality.