What's new in Aspire 9.5
यह कंटेंट अभी तक आपकी भाषा में उपलब्ध नहीं है।
📢 Aspire 9.5 is the next minor version release of Aspire. It supports:
- .NET 8.0 Long Term Support (LTS).
- .NET 9.0 Standard Term Support (STS).
- .NET 10.0 Release Candidate (RC) 1.
If you have feedback, questions, or want to contribute to Aspire, collaborate with us on GitHub or join us on Discord to chat with the team and other community members.
It’s important to note that Aspire releases are out-of-band from .NET releases. While major versions of Aspire align with major .NET versions, minor versions are released more frequently. For more information on .NET and Aspire version support, see:
- .NET support policy: Definitions for LTS and STS.
- Aspire support policy: Important unique product lifecycle details.
⬆️ Upgrade to Aspire 9.5
Section titled “⬆️ Upgrade to Aspire 9.5”Moving between minor releases of Aspire is simple:
-
Get the latest release of the Aspire CLI:
Terminal window curl -sSL https://aspire.dev/install.sh | bashTerminal window iex "& { $(irm https://aspire.dev/install.ps1) }" -
In your AppHost project file (that is, MyApp.AppHost.csproj), update the 📦 Aspire.AppHost.Sdk package to version
9.5.2:<Sdk Name="Aspire.AppHost.Sdk" Version="9.5.2" />For more information, see Aspire SDK.
-
Check for any NuGet package updates, either using the NuGet Package Manager in Visual Studio or the Update NuGet Package command from C# Dev Kit in Visual Studio (VS) Code.
-
Update to the latest Aspire templates by running the following .NET command line:
.NET CLI dotnet new install Aspire.ProjectTemplates
🛠️ CLI and tooling
Section titled “🛠️ CLI and tooling”Aspire 9.5 adds targeted CLI and tooling updates that speed up setup and maintenance.
Key improvements:
- Channel-aware package selection in
aspire addso you can choose stable, daily, or custom builds. - Preview
aspire updatecommand that scans your AppHost, validates versions, and applies safe upgrades. - Experimental single-file AppHost (
apphost.cs) behind a feature flag. - SSH Remote port forwarding support in VS Code, matching Dev Container and Codespaces behavior.
- Enhanced
aspire execwith--workdir, clearer help, and early argument validation. - Performance refinements: package search disk cache, cleaner debug output, clearer status messages, and faster repeat package resolution.
Run aspire update to upgrade, enable the single-file AppHost to experiment with a minimal setup, and use aspire exec to script tasks with inherited environment context.
Channel-aware aspire add and templating
Section titled “Channel-aware aspire add and templating”You can now pick packages from different channels or versions during aspire add. Additionally, friendly name generation is now more flexible for searching packages. When adding packages, you should use versions that are aligned to the Aspire.Hosting.AppHost package that you’re using. To update your entire AppHost and its referenced project, you can use the aspire update command as described in the following section.
New aspire update command (preview)
Section titled “New aspire update command (preview)”The new aspire update command helps you keep your Aspire projects current by automatically detecting and updating outdated packages and templates.
# Analyze and update out-of-date Aspire packages & templatesaspire update
This command updates your SDK, AppHost packages, and any Aspire client integrations used in the app. It validates package compatibility and asks for confirmation before applying changes. Like add, update is channel aware, so you can choose to update to stable, daily, or your own configuration of builds.
File-based AppHost support (preview)
Section titled “File-based AppHost support (preview)”Aspire 9.5 introduces infrastructure for .NET 10’s new file-based apps feature, meaning you only need one file — and no project file — for your Aspire Apphost. The new capabilities are currently behind a feature flag that elevates the minimum .NET SDK requirement to prepare for upcoming file-based app execution scenarios.
# Enable file-based AppHost ("apphost.cs") supportaspire config set features.singlefileAppHostEnabled true# Disable the minimum SDK version checkaspire config set features.minimumSdkCheckEnabled falseFor more information, see aspire config set command.
SDK version requirements:
- Feature enabled: Requires .NET SDK 10.0.100 RC1 or later
- Override support: Manual SDK version overrides continue to work with highest precedence
You can use aspire new to create a new, blank file-based AppHost. Select the Single-file AppHost (experimental) option from the project template list:
#:sdk Aspire.AppHost.Sdk@9.5.2
var builder = DistributedApplication.CreateBuilder(args);
builder.Build().Run();
Then add some resources, use aspire add the same as you would with a project-based Apphost, and aspire run to start!
SSH Remote support for port forwarding in VS Code
Section titled “SSH Remote support for port forwarding in VS Code”Aspire 9.5 adds SSH Remote support in VS Code. Ports forward automatically in SSH Remote sessions the same way they do in Dev Containers and GitHub Codespaces.
aspire exec command (preview) enhancements
Section titled “aspire exec command (preview) enhancements”The aspire exec command allows you to execute commands within the context of your Aspire application environment, inheriting environment variables, and configuration from your app model resources.
Aspire 9.5 builds on the 9.4 preview and adds several key improvements:
--workdir(-w) flag to run commands inside a specific working directory.- Fail-fast argument validation with clearer error messages.
- Improved help and usage text for better developer experience.
For more information, see aspire exec command reference.
Basic usage examples
Section titled “Basic usage examples”# Execute database migrations with environment variables from your app modelaspire exec --resource my-api -- dotnet ef database update
# Run commands in a specific working directoryaspire exec --resource worker --workdir /app/tools -- dotnet run
# Wait for resource to start before executing commandaspire exec --start-resource my-worker -- npm run buildCommand syntax
Section titled “Command syntax”- Use
--resourceto execute immediately when AppHost starts. - Use
--start-resourceto wait for the resource to be running first. - Use
--workdirto specify the working directory for the command. - Use
--to separateaspireoptions from the command to execute.
Other tweaks
Section titled “Other tweaks”- Relative path included in AppHost status messages.
- Clean CLI debug logging with reduced noise.
- Directory safety check for
aspire newand consistent template inputs. - Refactored NuGet prefetch architecture reducing UI lag during
aspire new. - Package search disk cache to speed up
aspire new | add | updatecommands. - Context-sensitive completion messages for publish/deploy.
📊 Dashboard enhancements
Section titled “📊 Dashboard enhancements”Generative AI visualizer
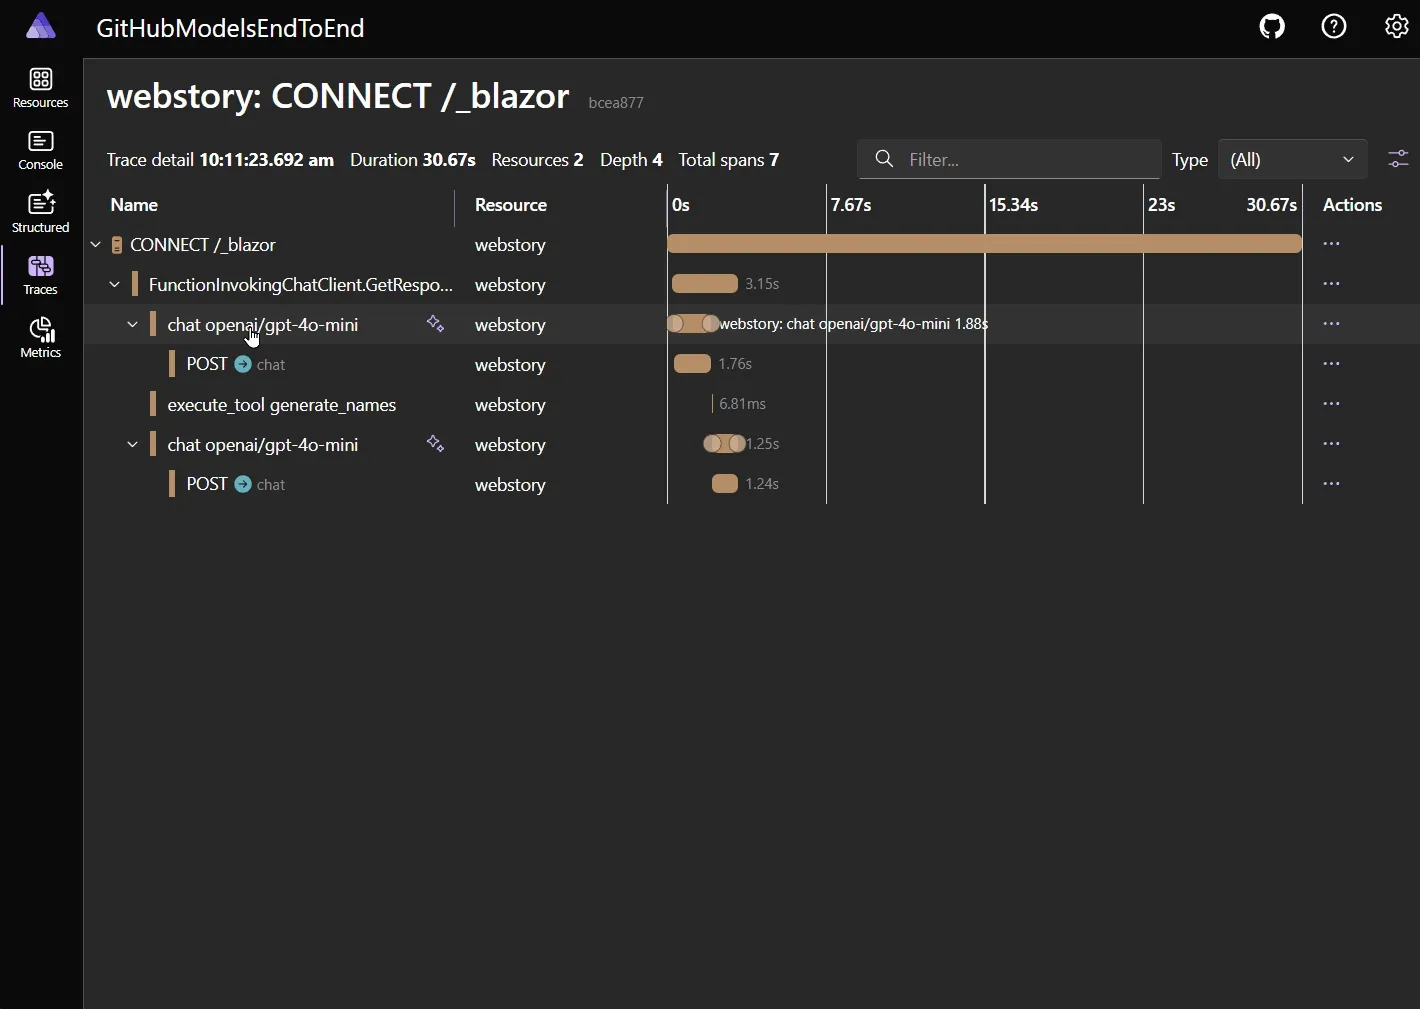
Section titled “Generative AI visualizer”Aspire 9.5 introduces the GenAI visualizer, which collates, summarizes, and visualizes LLM-centric calls within your app:
- 🗃️ Explore input and output messages.
- 🚀 JSON/XML payloads highlighted and indented.
- 🖼️ Preview Markdown and multimodal content (for example, images).
If GenAI-specific telemetry is found in an OpenTelemetry (OTEL) span, a sparkle (✨) icon appears next to its name in the Traces view. Clicking the icon launches the visualizer dialog.
The GenAI telemetry semantic conventions are evolving rapidly. The visualizer supports multiple versions of the telemetry, and we update it as the conventions move toward a stable release.
Rich property grid content
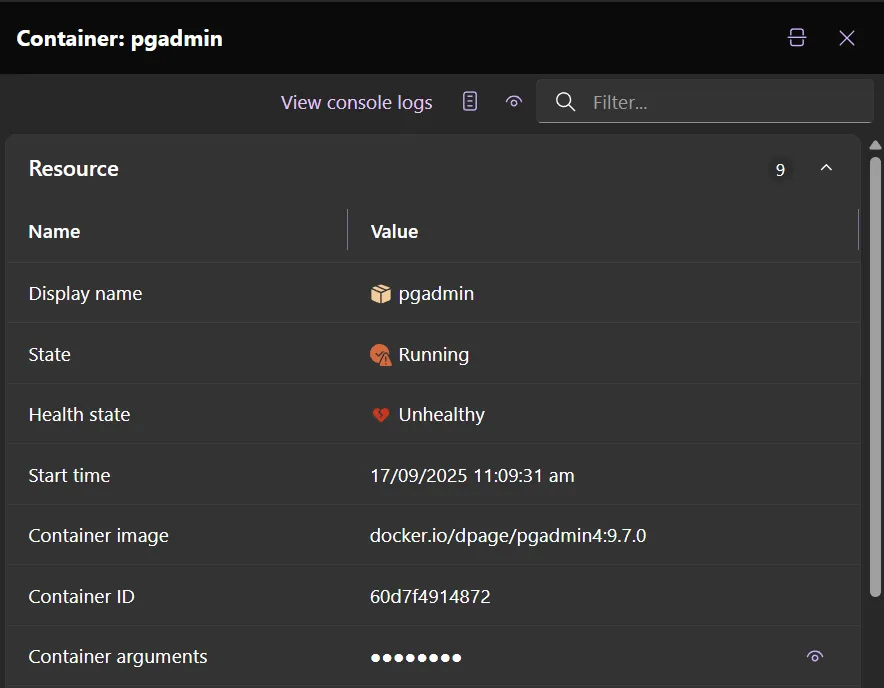
Section titled “Rich property grid content”In the Aspire 9.5 Dashboard, there are icons and clickable buttons in property grids in resource details, log entry details, and span details.
- Icons improve visual clarity. For example, quickly see that a resource isn’t in a healthy state if the icon is red or yellow.
- Clickable buttons improve navigation. For example, select a resource name or telemetry ID to navigate to a different page for more information.
Multi-resource console logs
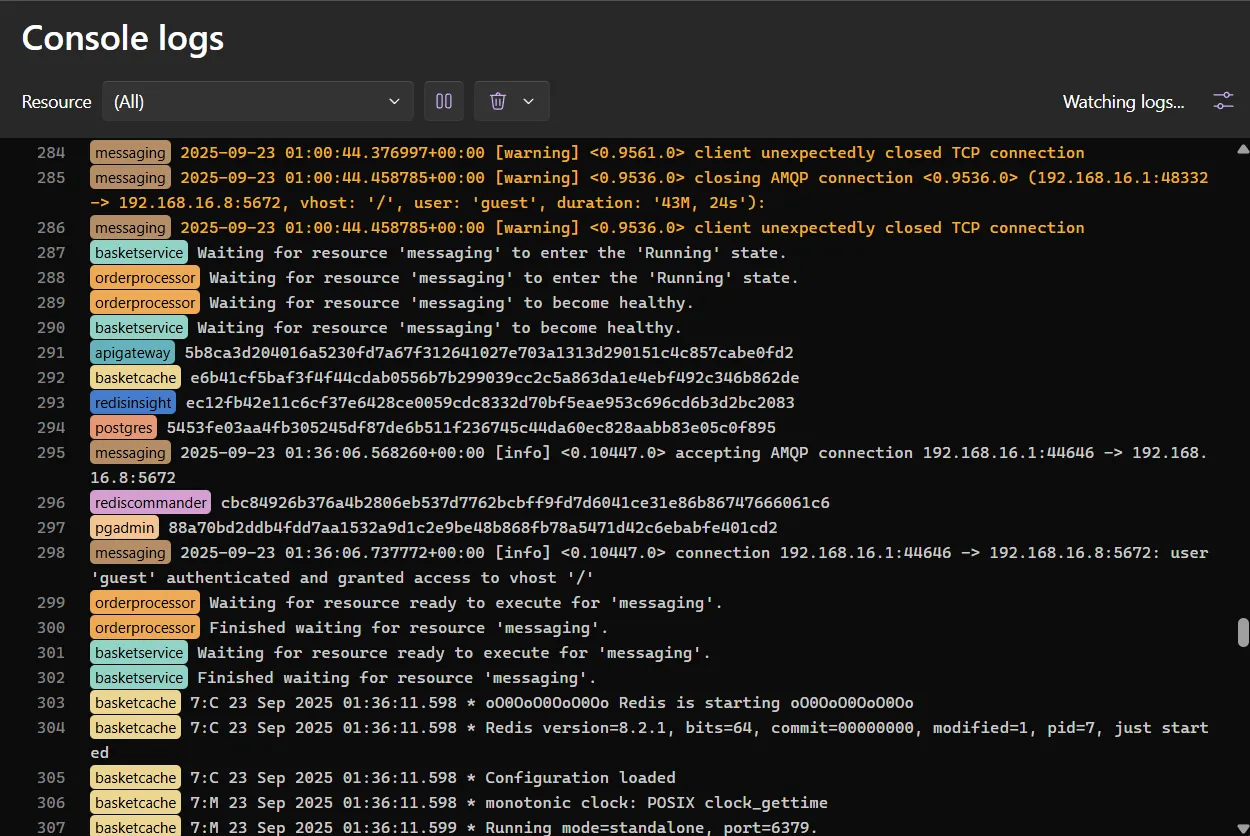
Section titled “Multi-resource console logs”A new “All” option in the console logs view streams logs from every running resource simultaneously.
- Unified log stream: See logs from all resources in chronological order.
- Color-coded prefixes: Each resource gets a deterministic color for easy identification.
Custom resource icons
Section titled “Custom resource icons”Resources can now specify custom icons and their variant (Filled, which is the default, or Regular) using WithIconName() for better visual identification in dashboard views. Any Fluent UI system icons can be used.
var postgres = builder.AddPostgres("database")    .WithIconName("database");
var redis = builder.AddRedis("cache")    .WithIconName("memory");
var api = builder.AddProject<Projects.Api>("api")    .WithIconName("webAsset", ApplicationModel.IconVariant.Regular);
This iconography helps teams quickly identify different types of resources in complex applications with many services. Custom resource icons now also apply to project and container resources through unified annotation, providing consistent visual identification across all resource types.
Reverse proxy support
Section titled “Reverse proxy support”The dashboard now properly handles reverse proxy scenarios with explicit forwarded header mapping when enabled. This fixes common issues with authentication redirects and URL generation behind proxies like YARP.
# Enable forwarded headers processingexport ASPIRE_DASHBOARD_FORWARDEDHEADERS_ENABLED=trueThis is useful for deployment scenarios where the dashboard is accessed through a load balancer or reverse proxy.
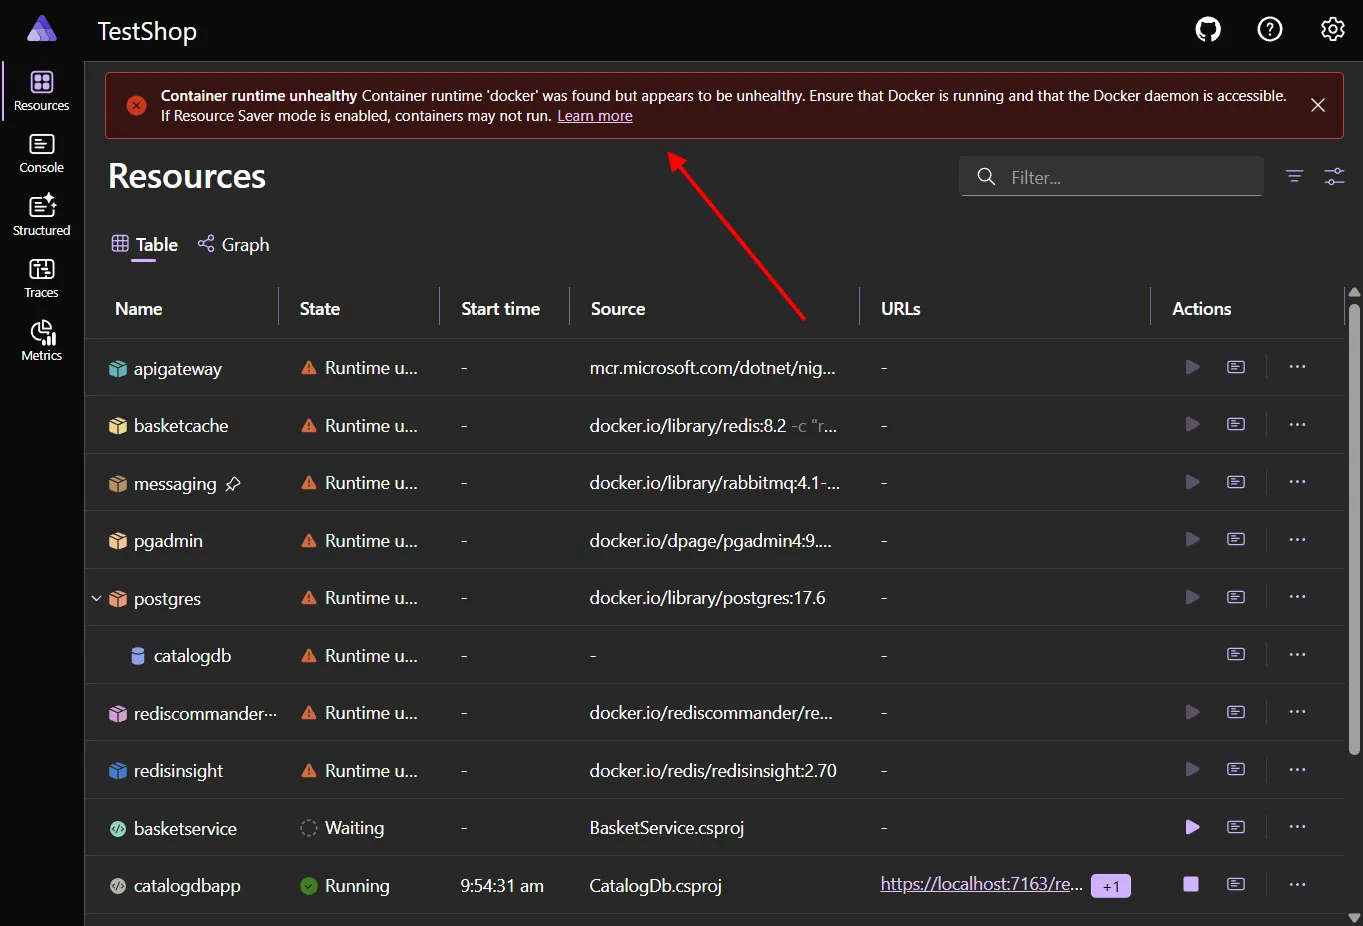
Container runtime notifications
Section titled “Container runtime notifications”Notifications now appear when Docker or Podman is installed but unhealthy, with automatic dismissal when the runtime recovers. This provides immediate feedback when your container runtime needs attention, helping diagnose startup issues faster.
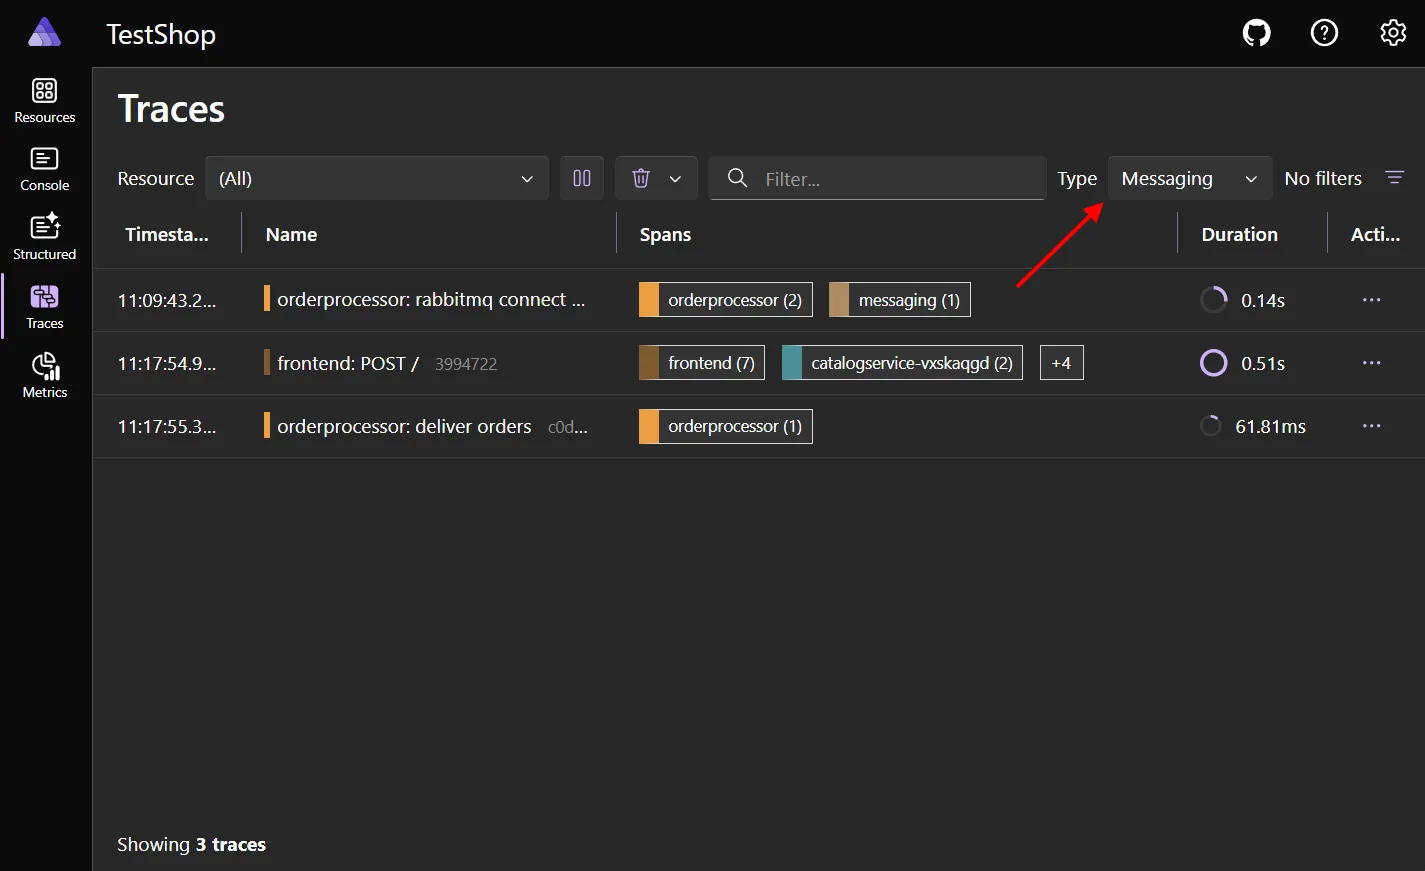
Trace filtering
Section titled “Trace filtering”The Traces page now has a type filter, a quick way to find traces and spans for the selected operation type.
For example, choose Messaging 📬 to see only traces from your app that interact with RabbitMQ, Azure Service Bus, etc.
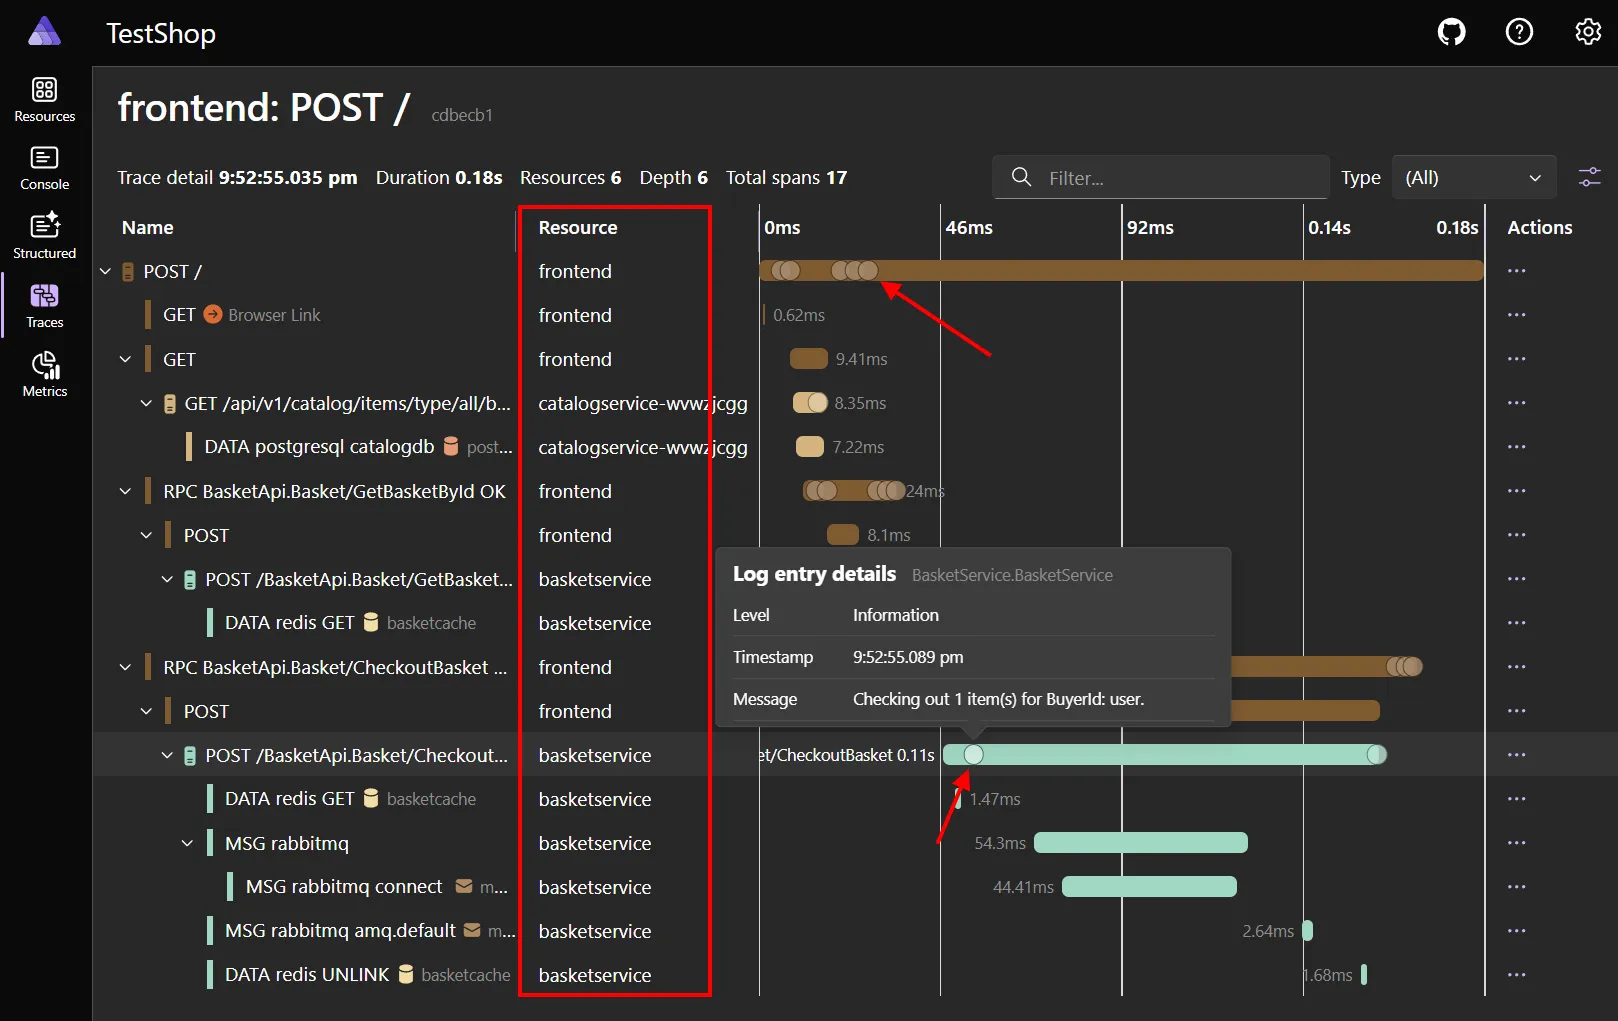
Trace detail improvements
Section titled “Trace detail improvements”The trace detail page includes several quality-of-life improvements:
🏷️ Span names are clearer, with resources split into their own column 🪵 Logs are now shown in the waterfall chart—hover for a tooltip, or select for full details ↕️ New “Expand all” and “Collapse all” buttons
Other improvements
Section titled “Other improvements”- Resource action menus now use submenus to prevent overflow on complex apps.
- Projects show their associated launch profiles.
- Error spans use consistent error styling.
- Better default icons for parameters and services.
- Enhanced port parsing.
- Message truncation for long log entries.
- Optional log line wrapping.
- Improved text visualizer dialog.
- Comprehensive dashboard localization improvements including localized Launch Profile names.
- Embedded log entries within trace spans.
- Better span timing calculations.
- Accessibility improvements with better toolbar/menu overflow handling, improved keyboard navigation, semantic headings, and mobile navigation scroll fixes.
📦 Integration changes and additions
Section titled “📦 Integration changes and additions”OpenAI hosting integration
Section titled “OpenAI hosting integration”The new AddOpenAI integration provides first-class support for modeling OpenAI endpoints and their associated models within your Aspire application model. For more information, see Aspire OpenAI integration (Preview).
Features:
- Single OpenAI endpoint resource with child model resources using
AddModel. - Resource referencing so other projects automatically receive connection information.
var builder = DistributedApplication.CreateBuilder(args);
var openai = builder.AddOpenAI("openai");
var chatModel = openai.AddModel("chat", "gpt-4o-mini");
var api = builder.AddProject<Projects.Api>("api")    .WithReference(chatModel);
builder.Build().Run();
Local development scenario:
// Use with local OpenAI-compatible servicesvar localOpenAI = builder.AddOpenAI("local-openai")    .WithApiKey(builder.AddParameter("local-api-key"))    .WithEndpoint("http://localhost:11434"); // Ollama or similar
var localModel = localOpenAI.AddModel("local-chat", "llama3.2");
GitHub Models and Azure AI Foundry typed catalogs
Section titled “GitHub Models and Azure AI Foundry typed catalogs”Aspire 9.5 introduces a typed catalog for GitHub and Azure-hosted models, providing IntelliSense support and refactoring safety when working with AI models. This brings type safety and IntelliSense support for the ever-increasing AI model catalog, and takes the guesswork out of version and “format” strings. The catalog is updated daily.
var builder = DistributedApplication.CreateBuilder(args);
// Before: String-based approach (error-prone)var model = builder.AddGitHubModel("chat", "gpt-4o-mini"); // Typos not caught
// After: Typed catalog approachvar chatModel = builder.AddGitHubModel("chat", GitHubModel.OpenAI.OpenAIGPT4oMini);
// IntelliSense shows all available models grouped by providervar embeddingModel = builder.AddGitHubModel("embeddings", GitHubModel.OpenAI.OpenAITextEmbedding3Large);
For more information, see:
Dev Tunnels hosting integration
Section titled “Dev Tunnels hosting integration”Aspire 9.5 introduces first-class support for Dev Tunnels, enabling seamless integration of secure public tunnels for your applications during development and testing scenarios.
Features:
- Secure public tunnels: Create public HTTPS endpoints for applications running locally.
- Automatic tunnel management: Tunnels are created, configured, and cleaned up automatically.
- Private and anonymous tunnels: Support for both authenticated private tunnels and public anonymous access.
- Development workflow integration: Perfect for webhook testing, mobile app development, and external service integration.
var builder = DistributedApplication.CreateBuilder(args);
// Add a basic Dev Tunnel resource (default: private access)var tunnel = builder.AddDevTunnel("dev-tunnel");
// Add your web applicationvar webApp = builder.AddProject<Projects.WebApp>("webapp");
// Connect the tunnel to the web application endpointtunnel.WithReference(webApp);
builder.Build().Run();
The Dev Tunnels integration automatically handles Azure authentication, tunnel lifecycle management, and provides public or private URLs (depending on configuration) to connected resources, making it easy to expose local development services securely to external consumers. Dev Tunnels also improves support for mobile dev, such as .NET MAUI, making it easy to launch both your backend and mobile app at once without complex dev-time config. For more information, see Aspire Dev Tunnels integration (Preview).
YARP static files support
Section titled “YARP static files support”Aspire 9.5 adds comprehensive static file serving capabilities to the YARP integration, enabling you to serve static assets directly from YARP alongside reverse proxy functionality. This is perfect for single-page applications, frontend assets, and hybrid scenarios where you need both static content and API proxying.
Features:
- Direct static file serving: Serve HTML, CSS, JS, and other static assets from YARP.
- Flexible source options: Bind mount local directories or use Docker multi-stage builds.
- Automatic configuration: Simple API enables static files with minimal setup.
- Production ready: Works in both development and publish scenarios.
var builder = DistributedApplication.CreateBuilder(args);
// Enable static file serving (serves from wwwroot folder)var yarp = builder.AddYarp("gateway")    .WithStaticFiles();
builder.Build().Run();
Docker multi-stage build scenario:
var builder = DistributedApplication.CreateBuilder(args);
// Use Dockerfile to build and copy static assetsvar frontend = builder.AddYarp("frontend")    .WithStaticFiles()    .WithDockerFile("../react-app");
builder.Build().Run();
For more information, see Multi-stage Docker builds.
Hybrid static + API gateway:
var builder = DistributedApplication.CreateBuilder(args);
var backendApi = builder.AddProject<Projects.Api>("api");var authService = builder.AddProject<Projects.Auth>("auth");
// YARP serves static files AND proxies API requestsvar gateway = builder.AddYarp("app-gateway")    .WithStaticFiles("./frontend/dist")    .WithConfiguration(yarp =>    {        // API routes        yarp.AddRoute("/api/{**catch-all}", backendApi)            .WithTransformPathRemovePrefix("/api");
        // Auth routes        yarp.AddRoute("/auth/{**catch-all}", authService)            .WithTransformPathRemovePrefix("/auth");
        // Static files are served for all other routes    });
builder.Build().Run();
This feature enables modern web application architectures where YARP acts as both a reverse proxy for backend services and a static file server for frontend assets, providing a unified entry point for your distributed application.
For more information, see Aspire YARP integration.
Azure Kusto / Azure Data Explorer
Section titled “Azure Kusto / Azure Data Explorer”A new preview package Aspire.Hosting.Azure.Kusto has been added. Once the package has been added to the AppHost, it’s possible to start a Kusto emulator with just a few lines of code:
var builder = DistributedApplication.CreateBuilder(args);
var db = builder.AddAzureKustoCluster("kusto")    .RunAsEmulator()    .AddReadWriteDatabase("sensorreadings");
builder.Build().Run();
RabbitMQ auto activation
Section titled “RabbitMQ auto activation”RabbitMQ client connections now support auto activation to prevent startup deadlocks and improve application reliability. When enabled, auto activation ensures that the RabbitMQ connection is established during application startup rather than being lazily initialized on first use. This helps detect connection issues early and prevents certain race conditions that can occur with lazy initialization.
Auto activation is disabled by default in Aspire 9.5 to maintain backward compatibility. In a future release, it’s planned to be enabled by default.
When to enable auto activation:
- Your application needs to verify RabbitMQ connectivity during startup
- You want to fail fast if RabbitMQ is unavailable
- Your application requires connections to be established before accepting traffic
- You’re experiencing startup deadlocks with lazy connection initialization
Enable auto activation:
var builder = WebApplication.CreateBuilder(args);
// Auto activation is disabled by default for RabbitMQ// Enable using DisableAutoActivation=falsebuilder.AddRabbitMQClient("messaging", o => o.DisableAutoActivation = false);
For more information, see RabbitMQ integration - Auto activation.
Redis integration improvements
Section titled “Redis integration improvements”Auto activation
Section titled “Auto activation”Redis client connections also now support auto activation, and are also disabled by default, but planned to be enabled by default in a future release.
var builder = WebApplication.CreateBuilder(args);
// Auto activation is disabled by default for Redis, enable using DisableAutoActivation=falsevar redisClient = builder.AddRedisClient("redis", c => c.DisableAutoActivation = false);
Client builder pattern
Section titled “Client builder pattern”Aspire 9.5 introduces a new Redis client builder pattern that provides a fluent, type-safe approach to configuring Redis clients with integrated support for distributed caching, output caching, and Azure authentication.
Basic usage:
var builder = WebApplication.CreateBuilder(args);
builder.AddRedisClientBuilder("redis")  .WithDistributedCache(options =>  {    options.InstanceName = "MyApp";  });
To enable Azure authentication, add a reference to the new Aspire.Microsoft.Azure.StackExchangeRedis package, and chain a call to .WithAzureAuthentication():
builder.AddRedisClientBuilder("redis") .WithAzureAuthentication() .WithDistributedCache(options => { options.InstanceName = "MyApp"; });Azure Redis Enterprise support
Section titled “Azure Redis Enterprise support”Aspire 9.5 introduces first-class support for Azure Redis Enterprise, providing a high-performance, fully managed Redis service with enterprise-grade features. Azure Redis Enterprise provides advanced caching capabilities with clustering, high availability, and enterprise security features while maintaining compatibility with the standard Redis APIs.
The new AddAzureRedisEnterprise extension method enables Redis Enterprise resource modeling:
var builder = DistributedApplication.CreateBuilder(args);
// Add Azure Redis Enterprise resourcevar redisEnterprise = builder.AddAzureRedisEnterprise("redis-enterprise");
// Use in your applicationsvar api = builder.AddProject<Projects.Api>("api")    .WithReference(redisEnterprise);
builder.Build().Run();
Local development with container emulation:
var redisEnterprise = builder.AddAzureRedisEnterprise("redis-enterprise") .RunAsContainer(container => container .WithHostPort(6379));Authentication options:
Like other Azure integrations, Azure Redis Enterprise uses Microsoft Entra ID authentication by default. This is the recommended authentication strategy since secrets aren’t used. To enable access key authentication, you can use the following:
// With access key authentication (default)var redisEnterprise = builder.AddAzureRedisEnterprise("redis-enterprise")    .WithAccessKeyAuthentication();
// With Key Vault integration for access keysvar keyVault = builder.AddAzureKeyVault("keyvault");var redisEnterprise = builder.AddAzureRedisEnterprise("redis-enterprise")    .WithAccessKeyAuthentication(keyVault);
For more information, see Aspire Azure Managed Redis integration.
Azure App Configuration emulator (preview)
Section titled “Azure App Configuration emulator (preview)”Aspire 9.5 adds preview support for running an Azure App Configuration emulator as part of your distributed application model. The emulator lets you develop locally with full feature parity for key/value configuration data—without provisioning a live Azure resource.
Container image (preview): mcr.microsoft.com/azure-app-configuration/app-configuration-emulator:1.0.0-preview
You can use this container with or without Aspire—it’s just a normal container image. Aspire adds first-class resource modeling, lifecycle management, environment wiring, and (optionally) persistent storage.
Features:
- Local development parity for Azure App Configuration scenarios.
- Built-in browser UI for CRUD (create, read, update, delete) of configuration entries.
- Persistent data via a mounted volume (optional).
- Seamless integration with other Aspire resources via
WithReference. - Supports inner-loop testing without network latency or secrets in Azure.
Add emulator via Aspire:
var builder = DistributedApplication.CreateBuilder(args);
var appConfig = builder.AddAzureAppConfiguration("config")  .RunAsEmulator(emulator => emulator    .WithDataVolume()); // Persists configuration across restarts
var api = builder.AddProject<Projects.Api>("api")    .WithReference(appConfig);
builder.Build().Run();
Accessing the UI:
When running under Aspire, the emulator dashboard (configuration explorer) is exposed as a normal endpoint. Open it from the Aspire Dashboard resource details panel to manage key-values interactively.
Standalone (without Aspire):
docker run --rm -p 8080:8080 \ mcr.microsoft.com/azure-app-configuration/app-configuration-emulator:1.0.0-previewThen browse to http://localhost:8080 to launch the UI and manage configuration entries.
Typical project configuration usage:
var builder = WebApplication.CreateBuilder(args);
builder.AddAzureAppConfiguration("config");
var app = builder.Build();
app.MapGet("/message", (IConfiguration config) =>{    var message = config["Message"];    return new { Message = message };});app.Run();
This enables fast local iteration with a real UI and no external dependencies, while keeping deployment parity with Azure-hosted configuration.
Azure Storage emulator improvements
Section titled “Azure Storage emulator improvements”Aspire now pulls Azurite version 3.35.0 by default, resolving health check issues that previously returned HTTP 400 responses. This improves the reliability of Azure Storage emulator health checks during development.
MySQL password improvements
Section titled “MySQL password improvements”The MySQL integration added support for specifying a password parameter:
var builder = DistributedApplication.CreateBuilder(args);
// Secure password parametervar password = builder.AddParameter("mysql-password", secret: true);
var mysql = builder.AddMySql("mysql")    .WithPassword(password);

builder.Build().Run();
Other improvements
Section titled “Other improvements”- New reference properties have been added to Azure PostgreSQL and Redis resources for custom connection string composition and individual component access.
- OpenTelemetry Protocols (OTLP) support now has protocol selection capabilities, allowing you to choose between gRPC and HTTP protobuf transports for telemetry data.
🧩 App model enhancements
Section titled “🧩 App model enhancements”Resource lifecycle events
Section titled “Resource lifecycle events”Aspire 9.5 introduces new resource lifecycle event APIs that allow you to register callbacks for when resources stop, providing better control over cleanup and coordination during application shutdown.
The new OnResourceStopped extension method allows you to register callbacks that execute when a resource enters the stopped state:
var builder = DistributedApplication.CreateBuilder(args);
var invoicing = builder.AddPostgres("postgres", "mypostgres").AddDatabase("invoicing");
var api = builder.AddProject<Projects.Api>("api")    .OnResourceStopped(async (resource, stoppedEvent, cancellationToken) =>    {        // Use events to clean up the system to allow rapid        // inner loop debugging.
        await ResetSystemState();    })    .WithReference(invoicing);
builder.Build().Run();
Resource stopped event details:
The ResourceStoppedEvent provides information about the stopping event:
// Register detailed stopped event handlervar redis = builder.AddRedis("cache")    .OnResourceStopped(async (resource, stoppedEvent, cancellationToken) =>    {        // Access event details        Console.WriteLine($"Resource: {resource.Name}");        Console.WriteLine($"Event timestamp: {stoppedEvent.Snapshot.StopTimeStamp}");        Console.WriteLine($"Exit code: {stoppedEvent.Snapshot.ExitCode}");
        // Perform async cleanup with cancellation support        await CleanupCacheConnections(cancellationToken);    });
Context-based endpoint resolution
Section titled “Context-based endpoint resolution”Breaking change: Endpoint resolution in WithEnvironment callbacks now correctly resolves container hostnames instead of always using “localhost.”
var redis = builder.AddRedis("redis");
// Another container getting endpoint info from Redis containervar rabbitmq = builder.AddContainer("myapp", "mycontainerapp")    .WithEnvironment(context =>    {        var endpoint = redis.GetEndpoint("tcp");        var redisHost = endpoint.Property(EndpointProperty.Host);        var redisPort = endpoint.Property(EndpointProperty.Port);
        // Previously: redisHost would always resolve to "localhost"        // Now: redisHost correctly resolves to "redis" (container name)        context.EnvironmentVariables["REDIS_HOST"] = redisHost;        context.EnvironmentVariables["REDIS_PORT"] = redisPort;    })    .WithReference(redis);
What you need to review:
- Container deployments: Your apps will now receive correct container hostnames.
- Local development: Localhost behavior is preserved for noncontainerized scenarios.
- Connection strings: Automatic connection strings continue to work as expected.
- Manual environment: Review custom
WithEnvironmentcalls that assume localhost.
HTTP health probes for resources
Section titled “HTTP health probes for resources”Aspire 9.5 introduces comprehensive HTTP health probe support that allows you to configure startup, readiness, and liveness probes for your resources, providing better health monitoring and deployment coordination.
Features:
- Multiple probe types: Configure startup, readiness, and liveness probes independently.
- Flexible endpoint targeting: Probe any HTTP endpoint with custom paths and configurations.
- Configurable timing: Control probe intervals, timeouts, and failure thresholds.
- Kubernetes alignment: Probe semantics align with Kubernetes health check concepts.
var builder = DistributedApplication.CreateBuilder(args);
// Add readiness probe to ensure service is ready before routing trafficvar api = builder.AddProject<Projects.Api>("api")    .WithHttpProbe(ProbeType.Readiness, "/health/ready");
// Add liveness probe to detect if service needs restartvar worker = builder.AddProject<Projects.Worker>("worker")    .WithHttpProbe(ProbeType.Liveness, "/health/live");
builder.Build().Run();
Advanced probe configuration:
var builder = DistributedApplication.CreateBuilder(args);
// Comprehensive probe setup with custom timingvar api = builder.AddProject<Projects.Api>("api")    .WithHttpProbe(        type: ProbeType.Startup,        path: "/health/startup",        initialDelaySeconds: 30,    // Wait 30s before first probe        periodSeconds: 10,          // Probe every 10 seconds        timeoutSeconds: 5,          // 5 second timeout per probe        failureThreshold: 5,        // Consider failed after 5 failures        successThreshold: 1         // Consider healthy after 1 success    );
builder.Build().Run();
Integration with resource dependencies:
var builder = DistributedApplication.CreateBuilder(args);
var database = builder.AddPostgres("postgres");var cache = builder.AddRedis("redis");
// API with probes that check dependenciesvar api = builder.AddProject<Projects.Api>("api")    .WithHttpProbe(ProbeType.Readiness, "/health/ready") // Checks DB & Redis connectivity    .WaitFor(database)  // Wait for database startup    .WaitFor(cache)     // Wait for cache startup    .WithReference(database)    .WithReference(cache);
// Frontend waits for API to be ready (not just started)var frontend = builder.AddProject<Projects.Frontend>("frontend")    .WaitFor(api)  // Waits for API readiness probe to pass    .WithReference(api);
builder.Build().Run();
This feature enhances deployment reliability by providing fine-grained health monitoring that integrates seamlessly with Aspire’s resource orchestration and dependency management.
Enhanced resource waiting patterns
Section titled “Enhanced resource waiting patterns”New WaitForStart method provides granular control over startup ordering, complementing existing WaitFor semantics. It also pairs with improved ExternalService health honoring which ensures dependents truly wait for external resources to be healthy.
Understanding wait behaviors:
WaitFor: Waits for dependency to be Running AND pass all health checks.WaitForStart: Waits only for dependency to reach Running (ignores health checks).WaitForCompletion: Waits for dependency to reach a terminal state.
var postgres = builder.AddPostgres("postgres");var redis = builder.AddRedis("redis");
var api = builder.AddProject<Projects.Api>("api")    .WaitForStart(postgres)  // New: startup only    .WaitFor(redis)          // Healthy state    .WithReference(postgres)    .WithReference(redis);
ExternalService health integration:
WaitFor now honors ExternalService health checks. Previously a dependent could start even if the external target failed its readiness probe.
var externalApi = builder.AddExternalService("backend-api", "http://api.company.com")    .WithHttpHealthCheck("/health/ready");
var frontend = builder.AddProject<Projects.Frontend>("frontend")    .WaitFor(externalApi)    // Now waits for healthy external API    .WithReference(externalApi);
If you need the old (lenient) behavior:
// Do not wait for healthvar frontend = builder.AddProject<Projects.Frontend>("frontend")    .WithReference(externalApi);
// Or only wait for startupvar frontend2 = builder.AddProject<Projects.Frontend>("frontend2")    .WaitForStart(externalApi)    .WithReference(externalApi);
Enhanced resource lifetime support
Section titled “Enhanced resource lifetime support”Breaking change: Resources like ParameterResource, ConnectionStringResource, and GitHub Model resources now participate in lifecycle operations and support WaitFor.
var builder = DistributedApplication.CreateBuilder(args);
var connectionString = builder.AddConnectionString("database");var apiKey = builder.AddParameter("api-key", secret: true);
var api = builder.AddProject<Projects.Api>("api")    .WaitFor(connectionString)    .WaitFor(apiKey)    .WithEnvironment("DB_CONNECTION", connectionString)    .WithEnvironment("API_KEY", apiKey);
var github = builder.AddGitHubModels("github");var model = github.AddModel("gpt4", GitHubModel.OpenAI.Gpt4o);
var aiService = builder.AddProject<Projects.AIService>("ai-service")    .WaitFor(model)    .WithReference(model);
builder.Build().Run();
These resources no longer implement IResourceWithoutLifetime; they surface as Running and can be waited on just like services.
☁️ Publishing and deployment
Section titled “☁️ Publishing and deployment”Azure Container App Jobs support
Section titled “Azure Container App Jobs support”Aspire 9.5 introduces comprehensive support for Azure Container App Jobs, allowing you to deploy both project and container resources as background job workloads that can run on schedules, in response to events, or be triggered manually. For more information, see Azure Container App Jobs
Container App Jobs complement the existing Container Apps functionality by providing a dedicated way to run finite workloads like data processing, ETL operations, batch jobs, and scheduled maintenance tasks.
Publishing resources as Container App Jobs
Section titled “Publishing resources as Container App Jobs”Use the new PublishAsAzureContainerAppJob extension method to publish resources as jobs:
var builder = DistributedApplication.CreateBuilder(args);
// Publish a project as a Container App Jobvar dataProcessor = builder.AddProject<Projects.DataProcessor>("data-processor")    .PublishAsAzureContainerAppJob(); // Deploys as a job which must be manually started.
builder.Build().Run();
Or use the PublishAsScheduledAzureContainerAppJob extension method to publish a resource as a job that runs on a schedule:
var builder = DistributedApplication.CreateBuilder(args);
// Publish a project as a Container App Jobvar dataProcessor = builder.AddProject<Projects.DataProcessor>("data-processor")    .PublishAsScheduledAzureContainerAppJob("0 0 * * *"); // Every day at midnight
builder.Build().Run();
Job customization and configuration
Section titled “Job customization and configuration”Use the callback on the PublishAsAzureContainerAppJob(...) method to customize the job:
var builder = DistributedApplication.CreateBuilder(args);
// Publish a project as a Container App Jobvar dataProcessor = builder.AddProject<Projects.DataProcessor>("data-processor")    .PublishAsAzureContainerAppJob((infrastructure, job) => {        job.Configuration.ReplicaTimeout = 3600; // 1 hour    });
builder.Build().Run();
Built-in Azure deployment with Aspire CLI
Section titled “Built-in Azure deployment with Aspire CLI”Aspire 9.5 delivers the first iteration of a unified Azure provisioning and deployment pipeline through the aspire deploy command. The deployment experience features graph-based dependency planning through ResourceDeploymentGraph for correct resource provisioning order and maximum parallelism, support for interactive prompting to gather values required for deployment, and enhanced error reporting for identifying issues during deployment. The AppHost integrates Azure provisioning prompts into the standard interaction system for consistent UX, providing deployment-time flexibility with automatic infrastructure provisioning, container image building and registry pushing, and compute resource deployment to Azure Container Apps—all orchestrated through a single command with real-time progress monitoring and comprehensive error reporting.
For more information on deploying to Azure with the Aspire CLI, read the official documentation.
Executable resource configuration APIs
Section titled “Executable resource configuration APIs”Enhanced APIs for configuring executable resources with command and working directory specifications.
WithCommand and WithWorkingDirectory APIs
Section titled “WithCommand and WithWorkingDirectory APIs”New extension methods enable fluent, mutable configuration of executable resources, allowing you to modify command and working directory after initial setup:
// Configure executable with custom command and working directoryvar processor = builder.AddExecutable("data-processor", "python", "/app/data-processing")    .WithCommand("main.py --batch-size 100")    .WithArgs("--config", "production.json");
// Change working directory after initial configurationvar buildTool = builder.AddExecutable("build-tool", "npm", ".")    .WithCommand("run build:production")    .WithWorkingDirectory("./frontend");
Enhanced CommandLineArgsCallbackContext
Section titled “Enhanced CommandLineArgsCallbackContext”The CommandLineArgsCallbackContext now includes resource information for context-aware argument building:
var worker = builder.AddExecutable("worker", "dotnet", ".")    .WithArgs(context =>    {        // Access to the resource instance for dynamic configuration        var resourceName = context.Resource.Name;        var environment = context.ExecutionContext.IsRunMode ? "Development" : "Production";
        context.Args.Add("--resource-name");        context.Args.Add(resourceName);        context.Args.Add("--environment");        context.Args.Add(environment);    });
These APIs provide fine-grained control over executable resource configuration, enabling complex deployment scenarios and dynamic argument construction based on execution context.
InteractionInputCollection enhancements
Section titled “InteractionInputCollection enhancements”Enhanced parameter input handling with the new InteractionInputCollection type:
// Enhanced interaction service with typed input collectionpublic async Task<InteractionResult<InteractionInputCollection>> ProcessParametersAsync(){    var inputs = new List<InteractionInput>    {        new() { Name = "username", Label = "Username", InputType = InputType.Text },        new() { Name = "password", Label = "Password", InputType = InputType.Password },        new() { Name = "environment", Label = "Environment", InputType = InputType.Select,                Options = new[] { ("dev", "Development"), ("prod", "Production") } }    };
    var result = await interactionService.PromptInputsAsync(        "Configure Parameters",        "Enter application configuration:",        inputs);
    if (result.Success)    {        // Access inputs by name with type safety        var username = result.Value["username"].Value;        var password = result.Value["password"].Value;        var environment = result.Value["environment"].Value;    }
    return result;}
The InteractionInputCollection provides indexed access by name and improved type safety for parameter processing workflows.
Docker Compose Aspire Dashboard forwarding headers
Section titled “Docker Compose Aspire Dashboard forwarding headers”AddDockerComposeEnvironment(...).WithDashboard() gained WithForwardedHeaders() to enable forwarded Host and Proto handling for dashboard scenarios behind reverse proxies or compose networks. This mirrors the standalone dashboard forwarded header support and fixes auth redirect edge cases.
builder.AddDockerComposeEnvironment("env") .WithDashboard(d => d.WithForwardedHeaders());Container build customization
Section titled “Container build customization”ContainerBuildOptions support enables customizing the underlying dotnet publish invocation when Aspire builds project-sourced container images (for example to change configuration, trimming, or pass other MSBuild properties). Use the new options hook on the project container image configuration to set MSBuild properties instead of maintaining a custom Dockerfile. (Exact API surface is intentionally summarized here to avoid drift; see API docs for ContainerBuildOptions in the hosting namespace for usage.)
Deployment image tag callbacks
Section titled “Deployment image tag callbacks”Aspire 9.5 introduces powerful deployment image tag callback APIs that allow dynamic generation of container image tags at deployment time, supporting both synchronous and asynchronous scenarios.
Deployment tag callback features
Section titled “Deployment tag callback features”- Dynamic tag generation: Calculate image tags based on deployment context, git commits, build numbers, or timestamps.
- Async callback support: Perform asynchronous operations like API calls or file system access during tag generation.
- Deployment context access: Access the deployment environment, resource information, and configuration.
- Flexible callback types: Support simple lambdas, context-aware callbacks, and async operations.
Basic deployment tag examples
Section titled “Basic deployment tag examples”var builder = DistributedApplication.CreateBuilder(args);
// Simple static tag callbackvar api = builder.AddProject<Projects.Api>("api") .WithDeploymentImageTag(() => "v1.2.3-stable");
// Dynamic tag with timestampvar worker = builder.AddProject<Projects.Worker>("worker") .WithDeploymentImageTag(() => $"build-{DateTime.UtcNow:yyyyMMdd-HHmm}");
builder.Build().Run();Context-aware deployment tags
Section titled “Context-aware deployment tags”// Access deployment context for dynamic tag generationvar api = builder.AddProject<Projects.Api>("api") .WithDeploymentImageTag(context => { // Access resource information var resourceName = context.Resource.Name; var environment = context.Environment;
return $"{resourceName}-{environment}-{GetBuildNumber()}"; });
// Git-based taggingvar frontend = builder.AddProject<Projects.Frontend>("frontend") .WithDeploymentImageTag(context => { var gitCommit = GetGitCommitHash(); var branch = GetCurrentBranch(); return $"{branch}-{gitCommit[..8]}"; });Async deployment tag callbacks
Section titled “Async deployment tag callbacks”// Async callback for complex tag generationvar database = builder.AddProject<Projects.Database>("database") .WithDeploymentImageTag(async context => { // Perform async operations during deployment var buildInfo = await GetBuildInfoFromApi(); var version = await ReadVersionFromFile();
return $"db-{version}-build{buildInfo.Number}"; });
// API-based version lookupvar api = builder.AddProject<Projects.Api>("api") .WithDeploymentImageTag(async context => { using var client = new HttpClient(); var latestTag = await client.GetStringAsync("https://api.company.com/latest-tag"); return $"api-{latestTag.Trim()}"; });Advanced deployment scenarios
Section titled “Advanced deployment scenarios”// Environment-specific taggingvar service = builder.AddProject<Projects.Service>("service") .WithDeploymentImageTag(context => { return context.Environment switch { "Production" => $"prod-{GetReleaseVersion()}", "Staging" => $"staging-{GetBuildNumber()}", "Development" => $"dev-{DateTime.UtcNow:yyyyMMdd}", _ => "latest" }; });
// Multi-resource coordinationvar sharedVersion = await GetSharedVersionAsync();
var frontend = builder.AddProject<Projects.Frontend>("frontend") .WithDeploymentImageTag(() => $"frontend-{sharedVersion}");
var backend = builder.AddProject<Projects.Backend>("backend") .WithDeploymentImageTag(() => $"backend-{sharedVersion}");💔 Breaking changes
Section titled “💔 Breaking changes”InteractionInput API requires Name property
Section titled “InteractionInput API requires Name property”Breaking change: InteractionInput now requires a Name property, while Label becomes optional (#10835).
Migration example
Section titled “Migration example”// Before (9.4 and earlier)var input = new InteractionInput{ Label = "Database Password", InputType = InputType.SecretText, Required = true};
// After (9.5+)var input = new InteractionInput{ Name = "database_password", // Required field identifier Label = "Database Password", // Optional (defaults to Name) InputType = InputType.SecretText, Required = true};This change enables better form serialization and integration with interactive parameter processing.
Notification terminology renamed from MessageBar
Section titled “Notification terminology renamed from MessageBar”Breaking change: Notification terminology has been updated, with MessageBar renamed to use new notification terminology (#10449).
This change affects APIs and terminology used in the notification system, requiring updates to code that references the old MessageBar naming conventions.