


Custom resource commands
Each resource in the Aspire app model is represented as an IResource and when added to the distributed application builder, it’s the generic-type parameter of the IResourceBuilder<T> interface. You use the resource builder API to chain calls, configuring the underlying resource, and in some situations, you might want to add custom commands to the resource. Some common scenario for creating a custom command might be running database migrations or seeding/resetting a database. In this article, you learn how to add a custom command to a Redis resource that clears the cache.
Add custom commands to a resource
Section titled “Add custom commands to a resource”Start with an Aspire AppHost project. The walkthrough below registers a clear-cache command on a Redis resource. The C# version uses an extension method that wraps the registration; the TypeScript version registers the command inline against a Node service that exposes an admin endpoint. Both flows produce the same dashboard/CLI experience.
In a TypeScript AppHost, register the command inline on the resource builder. Because TypeScript doesn’t have extension methods, the closure captures any state the command needs:
import {    createBuilder,    type ExecuteCommandContext,    type ExecuteCommandResult,} from './.aspire/modules/aspire.mjs';
const builder = await createBuilder();
const cache = await builder    .addNodeApp("cache", "./cache-service", "src/server.ts")    .withHttpEndpoint();
await cache.withCommand(    "clear-cache",    "Clear Cache",    async (_context: ExecuteCommandContext): Promise<ExecuteCommandResult> => {        const endpoint = await cache.getEndpoint("http");        const url = await endpoint.url.get();        const res = await fetch(`${url}/admin/cache/clear`, { method: "POST" });
        if (!res.ok) {            return {                success: false,                message: `Cache service returned ${res.status} ${res.statusText}.`,            };        }
        return { success: true, message: "Cache cleared." };    },    {        commandOptions: {            description: "Drops all entries in the cache service.",            confirmationMessage: "Clear all cached entries?",            iconName: "AnimalRabbitOff",        },    });
await builder.build().run();
The preceding code:
- Adds a Node app named
cacheand registers aclear-cachecommand on it. - Implements the
executeCommandcallback as an async arrow that calls the resource’s HTTP endpoint to perform the actual cache invalidation. The pattern works for any resource that exposes an admin operation over HTTP; for resources whose clients you’d rather use directly (databases, message brokers, …), call those clients from the same callback. - Passes a fourth argument with
{ commandOptions: { ... } }to set the dashboard description, confirmation prompt, and icon.
Add a new class named RedisResourceBuilderExtensions.cs to the AppHost project and replace its contents with the following code:
using Microsoft.Extensions.DependencyInjection;using Microsoft.Extensions.Diagnostics.HealthChecks;using Microsoft.Extensions.Logging;using StackExchange.Redis;
namespace Aspire.Hosting;
internal static class RedisResourceBuilderExtensions{    public static IResourceBuilder<RedisResource> WithClearCommand(        this IResourceBuilder<RedisResource> builder)    {        var commandOptions = new CommandOptions        {            UpdateState = OnUpdateResourceState,            IconName = "AnimalRabbitOff",            IconVariant = IconVariant.Filled        };
        builder.WithCommand(            name: "clear-cache",            displayName: "Clear Cache",            executeCommand: context => OnRunClearCacheCommandAsync(builder, context),            commandOptions: commandOptions);
        return builder;    }
    private static async Task<ExecuteCommandResult> OnRunClearCacheCommandAsync(        IResourceBuilder<RedisResource> builder,        ExecuteCommandContext context)    {        var connectionString = await builder.Resource.GetConnectionStringAsync() ??            throw new InvalidOperationException(                $"Unable to get the '{context.ResourceName}' connection string.");
        await using var connection = ConnectionMultiplexer.Connect(connectionString);        var database = connection.GetDatabase();        await database.ExecuteAsync("FLUSHALL");
        return CommandResults.Success();    }
    private static ResourceCommandState OnUpdateResourceState(        UpdateCommandStateContext context)    {        var logger = context.ServiceProvider.GetRequiredService<ILogger<Program>>();        if (logger.IsEnabled(LogLevel.Information))        {            logger.LogInformation(                "Updating resource state: {ResourceSnapshot}",                context.ResourceSnapshot);        }
        return context.ResourceSnapshot.HealthStatus is HealthStatus.Healthy            ? ResourceCommandState.Enabled            : ResourceCommandState.Disabled;    }}
The preceding code:
- Shares the
Aspire.Hostingnamespace so that the extension is visible from the AppHost. - Is a
static classcontaining extension methods onIResourceBuilder<RedisResource>. - Defines a single extension method named
WithClearCommandthat registers aclear-cachecommand on the Redis resource, plus theexecuteCommandandupdateStatecallbacks the dashboard uses to run the command and decide when it’s enabled. - Returns the
IResourceBuilder<RedisResource>to keep the call site chainable.
The WithCommand API adds the appropriate annotations to the resource, which are consumed in the Aspire dashboard. The dashboard uses these annotations to render the command in the UI. Before getting too far into those details, let’s ensure that you first understand the parameters of the WithCommand method:
name: The name of the command to invoke.displayName: The name of the command to display in the dashboard.executeCommand: The callback that runs when the command is invoked. In C# the type isFunc<ExecuteCommandContext, Task<ExecuteCommandResult>>; in TypeScript it’s(context: ExecuteCommandContext) => Promise<ExecuteCommandResult>.updateState: A callback that decides the command’s enabled state in the dashboard. In C# it’sFunc<UpdateCommandStateContext, ResourceCommandState>and supplied viaCommandOptions.UpdateState; in TypeScript it’s(context: UpdateCommandStateContext) => Promise<ResourceCommandState>and supplied through theupdateStatefield onCommandOptions.iconName: The name of the icon to display in the dashboard. The icon is optional. Use a valid Fluent UI Blazor icon name. If the name isn’t recognized, the dashboard renders a question-mark circle (❓) icon as a fallback.iconVariant: The variant of the icon to display in the dashboard, valid options areRegular(default) orFilled.
Execute command logic
Section titled “Execute command logic”The executeCommand callback is where the command logic is implemented. The ExecuteCommandContext it receives gives you access to command-specific data such as the resource being acted on, cancellation, and logging.
In TypeScript the callback signature is (context: ExecuteCommandContext) => Promise<ExecuteCommandResult>. ExecuteCommandContext exposes async accessors for command-specific data:
resourceName()— the resource instance name.cancellationToken()— aCancellationTokenthat you can forward to APIs that accept anAbortSignal.logger()— the resource logger.arguments()— invocation arguments supplied when the command is executed.
The TypeScript callback is typically defined inline as an async arrow function. The example below pulls the resource’s HTTP endpoint and forwards the cancellation token to fetch:
async (context: ExecuteCommandContext): Promise<ExecuteCommandResult> => {    const endpoint = await cache.getEndpoint("http");    const url = await endpoint.url.get();    const cancellation = await context.cancellationToken();
    const res = await fetch(`${url}/admin/cache/clear`, {        method: "POST",        signal: cancellation as unknown as AbortSignal,    });
    if (!res.ok) {        return {            success: false,            message: `Cache service returned ${res.status} ${res.statusText}.`,        };    }
    return { success: true, message: "Cache cleared." };}
The preceding code:
- Reads the resource’s HTTP endpoint URL.
- Calls the resource’s admin endpoint with the cancellation token forwarded as an abort signal so the request stops when the dashboard or CLI cancels the command.
- Returns
{ success: false, message: ... }if the HTTP call fails, otherwise{ success: true, message: "Cache cleared." }.
In C# the parameter is typed as Func<ExecuteCommandContext, Task<ExecuteCommandResult>>. ExecuteCommandContext exposes:
ServiceProvider(IServiceProvider) — used to resolve services such as loggers orResourceCommandService.ResourceName(string) — the name of the resource instance that the command is being executed on.CancellationToken(CancellationToken) — used to cancel command execution.Logger(ILogger) — used to write log messages directly to the resource’s logs. These logs can be viewed in the Aspire dashboard or with theaspire logs <resource>command.
The earlier example delegates to a private static method named OnRunClearCacheCommandAsync to clear the cache:
private static async Task<ExecuteCommandResult> OnRunClearCacheCommandAsync(    IResourceBuilder<RedisResource> builder,    ExecuteCommandContext context){    var connectionString = await builder.Resource.GetConnectionStringAsync() ??        throw new InvalidOperationException(            $"Unable to get the '{context.ResourceName}' connection string.");
    await using var connection = ConnectionMultiplexer.Connect(connectionString);
    var database = connection.GetDatabase();
    await database.ExecuteAsync("FLUSHALL");
    return CommandResults.Success();}
The preceding code:
- Retrieves the connection string from the Redis resource.
- Connects to the Redis instance.
- Gets the database instance.
- Executes the
FLUSHALLcommand to clear the cache. - Returns a
CommandResults.Success()instance to indicate that the command was successful.
Update command state logic
Section titled “Update command state logic”The updateState callback decides whether a command is enabled in the dashboard. The dashboard invokes it whenever the resource’s state changes — typical use cases are gating destructive commands behind a healthy resource, or only enabling a command after a startup probe has succeeded.
In TypeScript the updateState field on CommandOptions is an async callback that receives an UpdateCommandStateContext. The context exposes resourceSnapshot(), an async function that returns a curated snapshot of the resource instance, including healthStatus and state (lifecycle state).
The following example gates the clear-cache command on the resource being healthy, mirroring the C# pattern:
import { HealthStatus, ResourceCommandState } from './.aspire/modules/aspire.mjs';
await cache.withCommand(    "clear-cache",    "Clear Cache",    executeClearCache,    {        commandOptions: {            iconName: "AnimalRabbitOff",            updateState: async (ctx) => {                const snapshot = await ctx.resourceSnapshot();
                return snapshot.healthStatus === HealthStatus.Healthy                    ? ResourceCommandState.Enabled                    : ResourceCommandState.Disabled;            },        },    });
The preceding code:
- Calls
ctx.resourceSnapshot()to retrieve the current resource snapshot. - Returns
ResourceCommandState.Enabledif the resource is healthy; otherwise, it returnsResourceCommandState.Disabled.
The HealthStatus and ResourceCommandState enums are exported from the generated SDK (aspire.ts) and are available to import directly.
In C# the parameter is typed as Func<UpdateCommandStateContext, ResourceCommandState>. UpdateCommandStateContext exposes:
ServiceProvider(IServiceProvider) — used to resolve services.ResourceSnapshot(CustomResourceSnapshot) — an immutable snapshot of the resource instance, including health status, lifecycle state, properties, and URLs.
The earlier example gates the clear-cache command on the Redis resource being healthy:
private static ResourceCommandState OnUpdateResourceState(    UpdateCommandStateContext context){    var logger = context.ServiceProvider.GetRequiredService<ILogger<Program>>();
    if (logger.IsEnabled(LogLevel.Information))    {        logger.LogInformation(            "Updating resource state: {ResourceSnapshot}",            context.ResourceSnapshot);    }
    return context.ResourceSnapshot.HealthStatus is HealthStatus.Healthy        ? ResourceCommandState.Enabled        : ResourceCommandState.Disabled;}
The preceding code:
- Retrieves the logger instance from the service provider.
- Logs the resource snapshot details.
- Returns
ResourceCommandState.Enabledif the resource is healthy; otherwise, it returnsResourceCommandState.Disabled.
Test the custom command
Section titled “Test the custom command”To test the custom command, update your AppHost to wire up the resource and the command:
import { createBuilder } from './.aspire/modules/aspire.mjs';
const builder = await createBuilder();
const cache = await builder.addNodeApp("cache", "../cache/server.js");await cache.withHttpEndpoint();await cache.withCommand(    "clear-cache",    "Clear Cache",    async (context) => {        const endpoint = await cache.getEndpoint("http");        const url = await endpoint.url.get();        const cancellation = await context.cancellationToken();
        const res = await fetch(`${url}/admin/cache/clear`, {            method: "POST",            signal: cancellation as unknown as AbortSignal,        });
        if (!res.ok) {            return {                success: false,                message: `Cache service returned ${res.status} ${res.statusText}.`,            };        }
        return { success: true, message: "Cache cleared." };    },    {        commandOptions: {            iconName: "AnimalRabbitOff",            description: "Clears the application cache.",            confirmationMessage: "Are you sure you want to clear the cache?",        },    });
const apiService = await builder.addProject("apiservice", "../ApiService/ApiService.csproj");
const web = await builder.addProject("webfrontend", "../Web/Web.csproj");await web.withExternalHttpEndpoints();await web.withReference(cache);await web.waitFor(cache);await web.withReference(apiService);await web.waitFor(apiService);
await builder.build().run();
The preceding code registers the cache service as a Node app with an HTTP endpoint and attaches the clear-cache command directly to it.
var builder = DistributedApplication.CreateBuilder(args);
var cache = builder.AddRedis("cache")                   .WithClearCommand();
var apiService = builder.AddProject<Projects.AspireApp_ApiService>("apiservice");
builder.AddProject<Projects.AspireApp_Web>("webfrontend")    .WithExternalHttpEndpoints()    .WithReference(cache)    .WaitFor(cache)    .WithReference(apiService)    .WaitFor(apiService);
builder.Build().Run();
The preceding code calls the WithClearCommand extension method to add the custom command to the Redis resource.
Run the app and navigate to the Aspire dashboard. You should see the custom command listed under the cache resource. On the Resources page of the dashboard, select the ellipsis button under the Actions column:
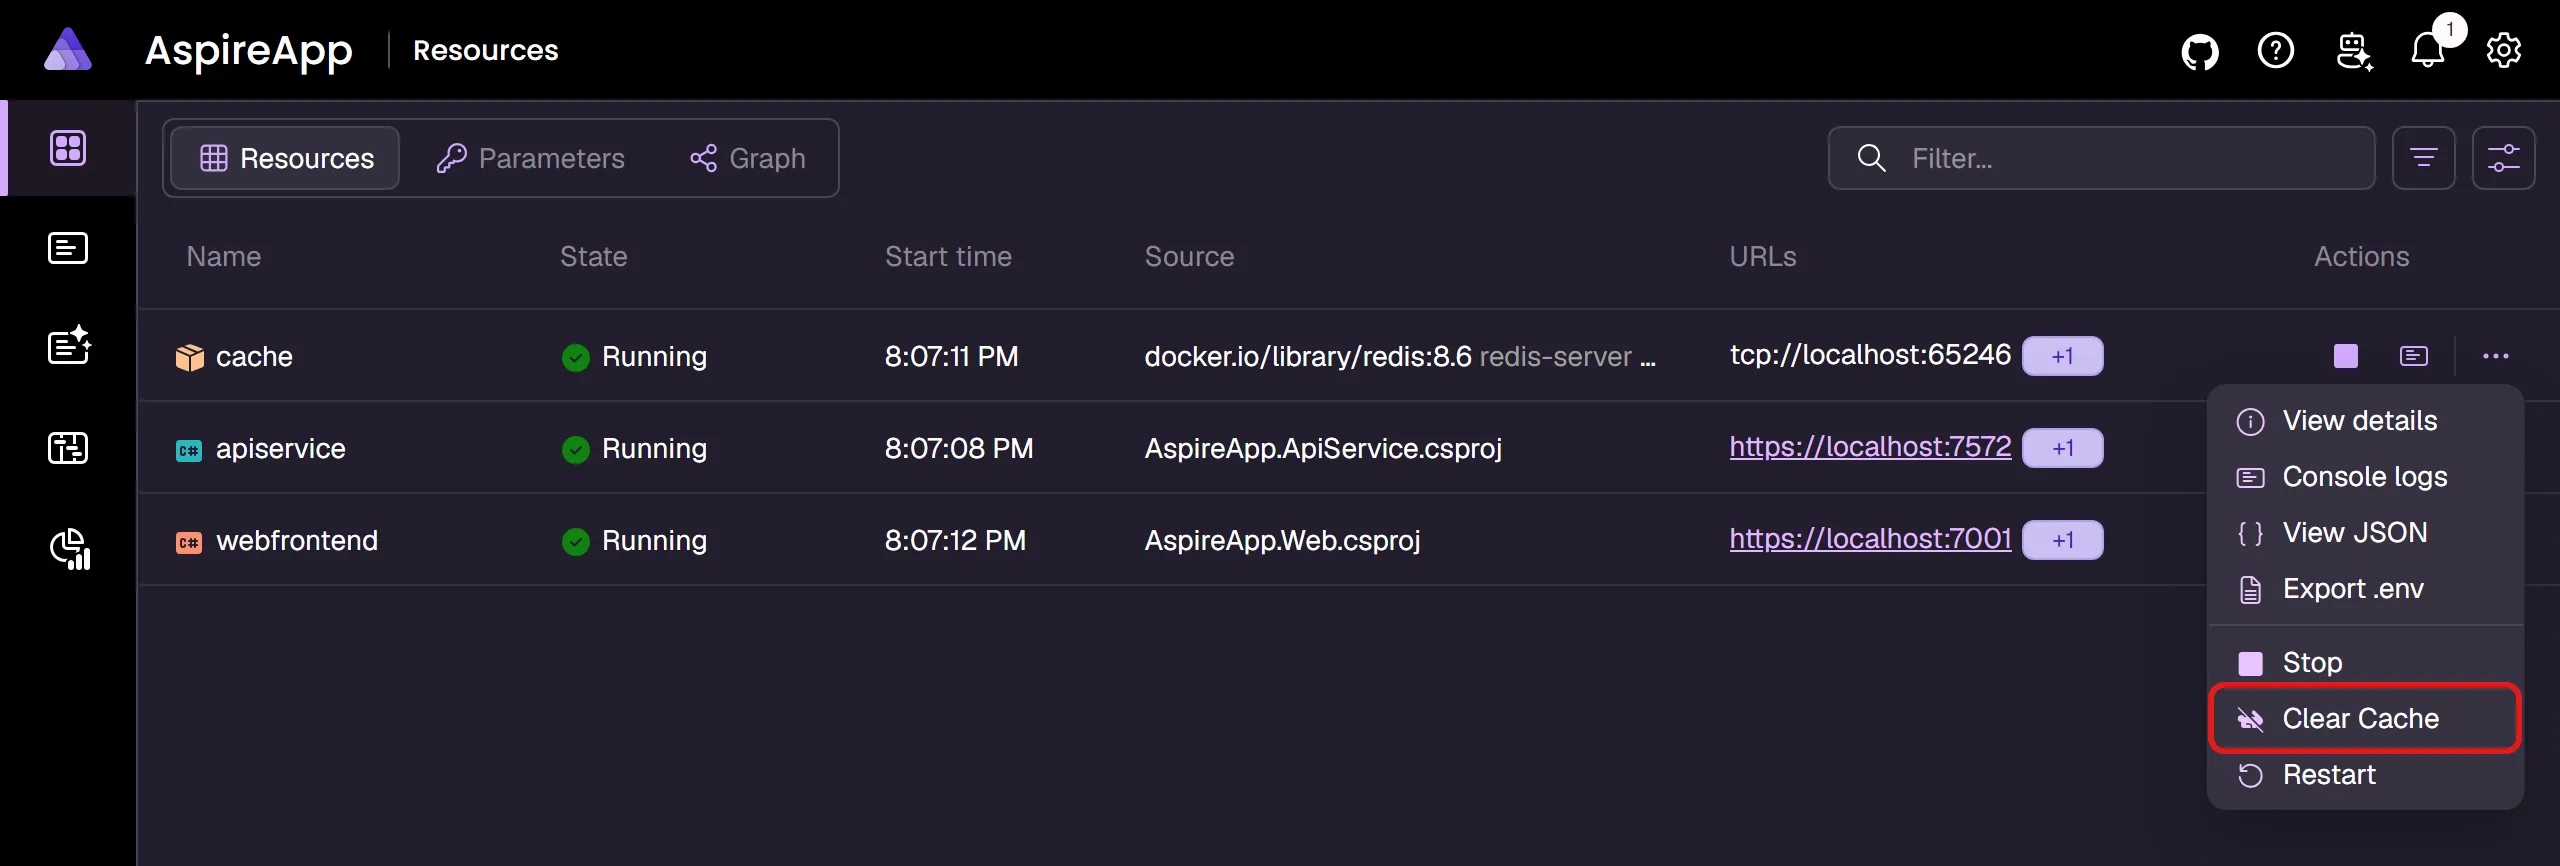
The preceding image shows the Clear cache command that was added to the Redis resource. The icon displays as a rabbit crossed out to indicate that the speed of the dependent resource is being cleared.
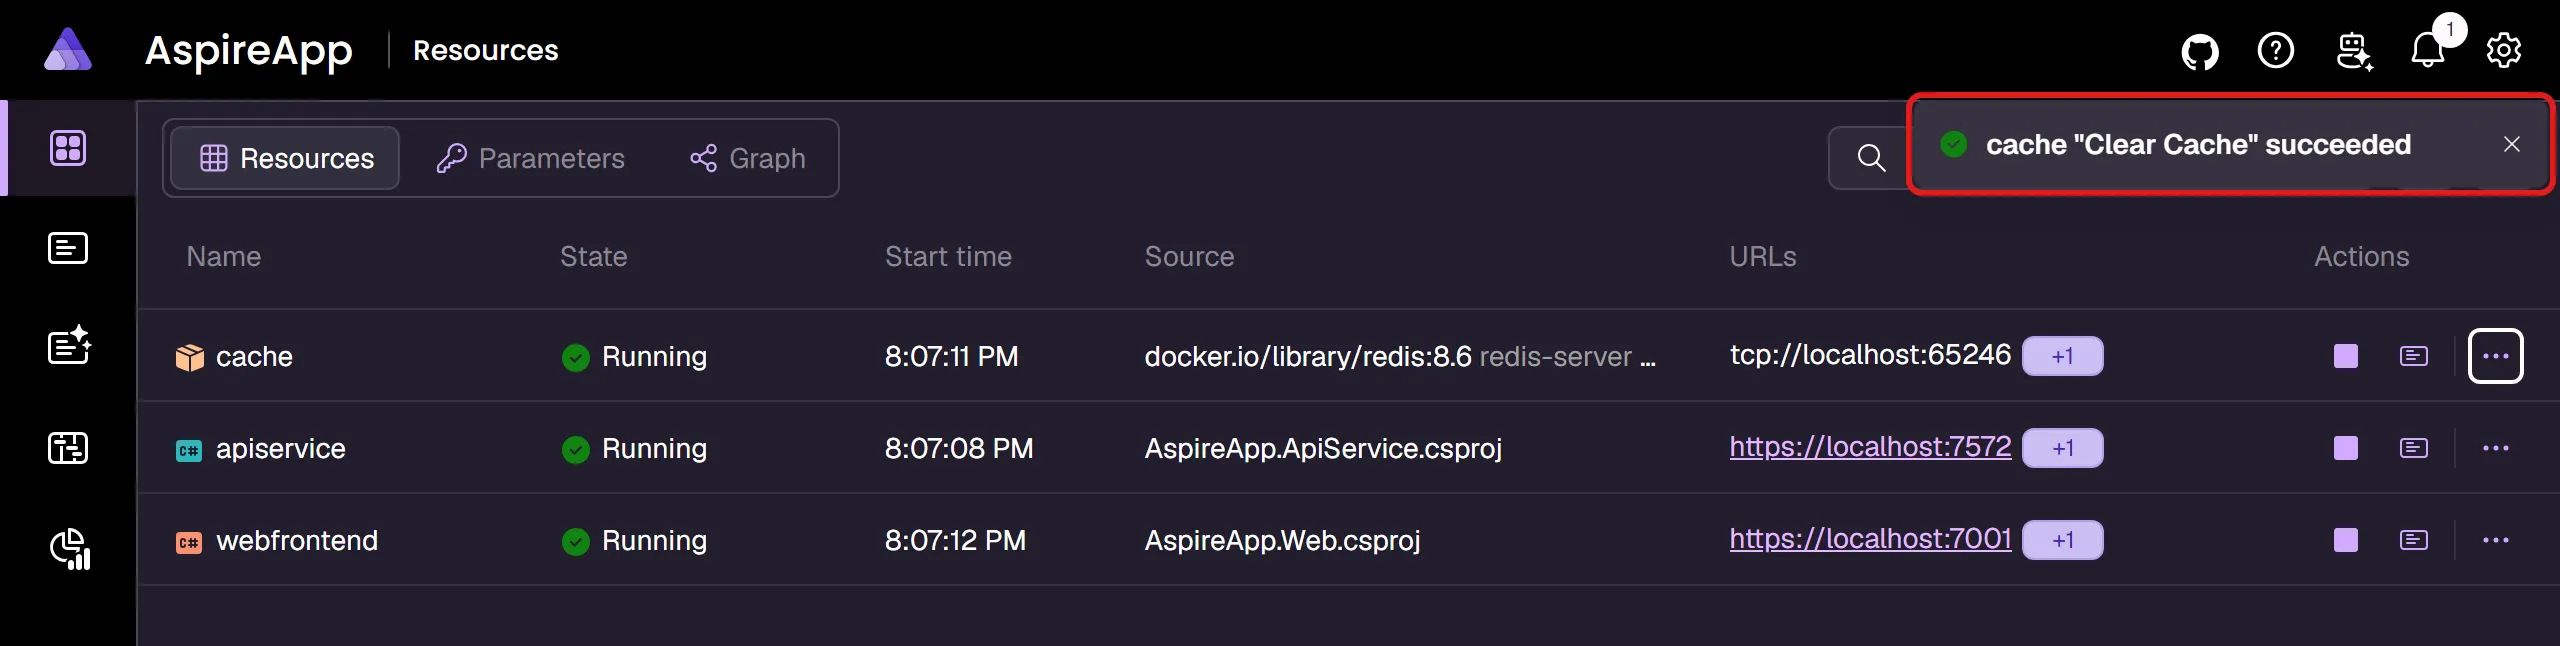
Select the Clear cache command to clear the cache of the Redis resource. The command should execute successfully, and the cache should be cleared. The result of the command is available in the notification center:
Programmatically execute commands
Section titled “Programmatically execute commands”In addition to executing commands through the Aspire dashboard, you can also execute commands programmatically using the ResourceCommandService. This service is useful when you need to:
- Execute commands from within your application code
- Automate command execution as part of a workflow
- Build custom tooling that needs to control resources
The most common scenario is to call commands from within other custom command implementations. In C#, use ExecuteCommandContext.ServiceProvider to retrieve the ResourceCommandService. In TypeScript, resolve the service from the AppHost execution context before registering the command, then capture it in the callback.
Execute commands from a custom command
Section titled “Execute commands from a custom command”The following example shows how to create a custom command that executes other commands. In this case, a “reset-all” command clears the cache and restarts a database:
import { createBuilder } from './.aspire/modules/aspire.mjs';
const builder = await createBuilder();
const executionContext = await builder.executionContext();const serviceProvider = await executionContext.serviceProvider();const commandService = await serviceProvider.getResourceCommandService();
const cache = await builder.addRedis("cache");await cache.withCommand("clear-cache", "Clear Cache", async () => {    // Clear cache implementation    return { success: true };});
const database = await builder.addPostgres("postgres");await database.withCommand("restart", "Restart Database", async () => {    // Restart database implementation    return { success: true };});
const api = await builder.addProject("api", "../Api/Api.csproj");await api.withReference(cache);await api.withReference(database);await api.withCommand("reset-all", "Reset Everything", async (ctx) => {    const logger = await ctx.logger();    const cancellationToken = await ctx.cancellationToken();
    await logger.logInformation("Starting full system reset...");
    const clearResult = await commandService.executeCommandAsync(        "cache", "clear-cache", { cancellationToken });
    const restartResult = await commandService.executeCommandAsync(        "postgres", "restart", { cancellationToken });
    if (!clearResult.success || !restartResult.success) {        return { success: false, message: "System reset failed" };    }
    await logger.logInformation("System reset completed successfully");    return { success: true };});
await builder.build().run();using Aspire.Hosting.ApplicationModel;using Microsoft.Extensions.DependencyInjection;
var builder = DistributedApplication.CreateBuilder(args);
var cache = builder.AddRedis("cache") .WithClearCommand(); // Defines a "clear-cache" command as shown earlier
var database = builder.AddPostgres("postgres") .WithCommand("restart", "Restart Database", async (context, ct) => { // Restart database implementation return CommandResults.Success(); });
var api = builder.AddProject<Projects.Api>("api") .WithReference(cache) .WithReference(database) .WithCommand("reset-all", "Reset Everything", async (context, ct) => { var commandService = context.ServiceProvider.GetRequiredService<ResourceCommandService>();
context.Logger.LogInformation("Starting full system reset...");
var clearResult = await commandService.ExecuteCommandAsync( resource: cache.Resource, commandName: "clear-cache", cancellationToken: ct);
var restartResult = await commandService.ExecuteCommandAsync( resource: database.Resource, commandName: "restart", cancellationToken: ct);
if (!clearResult.Success || !restartResult.Success) { return CommandResults.Failure("System reset failed"); }
context.Logger.LogInformation("System reset completed successfully"); return CommandResults.Success(); });
builder.Build().Run();In this example:
- In C#, the
contextparameter provides access to the service provider and logger - In TypeScript,
ResourceCommandServiceis retrieved from the AppHost execution context’s service provider before registering the command - In C#, commands are executed on resource instances using
cache.Resourceanddatabase.Resource; in TypeScript, they are executed by resource name string (for example,"cache"and"postgres") - Each command result is checked for success before proceeding
Execute a command by resource ID
Section titled “Execute a command by resource ID”You can also execute a command using the resource ID or resource name. The resource ID is the unique identifier for a resource instance, while the resource name is the display name (which must be unique to use this approach):
const result = await commandService.executeCommandAsync(    "cache",    "clear-cache",    { cancellationToken });
if (result.success) { console.log("Command executed successfully");}else if (result.canceled) { console.warn("Command was canceled");}else { console.error(`Command failed: ${result.message}`);}var result = await commandService.ExecuteCommandAsync( resourceId: "cache", commandName: "clear-cache", cancellationToken: cancellationToken);
if (result.Success){ logger.LogInformation("Command executed successfully");}else if (result.Canceled){ logger.LogWarning("Command was canceled");}else{ logger.LogError("Command failed: {Message}", result.Message);}The resource identifier argument (resourceId in C#, or the first argument in TypeScript when passing a string) can be either:
- The unique ID of the resource (e.g.,
cache-abcdwxyzfor a resource with replicas) - The display name (e.g.,
cache) if there are no duplicate names
Execute commands on resources with replicas
Section titled “Execute commands on resources with replicas”When executing a command on a resource with multiple replicas using the C# IResource overload, the command runs in parallel on all instances:
// For a resource with replicas, the command executes on all instancesvar result = await commandService.ExecuteCommandAsync( resource: cache.Resource, commandName: "clear-cache", cancellationToken: cancellationToken);In TypeScript, use the resource identifier overload shown earlier: pass a specific replica ID to target one instance, or pass a unique resource name when there are no duplicate names.
The behavior when executing on multiple replicas:
- The command runs in parallel on all instances
- If all commands succeed, the result indicates success
- If any commands fail, the result includes details about the failures
- If all non-successful commands were canceled, the result indicates cancellation
Handle command execution results
Section titled “Handle command execution results”The ExecuteCommandResult type carries the outcome of a command. It exposes the same conceptual fields in both languages:
Success/success(boolean) — Whether the command completed successfully.Canceled/canceled(boolean) — Whether the command was canceled by the user.Message/message(string?) — A human-readable message that surfaces in the dashboard notification center and CLI output. Used for both success messages and error messages.Data/data(CommandResultData?) — Optional structured output (plain text, JSON, or Markdown). See Return a result from a command.
In TypeScript there is no helper class — return a plain object that conforms to ExecuteCommandResult:
// Success with no payloadreturn { success: true };
// Failure with a status messagereturn { success: false, message: "Error occurred during execution" };
// Cancellation (typically when the user backs out of a confirmation prompt)return { canceled: true };
// Failure derived from a caught exceptionreturn { success: false, message: err instanceof Error ? err.message : String(err) };
The CommandResults helper class provides factory methods for the common shapes:
// Success with no payloadreturn CommandResults.Success();
// Failure with a status messagereturn CommandResults.Failure("Error occurred during execution");
// Cancellation (typically when the user backs out of a confirmation prompt)return CommandResults.Canceled();
// Failure derived from an exception (uses Exception.Message)return CommandResults.Failure(ex);
Return a result from a command
Section titled “Return a result from a command”Resource commands can return a structured payload — plain text, JSON, or Markdown — alongside the success/failure signal. The payload flows automatically through the entire Aspire pipeline:
-
Dashboard: The success notification gains a View response action that opens a text visualizer dialog with the payload.
Jsonresults lock the visualizer to JSON syntax highlighting;Markdownresults lock it to Markdown rendering. SetDisplayImmediatelyto open the dialog as soon as the command completes (no click required). -
CLI: Status messages route to
stderrand the payload routes tostdout, so the output is safe to pipe to tools such asjq:Terminal aspire resource cache issue-access-token | jq -r .token -
MCP tools: The payload is appended to the tool response as a second
TextContentBlockafter the status message.
Return text or JSON
Section titled “Return text or JSON”A common scenario is issuing an access token from a custom command — developers can copy it straight from the dashboard or pipe it into a Bearer header from the CLI. In Text mode, the result is just the token; in Json mode, the result includes the expiry and scopes.
Use the CommandResults.Success(message, result, resultFormat) overload to attach a payload to a successful result. The message is the notification center/CLI status; result is the payload string; resultFormat controls how the dashboard visualizer interprets it.
In TypeScript, return an ExecuteCommandResult object literal with a data property of type CommandResultData:
import {    createBuilder,    CommandResultFormat,    type ExecuteCommandContext,    type ExecuteCommandResult,} from './.aspire/modules/aspire.mjs';
const builder = await createBuilder();
await builder    .addNodeApp("myservice", "./myservice", "src/server.ts")    .withCommand("issue-access-token", "Issue Access Token",        async (_context: ExecuteCommandContext): Promise<ExecuteCommandResult> => {            const token = crypto.randomUUID().replace(/-/g, "");
            return {                success: true,                message: "Access token issued.",                data: {                    value: token,                    format: CommandResultFormat.Text,                },            };        });
await builder.build().run();
To return JSON with the expiry and scopes, switch the format to CommandResultFormat.Json:
import {    createBuilder,    CommandResultFormat,    type ExecuteCommandContext,    type ExecuteCommandResult,} from './.aspire/modules/aspire.mjs';
const builder = await createBuilder();
await builder    .addNodeApp("myservice", "./myservice", "src/server.ts")    .withCommand("issue-access-token", "Issue Access Token",        async (_context: ExecuteCommandContext): Promise<ExecuteCommandResult> => {            const token = crypto.randomUUID().replace(/-/g, "");            const json = JSON.stringify({                token,                expiresAt: new Date(Date.now() + 3_600_000).toISOString(),                scopes: ["read", "write"],            });
            return {                success: true,                message: "Access token issued.",                data: {                    value: json,                    format: CommandResultFormat.Json,                },            };        });
await builder.build().run();using System.Security.Cryptography;using Aspire.Hosting.ApplicationModel;
var builder = DistributedApplication.CreateBuilder(args);
builder.AddProject<Projects.MyService>("myservice") .WithCommand( name: "issue-access-token", displayName: "Issue Access Token", executeCommand: context => { var token = Convert.ToBase64String(RandomNumberGenerator.GetBytes(32));
return Task.FromResult(CommandResults.Success( message: "Access token issued.", result: token, resultFormat: CommandResultFormat.Text)); });
builder.Build().Run();To return JSON with the expiry and scopes, switch the format to CommandResultFormat.Json:
using System.Security.Cryptography;using System.Text.Json;using Aspire.Hosting.ApplicationModel;
var builder = DistributedApplication.CreateBuilder(args);
builder.AddProject<Projects.MyService>("myservice")    .WithCommand(        name: "issue-access-token",        displayName: "Issue Access Token",        executeCommand: context =>        {            var token = Convert.ToBase64String(RandomNumberGenerator.GetBytes(32));            var json = JsonSerializer.Serialize(new            {                token,                expiresAt = DateTimeOffset.UtcNow.AddHours(1),                scopes = new[] { "read", "write" },            });
            return Task.FromResult(CommandResults.Success(                message: "Access token issued.",                result: json,                resultFormat: CommandResultFormat.Json));        });
builder.Build().Run();
Return Markdown
Section titled “Return Markdown”When a command needs rich output (for example headings, tables, and lists), use the CommandResults.Success(string, CommandResultData) overload to return a CommandResultData with Format = CommandResultFormat.Markdown. This alternative to the three-parameter string overload gives you full control over the result payload:
import {    createBuilder,    CommandResultFormat,    type ExecuteCommandContext,    type ExecuteCommandResult,} from './.aspire/modules/aspire.mjs';
const builder = await createBuilder();
await builder    .addNodeApp("myservice", "./myservice", "src/server.ts")    .withCommand("migrate-database", "Migrate Database",        async (_context: ExecuteCommandContext): Promise<ExecuteCommandResult> => {            const markdown = `# ⚙️ Database Migration Summary
| Table      | Result                     ||------------|----------------------------|| Customers  | ✅ 1,200 rows              || Products   | ✅ 850 rows                || Orders     | ✅ 3,400 rows              || OrderItems | ✅ 8,750 rows              || Categories | ✅ 45 rows                 || Reviews    | ❌ FK constraint violation || Inventory  | ✅ 850 rows                || Shipping   | ✅ 3,400 rows              || Payments   | ❌ Timeout after 30s       || Coupons    | ✅ 120 rows                |
**Summary:** 8 of 10 tables migrated successfully. 2 tables failed.`;
            return {                success: true,                message: "Database migrated.",                data: {                    value: markdown,                    format: CommandResultFormat.Markdown,                },            };        });
await builder.build().run();using Aspire.Hosting.ApplicationModel;
var builder = DistributedApplication.CreateBuilder(args);
builder.AddProject<Projects.MyService>("myservice") .WithCommand( name: "migrate-database", displayName: "Migrate Database", executeCommand: _ => { var markdown = """ # ⚙️ Database Migration Summary
| Table | Result | |------------|----------------------------| | Customers | ✅ 1,200 rows | | Products | ✅ 850 rows | | Orders | ✅ 3,400 rows | | OrderItems | ✅ 8,750 rows | | Categories | ✅ 45 rows | | Reviews | ❌ FK constraint violation | | Inventory | ✅ 850 rows | | Shipping | ✅ 3,400 rows | | Payments | ❌ Timeout after 30s | | Coupons | ✅ 120 rows |
**Summary:** 8 of 10 tables migrated successfully. 2 tables failed. """;
return Task.FromResult(CommandResults.Success( "Database migrated.", new CommandResultData { Value = markdown, Format = CommandResultFormat.Markdown, })); });
builder.Build().Run();Choose a result format
Section titled “Choose a result format”CommandResultFormat has three values:
| Value | Dashboard behavior |
|---|---|
Text | Plain text. Opens in the text visualizer dialog with no fixed format — the user can switch to a different syntax for inspection. |
Json | JSON. The visualizer locks to JSON mode for syntax highlighting and pretty-printing. |
Markdown | Markdown. The visualizer locks to Markdown rendering. |
Omit Data (return CommandResults.Success() or { success: true }) when the command has no payload to display.
Return data on a failure
Section titled “Return data on a failure”The matching CommandResults.Failure(errorMessage, result, resultFormat) overload attaches the same payload shape to a failed result, which is useful for surfacing diagnostic detail that the user (or a downstream tool) can inspect:
return { success: false, message: "Migration failed.", data: { value: errorJson, format: CommandResultFormat.Json, },};return CommandResults.Failure( errorMessage: "Migration failed.", result: errorJson, resultFormat: CommandResultFormat.Json);Auto-open the result dialog in the dashboard
Section titled “Auto-open the result dialog in the dashboard”By default, the dashboard surfaces the payload as a View response action on the notification in the notification center. Pass displayImmediately: true to CommandResults.Success to open the visualizer the moment the command completes — useful for short commands where the response is the point:
return { success: true, message: "Access token issued.", data: { value: json, format: CommandResultFormat.Json, displayImmediately: true, },};return CommandResults.Success( message: "Access token issued.", result: json, resultFormat: CommandResultFormat.Json, displayImmediately: true);Replica aggregation
Section titled “Replica aggregation”When a resource has multiple replicas, the command runs on all instances in parallel. If more than one replica returns a payload, only the first successful payload is propagated to the caller; the others are discarded.
Invoke commands from the CLI
Section titled “Invoke commands from the CLI”Any command registered with WithCommand can be invoked from the terminal — including the built-in start, stop, and restart commands — using the aspire resource command:
aspire resource <resource-name> <command-name> [--apphost <path>]The CLI splits status output from payload output so the result is friendly to scripting:
- The
Messageand any progress text is written to stderr. - The
Data.Value(when present) is written to stdout verbatim.JsonandTextpayloads are emitted as-is;Markdownis rendered with terminal-styled headings, lists, and code blocks. - The exit code is
0on success and non-zero on failure or cancellation.
Combined, this means you can pipe the structured payload directly into jq, redirect it to a file, or branch on the exit code:
$ aspire resource cache issue-access-token | jq -r .tokeney7WqGxk2vL...The status message Access token issued. was written to stderr, so stdout stays clean for the pipe.
if aspire resource db migrate > migrations.json; then echo "Applied $(jq length migrations.json) migrations."else echo "Migration failed — see error above." exit 1fiCommand arguments
Section titled “Command arguments”Commands can declare input arguments that the dashboard renders as a prompt dialog before execution and that the CLI accepts as named --<name> options. Arguments are defined by setting CommandOptions.Arguments to an array of InteractionInput objects.
import {    createBuilder,    InputType,    type ExecuteCommandContext,    type ExecuteCommandResult,} from './.aspire/modules/aspire.mjs';
const builder = await createBuilder();
await builder    .addNodeApp("myservice", "./myservice", "src/server.ts")    .withCommand(        "send-message",        "Send Message",        async (context: ExecuteCommandContext): Promise<ExecuteCommandResult> => {            const args = await context.arguments();            const text = await args.requiredValue("text");            const repeat = Number(await args.value("repeat") ?? "1");
            return { success: true, message: `Sent '${text}' ${repeat} time(s).` };        },        {            commandOptions: {                arguments: [                    { name: "text",   label: "Message", inputType: InputType.Text,   required: true, maxLength: 200 },                    { name: "repeat", label: "Repeat",  inputType: InputType.Number, value: "1" },                ]            }        });
await builder.build().run();using Aspire.Hosting.ApplicationModel;
var builder = DistributedApplication.CreateBuilder(args);
builder.AddProject<Projects.MyService>("myservice") .WithCommand( name: "send-message", displayName: "Send Message", executeCommand: context => { var text = context.Arguments.GetString("text")!; var repeat = int.TryParse(context.Arguments.GetString("repeat"), out var r) ? r : 1;
for (var i = 0; i < repeat; i++) { context.Logger.LogInformation("{Text}", text); }
return Task.FromResult(CommandResults.Success($"Sent '{text}' {repeat} time(s).")); }, commandOptions: new CommandOptions { Arguments = [ new InteractionInput { Name = "text", Label = "Message", InputType = InputType.Text, Required = true, MaxLength = 200 }, new InteractionInput { Name = "repeat", Label = "Repeat", InputType = InputType.Number, Value = "1" }, ] });
builder.Build().Run();InteractionInput properties
Section titled “InteractionInput properties”Each InteractionInput object in the Arguments array configures one input field in the dashboard prompt and one named --<name> option for the CLI:
| Property | Type | Description |
|---|---|---|
Name / name | string | Unique identifier used to read the value at runtime. |
Label / label | string? / string | undefined | Optional human-readable label shown in the dashboard input dialog. When omitted, the name is used as the label. |
InputType / inputType | InputType | Controls the widget type. See the table below. |
Value / value | string? | Default value pre-filled in the dialog. |
Required / required | bool | When true, the built-in validator rejects empty submissions. |
MaxLength / maxLength | int? | Optional maximum character length for Text and SecretText inputs. |
Options / options | IReadOnlyList<KeyValuePair<string,string>>? / InteractionInputOption[] | undefined | Required for Choice inputs. Each option provides the submitted key and display value. |
The InputType enum controls how the dashboard renders the field and how built-in validation works:
| Value | Dashboard widget | CLI behavior | Built-in validation |
|---|---|---|---|
Text | Single-line text box | --<name> <value> string option | Required, MaxLength |
Number | Number input | --<name> <value> parsed as number | Must be a valid number |
Boolean | Checkbox | --<name> (sets true) or --<name> <value> | Must be true or false |
Choice | Drop-down list | --<name> <value> matching one of Options | Must be a member of Options |
SecretText | Masked text box | --<name> <value> string option | Required, MaxLength |
Read argument values at runtime
Section titled “Read argument values at runtime”The ExecuteCommandContext exposes an Arguments property (C#) / arguments() method (TypeScript) that returns an InteractionInputCollection for reading submitted values.
InteractionInputCollection (returned by await context.arguments()) provides idiomatic async helpers:
const args = await context.arguments();
const all    = await args.toArray();                 // InteractionInput[]const input  = await args.required("text");          // InteractionInput (throws if absent)const text   = await args.value("text");             // string | undefinedconst must   = await args.requiredValue("text");     // string (throws if absent or empty)
Use requiredValue for arguments declared with required: true to get a non-nullable string directly. Use value when the argument is optional and you want to handle the absent case yourself.
InteractionInputCollection provides typed convenience accessors for common argument reads:
var text = context.Arguments.GetString("text"); // string? — null when absent or emptyvar repeat = context.Arguments.GetInt32("repeat"); // int — throws when absent or unparseablevar shout = context.Arguments.GetBoolean("shout"); // bool — throws when absent or unparseablevar amount = context.Arguments.GetDouble("amount"); // double — throws when absent or unparseableGetString returns null when the argument is absent or empty. The numeric and boolean accessors throw InvalidOperationException when the value is missing and FormatException (or OverflowException for GetInt32 and GetDouble) when the value can’t be parsed. Use Required = true on InteractionInput to enforce presence before the callback runs, or call GetString first and parse the result manually if you need a fallback.
Pass arguments from the CLI
Section titled “Pass arguments from the CLI”When invoking a command from the CLI, supply argument values as named --<name> options after the command name. Each declared argument is exposed as its own option, so the order you pass them in doesn’t matter:
aspire resource myservice send-message --text "Hello world" --repeat 3 --apphost MyApp.AppHost.csprojIn the example above, --text sets the text argument and --repeat sets the repeat argument. Each option name matches the input’s Name, and a kebab-case alias is also accepted for multi-word names. For example, an input named LogLevel accepts both --LogLevel and --log-level.
If an argument’s option name matches one of the Aspire CLI’s own options (for example the global --log-level / -l option, or --apphost), the CLI binds it during its own parsing pass and it never reaches the command. Separate the command’s options from the CLI’s options with a -- delimiter to force them through:
aspire resource myservice configure -- --log-level DebugThe command’s --help output flags any names that collide with a CLI option and shows the -- form to use.
Argument validation
Section titled “Argument validation”Commands can run server-side validation before the callback executes. Declare a ValidateArguments callback on CommandOptions to add custom rules on top of the built-in required, max-length, and type checks.
import {    createBuilder,    InputType,    type ExecuteCommandContext,    type InputsDialogValidationContext,} from './.aspire/modules/aspire.mjs';
const builder = await createBuilder();
await builder    .addNodeApp("myservice", "./myservice", "src/server.ts")    .withCommand(        "deploy",        "Deploy",        async (context: ExecuteCommandContext) => {            const args = await context.arguments();            const target = await args.requiredValue("target");            // ... perform deployment ...            return { success: true, message: `Deployed to ${target}.` };        },        {            commandOptions: {                arguments: [                    { name: "target", label: "Target", inputType: InputType.Text, required: true }                ],                validateArguments: async (context: InputsDialogValidationContext) => {                    const inputs = await context.inputs();                    const target = await inputs.value("target");
                    if (target?.toLowerCase() === "prod") {                        await context.addValidationError("target", "Target must not be 'prod'.");                    }                }            }        });
await builder.build().run();using Aspire.Hosting.ApplicationModel;
var builder = DistributedApplication.CreateBuilder(args);
builder.AddProject<Projects.MyService>("myservice") .WithCommand( name: "deploy", displayName: "Deploy", executeCommand: context => { var target = context.Arguments.GetString("target")!; // ... perform deployment ... return Task.FromResult(CommandResults.Success($"Deployed to {target}.")); }, commandOptions: new CommandOptions { Arguments = [ new InteractionInput { Name = "target", Label = "Target", InputType = InputType.Text, Required = true }, ], ValidateArguments = context => { var target = context.Inputs.GetString("target"); if (string.Equals(target, "prod", StringComparison.OrdinalIgnoreCase)) { context.AddValidationError("target", "Target must not be 'prod'."); }
return Task.CompletedTask; } });
builder.Build().Run();Built-in validation runs first (required fields, max length, choice membership, and type coercion). If built-in validation passes, the ValidateArguments callback runs next. Either kind of validation failure prevents the command callback from executing and returns structured field errors to the caller:
- Dashboard: The input dialog stays open with inline field-level error messages.
- CLI / MCP: The command exits with a non-zero status and prints the field errors to stderr.
The ValidateArguments context exposes the same Inputs/inputs() surface as ExecuteCommandContext.Arguments/arguments(), so the same typed accessors work in both places.
Command visibility
Section titled “Command visibility”By default, commands registered with WithCommand are visible to both the Aspire dashboard and to API/MCP callers. The ResourceCommandVisibility enum is bit-combinable, so you can restrict or expand where a command appears by setting CommandOptions.Visibility:
| Value | Where the command is available |
|---|---|
ResourceCommandVisibility.UI | Dashboard and other UI clients only |
ResourceCommandVisibility.Api | API and MCP clients only |
ResourceCommandVisibility.UI | ResourceCommandVisibility.Api | Both UI and API/MCP (default) |
ResourceCommandVisibility.None | Hidden from all clients |
import {    createBuilder,    ResourceCommandVisibility,    CommandResultFormat,} from './.aspire/modules/aspire.mjs';
const builder = await createBuilder();
await builder    .addNodeApp("myservice", "./myservice", "src/server.ts")    // Only exposed through the API/MCP — not shown in the dashboard    .withCommand(        "get-metrics",        "Get Metrics",        async (_context) => {            return {                success: true,                message: "Metrics collected.",                data: { value: "{}", format: CommandResultFormat.Json },            };        },        {            commandOptions: {                visibility: ResourceCommandVisibility.Api,            }        });
await builder.build().run();using Aspire.Hosting.ApplicationModel;
var builder = DistributedApplication.CreateBuilder(args);
builder.AddProject<Projects.MyService>("myservice") // Only exposed through the API/MCP — not shown in the dashboard .WithCommand( name: "get-metrics", displayName: "Get Metrics", executeCommand: context => { // ... collect and return metrics ... return Task.FromResult(CommandResults.Success( message: "Metrics collected.", value: new CommandResultData { Value = "{}", Format = CommandResultFormat.Json })); }, commandOptions: new CommandOptions { Visibility = ResourceCommandVisibility.Api, });
builder.Build().Run();Command progress
Section titled “Command progress”Commands can display a progress dialog in the dashboard while they execute. The progress dialog shows an indeterminate progress indicator with an optional title, message, and cancel button. Set CommandOptions.Progress to a CommandProgressOptions value with a Message to enable this behavior — the dialog only appears when Message is set.
await api.withCommand( "seed-database", "Seed Database", async () => { await seedDatabase(); return { success: true, message: "Database seeded." }; }, { commandOptions: { iconName: "DatabaseArrowDown", progress: { title: "Seeding", message: "Populating database with sample data...", }, }, },);builder.AddProject<Projects.Api>("api") .WithCommand( name: "seed-database", displayName: "Seed Database", executeCommand: async context => { await SeedDatabaseAsync(context.CancellationToken); return CommandResults.Success("Database seeded."); }, commandOptions: new CommandOptions { IconName = "DatabaseArrowDown", Progress = new CommandProgressOptions { Title = "Seeding", Message = "Populating database with sample data..." } });When CommandProgressOptions.Message is set, the dashboard automatically shows the progress dialog when the command starts and closes it when the command completes. By default, a Cancel button is shown. Clicking it cancels the command via ExecuteCommandContext.CancellationToken.
To hide the cancel button, set HideCancelButton to true:
{ commandOptions: { progress: { message: "Finalizing...", hideCancelButton: true, }, },}var commandOptions = new CommandOptions{ Progress = new CommandProgressOptions { Message = "Finalizing...", HideCancelButton = true }};For more control over progress behavior, including custom work callbacks and programmatic dismissal, use IInteractionService.PromptProgressAsync directly. For more information, see Display progress.
Process-backed resource commands
Section titled “Process-backed resource commands”The WithProcessCommand API provides a reusable helper for the common pattern of exposing a local-tool invocation as a resource command. Instead of managing process start, stdout/stderr capture, and cancellation yourself inside a WithCommand callback, WithProcessCommand does that for you:
- Starts a local process from the AppHost machine using the provided executable path and arguments.
- Passes arguments as an argument list (not through a shell), so no shell-quoting is needed.
- Streams stdout and stderr to the command logger (visible in the Aspire dashboard and via
aspire logs <resource>). - Returns the captured output as bounded text (configurable via
MaxOutputLineCount). - Maps non-zero exit codes and cancellation to appropriate
ExecuteCommandResultvalues automatically.
Static process command
Section titled “Static process command”The simplest form takes the executable and an argument array directly:
import { createBuilder } from './.aspire/modules/aspire.mjs';
const builder = await createBuilder();
const cache = await builder.addRedis("cache");
await cache.withProcessCommand(    "node-version",    "Show Node.js version",    {        executablePath: "node",        arguments: ["--version"],    });
await builder.build().run();#pragma warning disable ASPIREPROCESSCOMMAND001
var builder = DistributedApplication.CreateBuilder(args);
builder.AddRedis("cache") .WithProcessCommand( commandName: "dotnet-version", displayName: "Show .NET version", executablePath: "dotnet", arguments: ["--version"]);
builder.Build().Run();When the command runs in the dashboard or CLI, dotnet --version (C#) or node --version (TypeScript) executes on the AppHost machine, and the version string is captured and displayed as the command output.
Dynamic process command
Section titled “Dynamic process command”When the command arguments depend on runtime context — for example, a dataset name supplied by the user through the dashboard’s argument dialog — build the process specification from the command execution context:
import {  createBuilder,  type ExecuteCommandContext,  InputType,} from './.aspire/modules/aspire.mjs';
const builder = await createBuilder();
const cache = await builder.addRedis('cache');
await cache.withProcessCommandFactory(  'seed-data',  'Seed data',  async (context: ExecuteCommandContext) => {    const args = await context.arguments();    const dataset = await args.requiredValue('dataset');
    return {      executablePath: 'node',      arguments: ['./scripts/seed-data.js', '--dataset', dataset],      environmentVariables: {        NODE_ENV: 'development',      },    };  },  {    commandOptions: {      arguments: [        {          name: 'dataset',          label: 'Dataset',          inputType: InputType.Text,          required: true,        },      ],    },    maxOutputLineCount: 20,  });
await builder.build().run();#pragma warning disable ASPIREPROCESSCOMMAND001#pragma warning disable ASPIREINTERACTION001
using Aspire.Hosting.ApplicationModel;
var builder = DistributedApplication.CreateBuilder(args);
builder.AddRedis("cache") .WithProcessCommand( commandName: "seed-data", displayName: "Seed data", createProcessSpec: context => new ProcessCommandSpec("dotnet") { Arguments = [ "run", "--project", "tools/SeedData", "--", context.Arguments.GetString("dataset") ?? "small", ], EnvironmentVariables = { ["ConnectionStrings__db"] = "Host=localhost;Database=db" }, }, options: new ProcessCommandOptions { MaxOutputLineCount = 20, Arguments = [ new InteractionInput { Name = "dataset", Label = "Dataset", InputType = InputType.Text, Required = true }, ], });
builder.Build().Run();In C#, the callback overload receives an ExecuteCommandContext. In TypeScript, withProcessCommandFactory receives the same execution context and returns the process specification. The dashboard renders the configured arguments as a prompt dialog before starting the process, and the entered values are available through the command context.
ProcessCommandSpec properties
Section titled “ProcessCommandSpec properties”The following configuration options are available for the process to run. In C#, these map to ProcessCommandSpec properties. In TypeScript, provide them as fields in the options object passed to withProcessCommand, or return them from the withProcessCommandFactory callback.
- Executable path — the path to the process to launch. Short names (no directory separator) are resolved from the AppHost’s
PATH. - Arguments — a list of arguments passed to the process. Each entry is treated as a separate argument, so no shell quoting or escaping is needed.
- Environment variables — additional key/value pairs set in the child process’s environment.
- Inherit environment variables — whether the child process inherits the AppHost process’s environment variables. Defaults to
true. - Standard input content — optional text written to the process’s stdin immediately after it starts.
- Working directory — the directory the process starts in. Defaults to the AppHost directory if not specified.
- Kill entire process tree — whether cancellation and disposal should terminate the whole child process tree. Defaults to
true.
ProcessCommandOptions
Section titled “ProcessCommandOptions”The following options control how WithProcessCommand handles the process result. In C#, set them on ProcessCommandOptions. In TypeScript, provide them in the same options object as the process configuration for withProcessCommand, or in the fourth argument to withProcessCommandFactory.
- Max output line count — the maximum number of combined stdout/stderr lines captured and returned as the command result. Defaults to 50. Lines beyond this limit are silently discarded (oldest lines first).
- Display immediately — when
true(the default), the captured output is automatically shown in the dashboard as soon as the command finishes. - Success exit codes — the list of process exit codes that are treated as a successful command invocation. Defaults to
[0].
Executable path resolution
Section titled “Executable path resolution”WithProcessCommand resolves the executable using the following rules:
- If
ExecutablePathis an absolute path or contains a path separator, it is used as-is. - Otherwise, the AppHost process’s
PATHis searched for the named executable. On Windows,PATHEXTextensions are also tried.
This means you can reference tools such as dotnet, node, or docker by short name as long as they are on the AppHost’s PATH when the app starts.
 Aspire