


Set up Azure Blob Storage in the AppHost
このコンテンツはまだ日本語訳がありません。

This article is the reference for the Aspire Azure Blob Storage Hosting integration. It enumerates the AppHost APIs — with examples for both AppHost.cs and apphost.mts — that you use to model Azure Storage and blob resources in your AppHost project.
If you’re new to the Azure Blob Storage integration, start with the Get started with Azure Blob Storage integrations guide. For how consuming apps read the connection information this page exposes, see Connect to Azure Blob Storage.
Installation
Section titled “Installation”To start building an Aspire app that uses Azure Blob Storage, install the 📦 Aspire.Hosting.Azure.Storage NuGet package:
aspire add azure-storageLearn more about aspire add in the command reference.
This updates your aspire.config.json with the Azure Storage hosting integration package:
{ "packages": { "Aspire.Hosting.Azure.Storage": "13.6.0" }}aspire add azure-storageLearn more about aspire add in the command reference.
Or, choose a manual installation approach:
#:package Aspire.Hosting.Azure.Storage@*<PackageReference Include="Aspire.Hosting.Azure.Storage" Version="*" />Add Azure Storage resource
Section titled “Add Azure Storage resource”Once you’ve installed the hosting integration in your AppHost project, you can add an Azure Storage account resource as shown in the following examples:
import { createBuilder } from './.aspire/modules/aspire.mjs';
const builder = await createBuilder();
const storage = await builder.addAzureStorage("storage");
// After adding all resources, run the app...await builder.build().run();var builder = DistributedApplication.CreateBuilder(args);
var storage = builder.AddAzureStorage("storage");
// After adding all resources, run the app...builder.Build().Run();Add blob resource
Section titled “Add blob resource”After creating an Azure Storage resource, you can add a blob service resource to it using AddBlobs (or addBlobs):
import { createBuilder } from './.aspire/modules/aspire.mjs';
const builder = await createBuilder();
const blobs = await builder.addAzureStorage("storage")    .addBlobs("blobs");
await builder.addProject("api", "../ExampleProject/ExampleProject.csproj")    .withReference(blobs)    .waitFor(blobs);
// After adding all resources, run the app...await builder.build().run();var builder = DistributedApplication.CreateBuilder(args);
var blobs = builder.AddAzureStorage("storage") .AddBlobs("blobs");
var exampleProject = builder.AddProject<Projects.ExampleProject>("apiservice") .WithReference(blobs) .WaitFor(blobs);
// After adding all resources, run the app...builder.Build().Run();The preceding code:
- Adds an Azure Storage resource named
storage. - Chains a call to
AddBlobs(oraddBlobs) to add a blob service resource namedblobs. - Adds the
blobsresource as a reference toExampleProjectand waits for it to be ready before starting the project.
Add blob container resource
Section titled “Add blob container resource”You can add a specific named blob container resource directly using AddBlobContainer (or addBlobContainer). This is useful when your app needs access to a specific container by name:
import { createBuilder } from './.aspire/modules/aspire.mjs';
const builder = await createBuilder();
const container = await builder.addAzureStorage("storage")    .addBlobContainer("uploads", { blobContainerName: "upload-data" });
await builder.addProject("api", "../ExampleProject/ExampleProject.csproj")    .withReference(container)    .waitFor(container);
// After adding all resources, run the app...await builder.build().run();var builder = DistributedApplication.CreateBuilder(args);
var container = builder.AddAzureStorage("storage") .AddBlobContainer("uploads", blobContainerName: "upload-data");
var exampleProject = builder.AddProject<Projects.ExampleProject>("apiservice") .WithReference(container) .WaitFor(container);
// After adding all resources, run the app...builder.Build().Run();The blobContainerName option (or options.blobContainerName in TypeScript) sets the actual name of the container in Azure Storage. When omitted, the resource name is used as the container name.
Configure Azurite emulator
Section titled “Configure Azurite emulator”During local development, you can configure the Azure Storage resource to use Azurite — the open-source Azure Storage emulator — instead of a real Azure subscription. Call RunAsEmulator (or runAsEmulator) on the storage resource:
import { createBuilder } from './.aspire/modules/aspire.mjs';
const builder = await createBuilder();
const blobs = await builder.addAzureStorage("storage")    .runAsEmulator()    .addBlobs("blobs");
await builder.addProject("api", "../ExampleProject/ExampleProject.csproj")    .withReference(blobs)    .waitFor(blobs);
// After adding all resources, run the app...await builder.build().run();var builder = DistributedApplication.CreateBuilder(args);
var blobs = builder.AddAzureStorage("storage") .RunAsEmulator() .AddBlobs("blobs");
var exampleProject = builder.AddProject<Projects.ExampleProject>("apiservice") .WithReference(blobs) .WaitFor(blobs);
// After adding all resources, run the app...builder.Build().Run();- Storage Emulator container imageMicrosoft Artifact Registrymcr.microsoft.com/azure-storage/azurite:3.35.0
Tags reflect the latest defaults on the microsoft/aspire main branch, and may be newer than the version pinned by the package you install.
Configure Azurite container ports
Section titled “Configure Azurite container ports”By default, the Azurite container exposes the following endpoints:
| Endpoint | Container port | Host port |
|---|---|---|
blob | 10000 | dynamic |
queue | 10001 | dynamic |
table | 10002 | dynamic |
To configure fixed host ports, use the port configuration methods on the Azurite container resource:
import { createBuilder } from './.aspire/modules/aspire.mjs';
const builder = await createBuilder();
const storage = await builder.addAzureStorage("storage")    .runAsEmulator({        configureContainer: async (azurite) => {            await azurite.withBlobPort(27000)                .withQueuePort(27001)                .withTablePort(27002);        }    });
// After adding all resources, run the app...await builder.build().run();var builder = DistributedApplication.CreateBuilder(args);
var storage = builder.AddAzureStorage("storage") .RunAsEmulator(azurite => { azurite.WithBlobPort(27000) .WithQueuePort(27001) .WithTablePort(27002); });
// After adding all resources, run the app...builder.Build().Run();Configure Azurite container with persistent lifetime
Section titled “Configure Azurite container with persistent lifetime”To configure the Azurite container with a persistent lifetime, call WithLifetime (or withLifetime) with ContainerLifetime.Persistent:
import { createBuilder, ContainerLifetime } from './.aspire/modules/aspire.mjs';
const builder = await createBuilder();
const storage = await builder.addAzureStorage("storage")    .runAsEmulator({        configureContainer: async (azurite) => {            await azurite.withLifetime(ContainerLifetime.Persistent);        }    });
// After adding all resources, run the app...await builder.build().run();var builder = DistributedApplication.CreateBuilder(args);
var storage = builder.AddAzureStorage("storage") .RunAsEmulator(azurite => { azurite.WithLifetime(ContainerLifetime.Persistent); });
// After adding all resources, run the app...builder.Build().Run();Configure Azurite container with data volume
Section titled “Configure Azurite container with data volume”To add a data volume to the Azurite container, call WithDataVolume (or withDataVolume) on the emulator resource:
import { createBuilder } from './.aspire/modules/aspire.mjs';
const builder = await createBuilder();
const storage = await builder.addAzureStorage("storage")    .runAsEmulator({        configureContainer: async (azurite) => {            await azurite.withDataVolume();        }    });
// After adding all resources, run the app...await builder.build().run();var builder = DistributedApplication.CreateBuilder(args);
var storage = builder.AddAzureStorage("storage") .RunAsEmulator(azurite => { azurite.WithDataVolume(); });
// After adding all resources, run the app...builder.Build().Run();The data volume is used to persist Azurite data outside the lifecycle of its container. The data volume is mounted at the /data path in the Azurite container and when a name parameter isn’t provided, the name is formatted as .azurite/{resource name}. For more information on data volumes and details on why they’re preferred over bind mounts, see Docker docs: Volumes.
Configure Azurite container with data bind mount
Section titled “Configure Azurite container with data bind mount”To add a data bind mount to the Azurite container, call WithDataBindMount (or withDataBindMount) on the emulator resource:
import { createBuilder } from './.aspire/modules/aspire.mjs';
const builder = await createBuilder();
const storage = await builder.addAzureStorage("storage")    .runAsEmulator({        configureContainer: async (azurite) => {            await azurite.withDataBindMount({ path: "../azurite/data" });        }    });
// After adding all resources, run the app...await builder.build().run();var builder = DistributedApplication.CreateBuilder(args);
var storage = builder.AddAzureStorage("storage") .RunAsEmulator(azurite => { azurite.WithDataBindMount("../azurite/data"); });
// After adding all resources, run the app...builder.Build().Run();Data bind mounts rely on the host machine’s filesystem to persist the Azurite data across container restarts. The data bind mount is mounted at the ../azurite/data path on the host machine relative to the AppHost directory in the Azurite container. For more information on data bind mounts, see Docker docs: Bind mounts.
Connect to an existing Azure Storage account
Section titled “Connect to an existing Azure Storage account”You might have an existing Azure Storage account that you want to connect to instead of provisioning a new one. Chain a call to AsExisting (or asExisting) on the storage resource:
import { createBuilder } from './.aspire/modules/aspire.mjs';
const builder = await createBuilder();
const existingStorageName = await builder.addParameter("existingStorageName");const existingStorageResourceGroup = await builder.addParameter("existingStorageResourceGroup");
const blobs = await builder.addAzureStorage("storage")    .asExisting(existingStorageName, { resourceGroup: existingStorageResourceGroup })    .addBlobs("blobs");
await builder.addProject("api", "../ExampleProject/ExampleProject.csproj")    .withReference(blobs);
// After adding all resources, run the app...await builder.build().run();var builder = DistributedApplication.CreateBuilder(args);
var existingStorageName = builder.AddParameter("existingStorageName");var existingStorageResourceGroup = builder.AddParameter("existingStorageResourceGroup");
var blobs = builder.AddAzureStorage("storage") .AsExisting(existingStorageName, existingStorageResourceGroup) .AddBlobs("blobs");
builder.AddProject<Projects.ExampleProject>("apiservice") .WithReference(blobs);
// After adding all resources, run the app...builder.Build().Run();Connect to storage resources
Section titled “Connect to storage resources”When the Aspire AppHost runs, the storage resources can be accessed by external tools, such as the Azure Storage Explorer. If your storage resource is running locally using Azurite, it will automatically be picked up by the Azure Storage Explorer.
To connect to the storage resource from Azure Storage Explorer, follow these steps:
-
Run the Aspire AppHost.
-
Open the Azure Storage Explorer.
-
View the Explorer pane.
-
Select the Refresh all link to refresh the list of storage accounts.
-
Expand the Emulator & Attached node.
-
Expand the Storage Accounts node.
-
You should see a storage account with your resource’s name as a prefix:
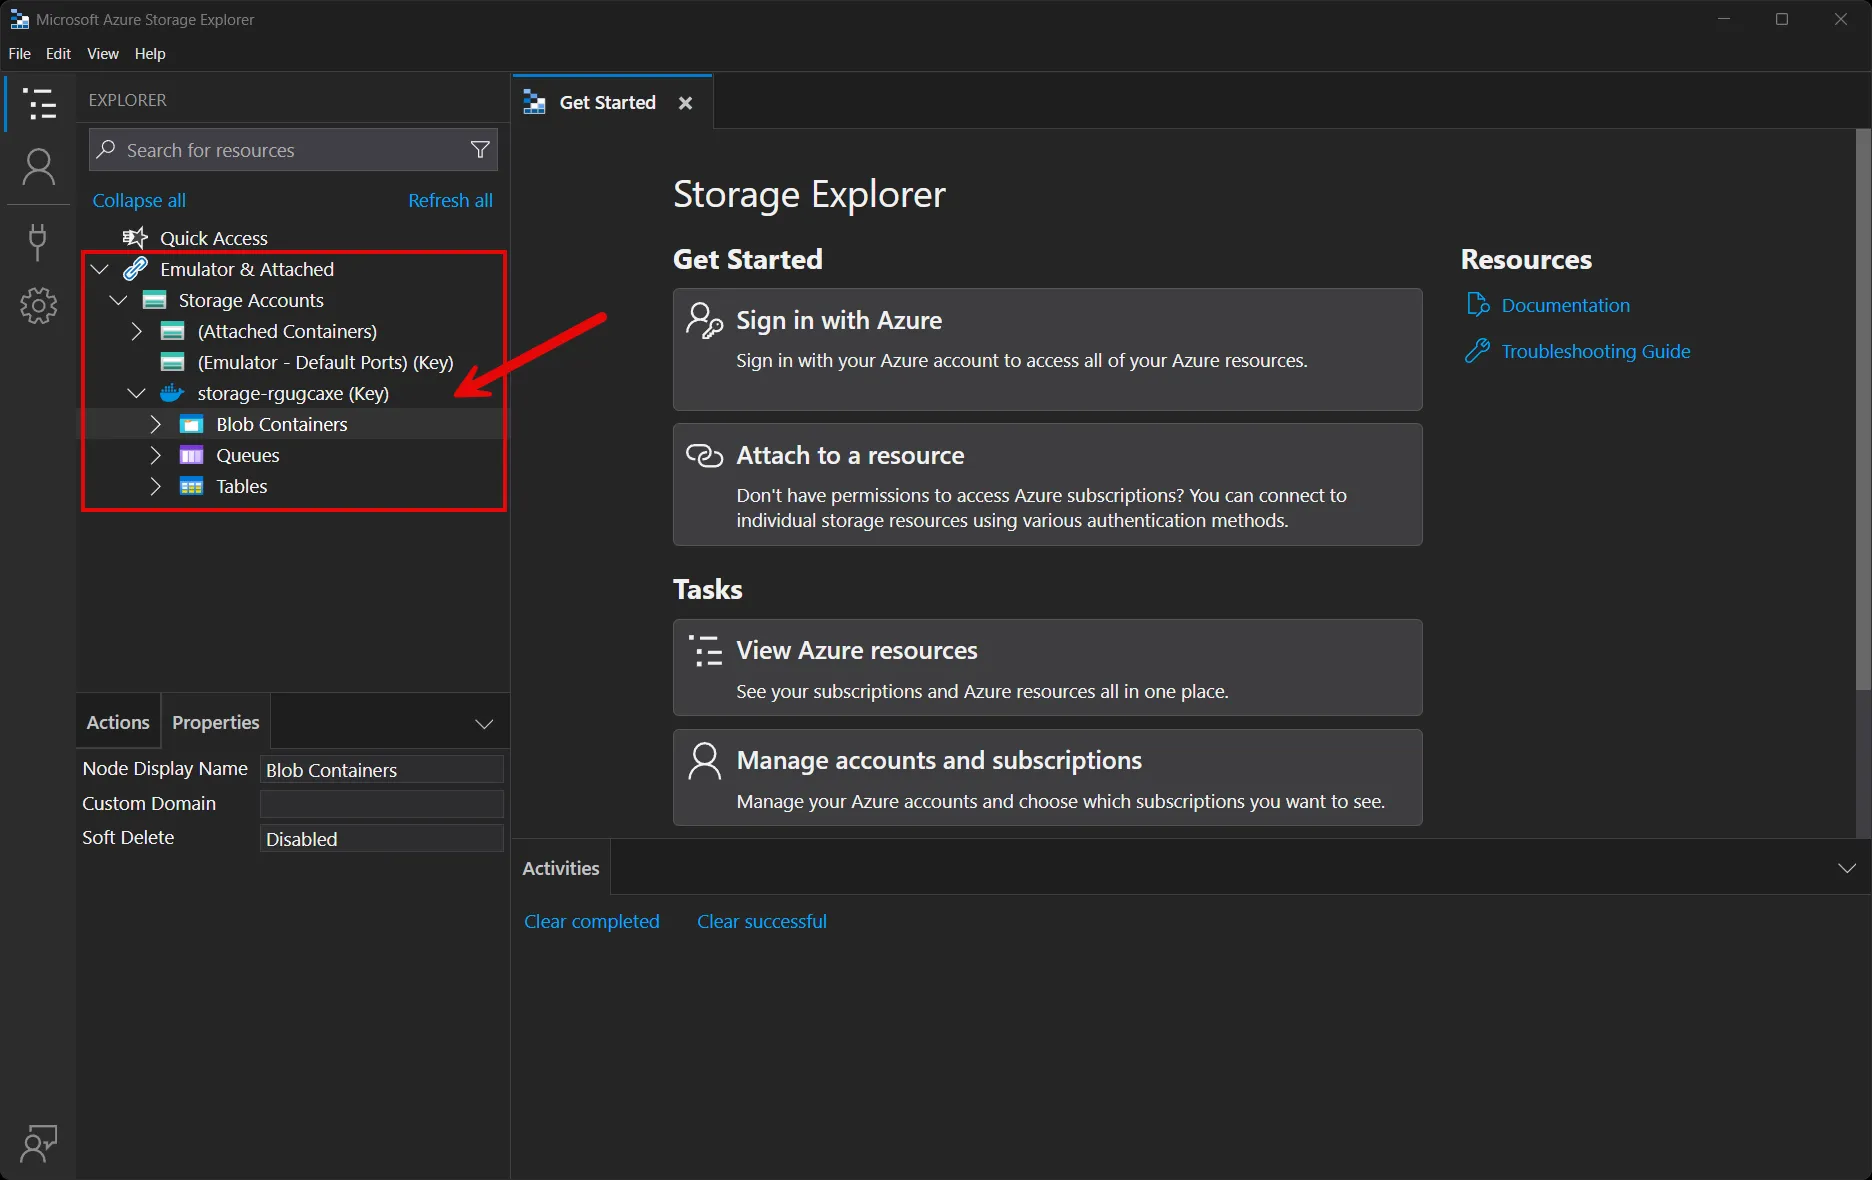
You’re free to explore the storage account and its contents using the Azure Storage Explorer. For more information, see Get started with Storage Explorer.
Role-based access
Section titled “Role-based access”By default, Aspire assigns the StorageBlobDataContributor role to the resource when provisioning in Azure. You can override the default roles using WithRoleAssignments (or withRoleAssignments) on the consuming resource:
import { createBuilder, AzureStorageRole } from './.aspire/modules/aspire.mjs';
const builder = await createBuilder();
const storage = await builder.addAzureStorage("storage");const blobs = await storage.addBlobs("blobs");
await builder.addProject("api", "../ExampleProject/ExampleProject.csproj")    .withReference(blobs)    .withRoleAssignments(storage, [AzureStorageRole.StorageBlobDataReader]);
// After adding all resources, run the app...await builder.build().run();var builder = DistributedApplication.CreateBuilder(args);
var storage = builder.AddAzureStorage("storage");var blobs = storage.AddBlobs("blobs");
builder.AddProject<Projects.ExampleProject>("apiservice") .WithReference(blobs) .WithRoleAssignments(storage, AzureStorageRole.StorageBlobDataReader);
// After adding all resources, run the app...builder.Build().Run();The AzureStorageRole enum exposes all Azure Storage built-in roles. Common blob-related roles include:
| Role | Description |
|---|---|
StorageBlobDataContributor | Read, write, and delete blob containers and data (default) |
StorageBlobDataOwner | Full access to blob containers and data, including POSIX access control |
StorageBlobDataReader | Read and list blob containers and data |
StorageBlobDelegator | Get a user delegation key for signing SAS tokens |
For more information on Azure Storage role-based access control, see Azure built-in roles for Storage.
Provisioning-generated Bicep
Section titled “Provisioning-generated Bicep”If you’re new to Bicep, it’s a domain-specific language for defining Azure resources. With Aspire, you don’t need to write Bicep by hand — the provisioning APIs generate Bicep for you. When you publish your app, the generated Bicep is output alongside the manifest file. When you add an Azure Storage resource with blob storage, the following Bicep is generated:
@description('The location for the resource(s) to be deployed.')param location string = resourceGroup().location
param principalId string
param principalType string
resource storage 'Microsoft.Storage/storageAccounts@2024-01-01' = {  name: take('storage${uniqueString(resourceGroup().id)}', 24)  kind: 'StorageV2'  location: location  sku: {    name: 'Standard_GRS'  }  properties: {    accessTier: 'Hot'    allowSharedKeyAccess: false    minimumTlsVersion: 'TLS1_2'    networkAcls: {      defaultAction: 'Allow'    }  }  tags: {    'aspire-resource-name': 'storage'  }}
resource blobs 'Microsoft.Storage/storageAccounts/blobServices@2024-01-01' = {  name: 'default'  parent: storage}
resource storage_StorageBlobDataContributor 'Microsoft.Authorization/roleAssignments@2022-04-01' = {  name: guid(storage.id, principalId, subscriptionResourceId('Microsoft.Authorization/roleDefinitions', 'ba92f5b4-2d11-453d-a403-e96b0029c9fe'))  properties: {    principalId: principalId    roleDefinitionId: subscriptionResourceId('Microsoft.Authorization/roleDefinitions', 'ba92f5b4-2d11-453d-a403-e96b0029c9fe')    principalType: principalType  }  scope: storage}
output blobEndpoint string = storage.properties.primaryEndpoints.blob
output name string = storage.name
The preceding Bicep provisions an Azure Storage account with a blob service, Standard GRS redundancy, TLS 1.2 minimum, and role assignments for blob data access.
The generated Bicep is a starting point and is influenced by changes to the provisioning infrastructure in C#. Customizations to the Bicep file directly will be overwritten, so make changes through the C# provisioning APIs to ensure they are reflected in the generated files.
Customize provisioning infrastructure
Section titled “Customize provisioning infrastructure”All Aspire Azure resources are subclasses of the AzureProvisioningResource type. This type enables the customization of the generated Bicep by providing a fluent API to configure the Azure resources using the ConfigureInfrastructure (or configureInfrastructure) API. For example, you can configure the sku, accessTier, and more:
import { createBuilder } from './.aspire/modules/aspire.mjs';
const builder = await createBuilder();
const storage = await builder.addAzureStorage("storage")    .configureInfrastructure(async (infra) => {        // Access and modify the provisioned infrastructure        // For example, add custom tags or modify SKU settings.    });
const blobs = await storage.addBlobs("blobs");
// After adding all resources, run the app...await builder.build().run();var builder = DistributedApplication.CreateBuilder(args);
var storage = builder.AddAzureStorage("storage") .ConfigureInfrastructure(infra => { var storageAccount = infra.GetProvisionableResources() .OfType<StorageAccount>() .Single();
storageAccount.Sku = new StorageSku { Name = StorageSkuName.PremiumLrs }; storageAccount.AccessTier = StorageAccountAccessTier.Premium; storageAccount.Tags.Add("environment", "production"); });
var blobs = storage.AddBlobs("blobs");
// After adding all resources, run the app...builder.Build().Run();For more information, see Customize Azure resources. For the full list of configurable properties, see the Azure.Provisioning.Storage API documentation.
Connection properties
Section titled “Connection properties”For the full reference of Azure Blob Storage connection properties — and how consuming apps in C#, TypeScript, Python, and Go read them — see Connect to Azure Blob Storage.
Hosting integration health checks
Section titled “Hosting integration health checks”The Azure Blob Storage hosting integration automatically adds a health check for the storage resource. The health check verifies that the storage service is reachable and can accept requests.
 Aspire