


Keycloak integration
Keycloak is an open-source Identity and Access Management solution aimed at modern applications and services. The Keycloak integration enables you to connect to existing Keycloak instances or create new instances from Aspire with the quay.io/keycloak/keycloak container image.
Hosting integration
Section titled “Hosting integration”The Keycloak hosting integration models the server as the KeycloakResource type. To access this type and APIs, add the 📦 Aspire.Hosting.Keycloak NuGet package in your AppHost project:
aspire add keycloakThe Aspire CLI is interactive, be sure to select the appropriate search result when prompted:
Select an integration to add:
> keycloak (Aspire.Hosting.Keycloak)> Other results listed as selectable options...#:package Aspire.Hosting.Keycloak@*<PackageReference Include="Aspire.Hosting.Keycloak" Version="*" />Add Keycloak resource
Section titled “Add Keycloak resource”In your AppHost, call AddKeycloakaddKeycloak to add and return a Keycloak resource builder:
import { createBuilder } from './.aspire/modules/aspire.mjs';
const builder = await createBuilder();
const keycloak = await builder.addKeycloak("keycloak", { port: 8080 });
const apiService = await builder.addProject("apiservice", "../ApiService/ApiService.csproj");await apiService.withReference(keycloak);await apiService.waitFor(keycloak);
const webfrontend = await builder.addProject("webfrontend", "../Web/Web.csproj");await webfrontend.withExternalHttpEndpoints();await webfrontend.withReference(keycloak);await webfrontend.withReference(apiService);await webfrontend.waitFor(apiService);
await builder.build().run();var builder = DistributedApplication.CreateBuilder(args);
var keycloak = builder.AddKeycloak("keycloak", 8080);
var apiService = builder.AddProject<Projects.ApiService>("apiservice") .WithReference(keycloak) .WaitFor(keycloak);
var webfrontend = builder.AddProject<Projects.Web>("webfrontend") .WithExternalHttpEndpoints() .WithReference(keycloak) .WithReference(apiService) .WaitFor(apiService);
builder.Build().Run();When Aspire adds a container image to the AppHost, it creates a new Keycloak instance on your local machine. The Keycloak resource includes default credentials:
KEYCLOAK_ADMIN: A value ofadminKEYCLOAK_ADMIN_PASSWORD: Random password generated using the default password parameter
When the AppHost runs, the password is stored in the AppHost’s secret store in the Parameters section:
{ "Parameters:keycloak-password": "<THE_GENERATED_PASSWORD>"}- Keycloak container imageQuay.ioquay.io/keycloak/keycloak:26.6
Tags reflect the latest defaults on the microsoft/aspire main branch, and may be newer than the version pinned by the package you install.
Add Keycloak resource with data volume
Section titled “Add Keycloak resource with data volume”To add a data volume to the Keycloak resource, call the WithDataVolumewithDataVolume method on the Keycloak resource:
import { createBuilder } from './.aspire/modules/aspire.mjs';
const builder = await createBuilder();
const keycloak = await builder.addKeycloak("keycloak", { port: 8080 });await keycloak.withDataVolume();
const apiService = await builder.addProject("apiservice", "../ApiService/ApiService.csproj");await apiService.withReference(keycloak);await apiService.waitFor(keycloak);
await builder.build().run();var builder = DistributedApplication.CreateBuilder(args);
var keycloak = builder.AddKeycloak("keycloak", 8080) .WithDataVolume();
var apiService = builder.AddProject<Projects.ApiService>("apiservice") .WithReference(keycloak) .WaitFor(keycloak);
builder.Build().Run();The data volume is used to persist the Keycloak data outside the lifecycle of its container. The data volume is mounted at the /opt/keycloak/data path in the Keycloak container.
Add Keycloak resource with data bind mount
Section titled “Add Keycloak resource with data bind mount”To add a data bind mount to the Keycloak resource, call the WithDataBindMountwithDataBindMount method:
import { createBuilder } from './.aspire/modules/aspire.mjs';
const builder = await createBuilder();
const keycloak = await builder.addKeycloak("keycloak", { port: 8080 });await keycloak.withDataBindMount("/path/to/keycloak/data");
const apiService = await builder.addProject("apiservice", "../ApiService/ApiService.csproj");await apiService.withReference(keycloak);await apiService.waitFor(keycloak);
await builder.build().run();var builder = DistributedApplication.CreateBuilder(args);
var keycloak = builder.AddKeycloak("keycloak", 8080) .WithDataBindMount(@"C:\Keycloak\Data");
var apiService = builder.AddProject<Projects.ApiService>("apiservice") .WithReference(keycloak) .WaitFor(keycloak);
builder.Build().Run();Add Keycloak resource with parameters
Section titled “Add Keycloak resource with parameters”When you want to explicitly provide the admin username and password used by the container image, you can provide these credentials as parameters:
import { createBuilder } from './.aspire/modules/aspire.mjs';
const builder = await createBuilder();
const username = await builder.addParameter("username");const password = await builder.addParameter("password", { secret: true });
const keycloak = await builder.addKeycloak("keycloak", {  port: 8080,  adminUsername: username,  adminPassword: password,});
const apiService = await builder.addProject("apiservice", "../ApiService/ApiService.csproj");await apiService.withReference(keycloak);await apiService.waitFor(keycloak);
await builder.build().run();var builder = DistributedApplication.CreateBuilder(args);
var username = builder.AddParameter("username");var password = builder.AddParameter("password", secret: true);
var keycloak = builder.AddKeycloak("keycloak", 8080, username, password);
var apiService = builder.AddProject<Projects.ApiService>("apiservice") .WithReference(keycloak) .WaitFor(keycloak);
builder.Build().Run();For more information on providing parameters, see External parameters.
Add Keycloak resource with realm import
Section titled “Add Keycloak resource with realm import”To import a realm into Keycloak, call the WithRealmImportwithRealmImport method:
import { createBuilder } from './.aspire/modules/aspire.mjs';
const builder = await createBuilder();
const keycloak = await builder.addKeycloak("keycloak", { port: 8080 });await keycloak.withRealmImport("./Realms");
const apiService = await builder.addProject("apiservice", "../ApiService/ApiService.csproj");await apiService.withReference(keycloak);await apiService.waitFor(keycloak);
await builder.build().run();var builder = DistributedApplication.CreateBuilder(args);
var keycloak = builder.AddKeycloak("keycloak", 8080) .WithRealmImport("./Realms");
var apiService = builder.AddProject<Projects.ApiService>("apiservice") .WithReference(keycloak) .WaitFor(keycloak);
builder.Build().Run();The realm import files are copied to /opt/keycloak/data/import in the
Keycloak container. Realm import files are JSON files that represent the realm
configuration.
Production alternatives for realm seeding
Section titled “Production alternatives for realm seeding”For production environments, consider these alternatives to seed your Keycloak instance:
Custom Keycloak image: Bake realm files into a custom image. Apply
WithDockerfilewithDockerfile to the Keycloak resource instead of replacing AddKeycloak
with AddContaineraddContainer:
FROM quay.io/keycloak/keycloak:25.0.0COPY ./realms/*.json /opt/keycloak/data/import/import { createBuilder } from './.aspire/modules/aspire.mjs';
const builder = await createBuilder();
const keycloak = await builder.addKeycloak("keycloak", { port: 8080 });await keycloak.withDockerfile("./keycloak");
const apiService = await builder.addProject("apiservice", "../ApiService/ApiService.csproj");await apiService.withReference(keycloak);await apiService.waitFor(keycloak);
await builder.build().run();var builder = DistributedApplication.CreateBuilder(args);
var keycloak = builder.AddKeycloak("keycloak", 8080) .WithDockerfile("./keycloak");
var apiService = builder.AddProject<Projects.ApiService>("apiservice") .WithReference(keycloak) .WaitFor(keycloak);
builder.Build().Run();apphost.mtskeycloak/ Dockerfile realms/ demo-realm.jsonAppHost.cskeycloak/ Dockerfile realms/ demo-realm.jsonInitialization service: Create a separate initialization service or job that uses the Keycloak Admin REST API or Keycloak Admin Client to create and configure realms, clients, and users when the Keycloak instance first starts.
Infrastructure as Code: Use tools like Terraform with the Keycloak provider to manage realm configuration separately from your application deployment.
Export telemetry to OTLP collector
Section titled “Export telemetry to OTLP collector”Keycloak containers can export telemetry to your OTLP collector using the WithOtlpExporterwithOtlpExporter method:
import { createBuilder } from './.aspire/modules/aspire.mjs';
const builder = await createBuilder();
const keycloak = await builder.addKeycloak("keycloak", { port: 8080 });await keycloak.withOtlpExporter();
const apiService = await builder.addProject("apiservice", "../ApiService/ApiService.csproj");await apiService.withReference(keycloak);await apiService.waitFor(keycloak);
await builder.build().run();var builder = DistributedApplication.CreateBuilder(args);
var keycloak = builder.AddKeycloak("keycloak", 8080) .WithOtlpExporter();
var apiService = builder.AddProject<Projects.ApiService>("apiservice") .WithReference(keycloak) .WaitFor(keycloak);
builder.Build().Run();This enables Keycloak to send traces, metrics, and logs to the Aspire dashboard, providing better observability for your authentication flows.
Use PostgreSQL with the Community Toolkit extension
Section titled “Use PostgreSQL with the Community Toolkit extension”The 📦 CommunityToolkit.Aspire.Hosting.Keycloak.Extensions package decorates the official KeycloakResource with WithPostgreswithPostgres. It configures Keycloak to use an official PostgresDatabaseResource, supplies the JDBC URL and credentials, and makes Keycloak wait for the database.
aspire add communitytoolkit-keycloak-extensionsThe Aspire CLI is interactive, be sure to select the appropriate search result when prompted:
Select an integration to add:
> communitytoolkit-keycloak-extensions (CommunityToolkit.Aspire.Hosting.Keycloak.Extensions)> Other results listed as selectable options...#:package CommunityToolkit.Aspire.Hosting.Keycloak.Extensions@*<PackageReference Include="CommunityToolkit.Aspire.Hosting.Keycloak.Extensions" Version="*" />import { createBuilder } from './.aspire/modules/aspire.mjs';
const builder = await createBuilder();
const postgres = await builder.addPostgres('keycloak-postgres');const database = await postgres.addDatabase('keycloakdb');
const keycloak = await builder.addKeycloak('keycloak', { port: 8080 });await keycloak.withPostgres(database);
await builder.build().run();var builder = DistributedApplication.CreateBuilder(args);
var postgres = builder.AddPostgres("keycloak-postgres");var database = postgres.AddDatabase("keycloakdb");
var keycloak = builder.AddKeycloak("keycloak", 8080) .WithPostgres(database);
builder.Build().Run();By default, WithPostgres uses the PostgreSQL server’s username and password parameters. Its optional arguments let you supply different username and password parameter resources and set xaEnabled when Keycloak needs XA transactions.
Hosting integration health checks
Section titled “Hosting integration health checks”The Keycloak hosting integration automatically adds an HTTP health check
against the management endpoint’s /health/ready path.
Client integration
Section titled “Client integration”To get started with the Keycloak client integration, install the 📦 Aspire.Keycloak.Authentication NuGet package in your ASP.NET Core project:
dotnet add package Aspire.Keycloak.Authentication#:package Aspire.Keycloak.Authentication@*<PackageReference Include="Aspire.Keycloak.Authentication" Version="*" />The Keycloak client integration registers JwtBearer and OpenId Connect authentication handlers in the DI container for connecting to a Keycloak server.
Add JWT bearer authentication
Section titled “Add JWT bearer authentication”In the Program.cs file of your ASP.NET Core API project, call the AddKeycloakJwtBearer extension method to add JwtBearer authentication:
builder.Services.AddAuthentication()    .AddKeycloakJwtBearer(        serviceName: "keycloak",        realm: "api",        options =>        {            options.Audience = "store.api";
// For development only - disable HTTPS metadata validation // In production, use explicit Authority configuration instead if (builder.Environment.IsDevelopment()) { options.RequireHttpsMetadata = false; } });Add OpenId Connect authentication
Section titled “Add OpenId Connect authentication”In the Program.cs file of your API-consuming project (for example, Blazor), call the AddKeycloakOpenIdConnect extension method to add OpenId Connect authentication:
builder.Services.AddAuthentication(OpenIdConnectDefaults.AuthenticationScheme) .AddKeycloakOpenIdConnect( serviceName: "keycloak", realm: "api", options => { options.ClientId = "StoreWeb"; options.ResponseType = OpenIdConnectResponseType.Code; options.Scope.Add("store:all"); });Authentication flows
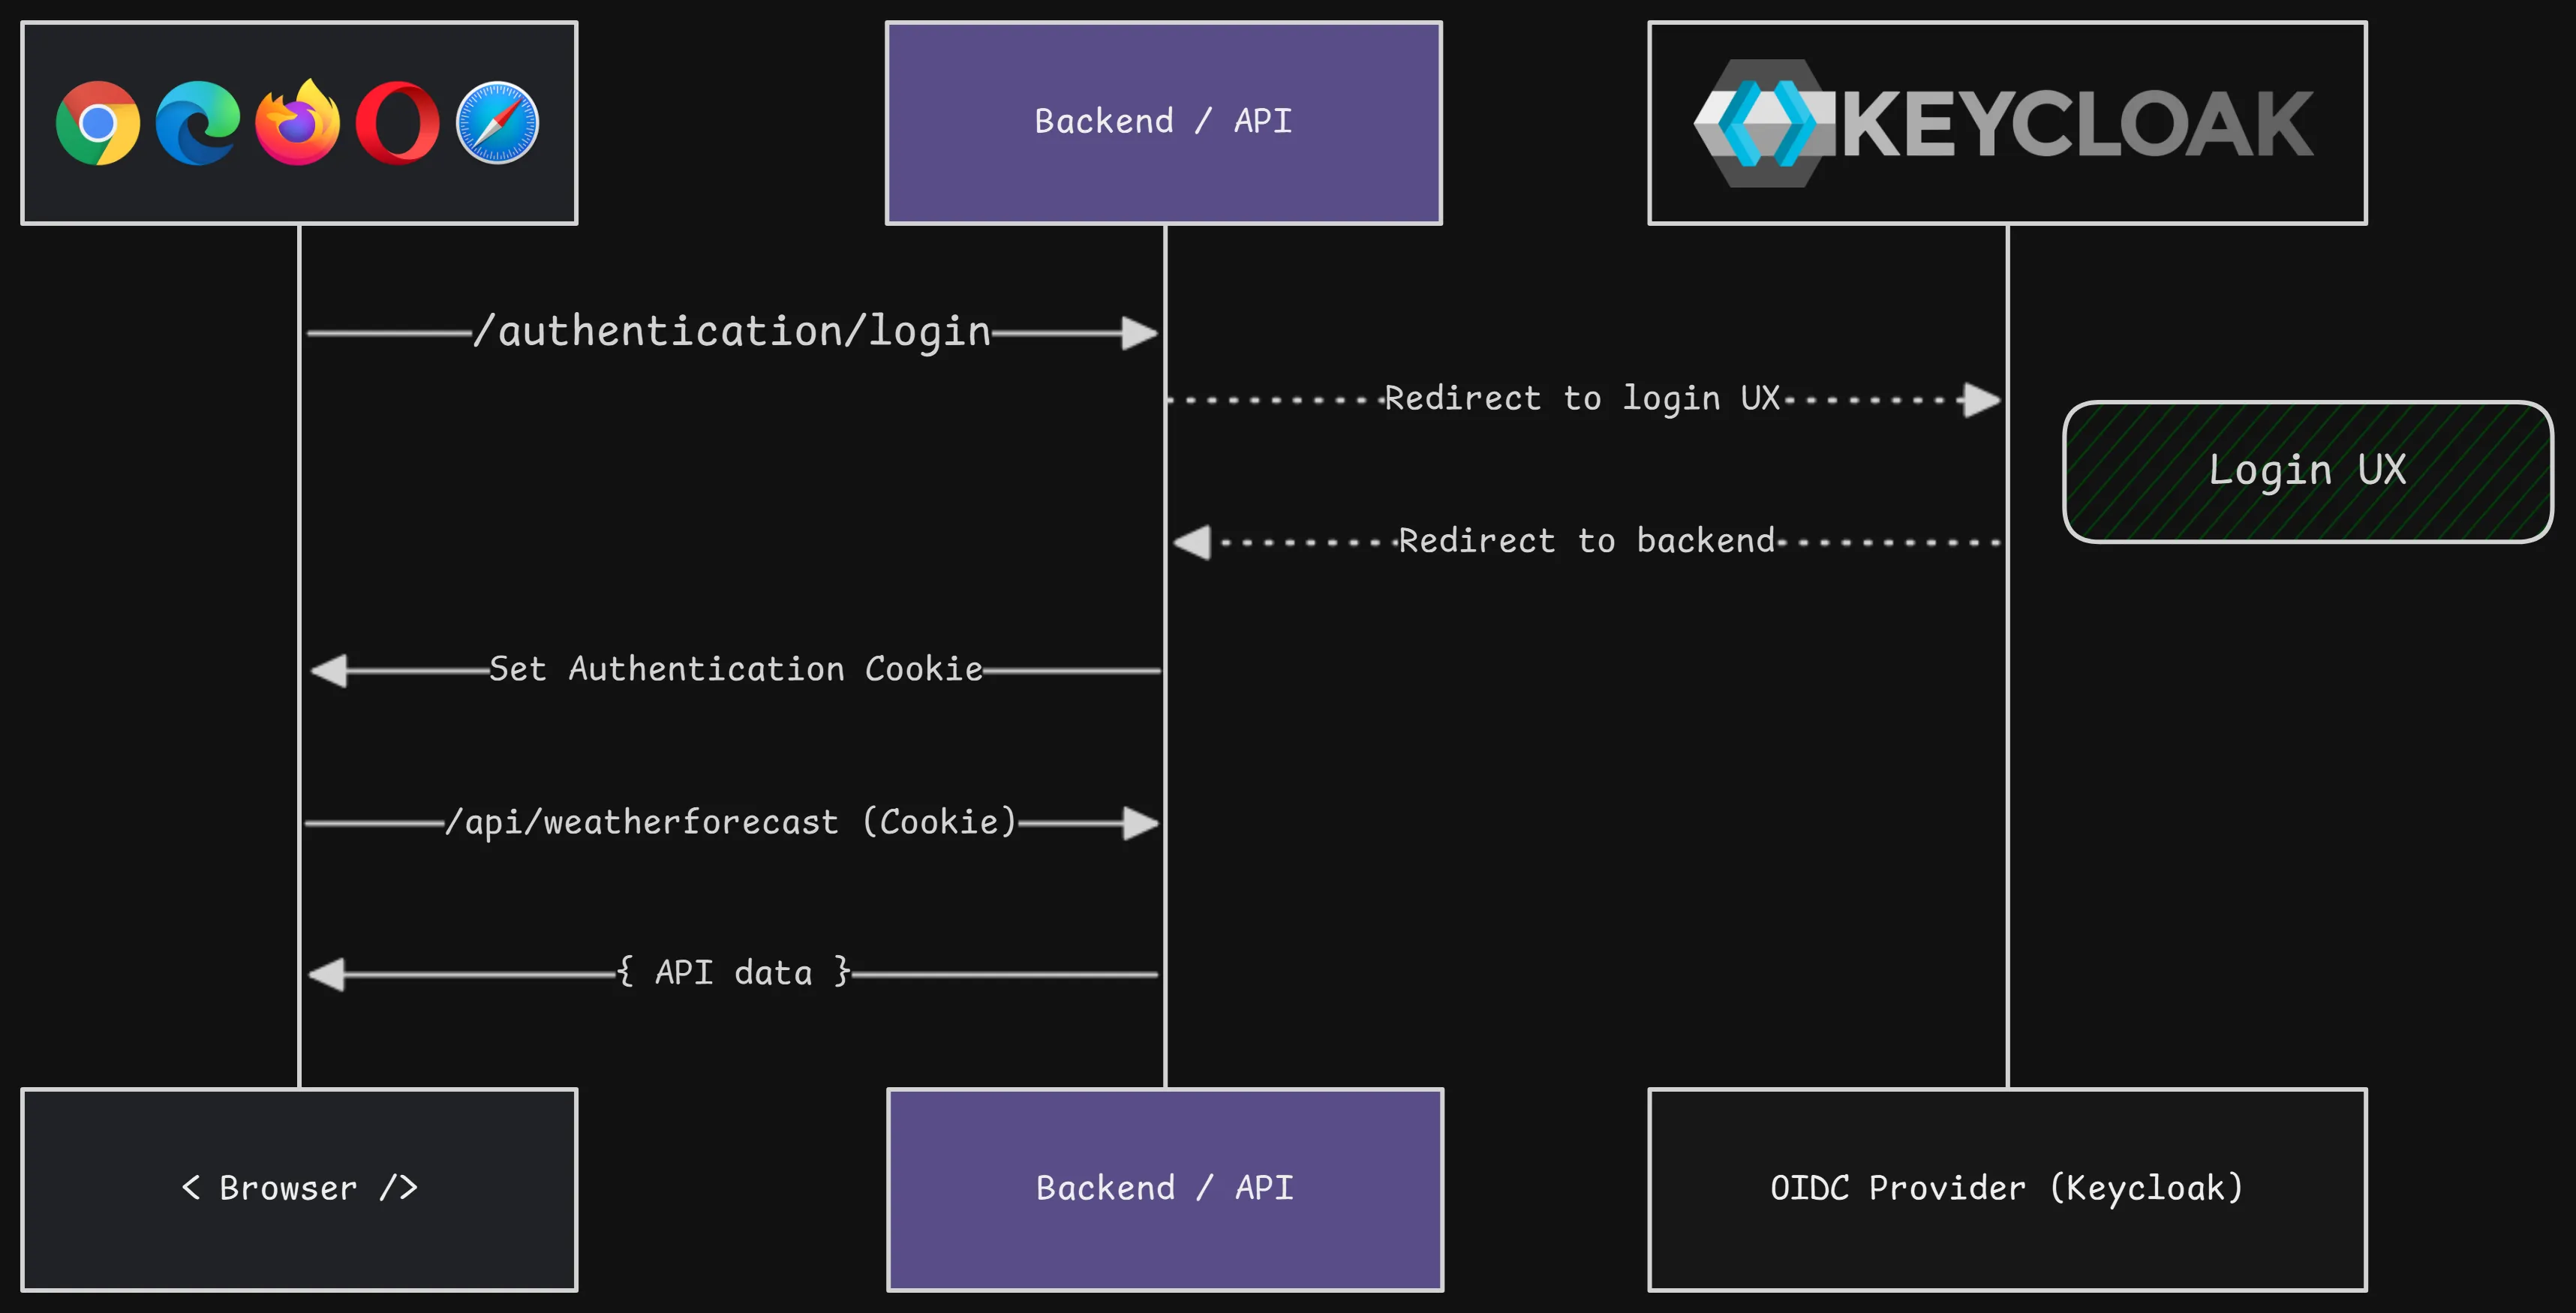
Section titled “Authentication flows”When the backend also serves the API, the browser signs in through Keycloak and uses an authentication cookie for subsequent requests to the backend:
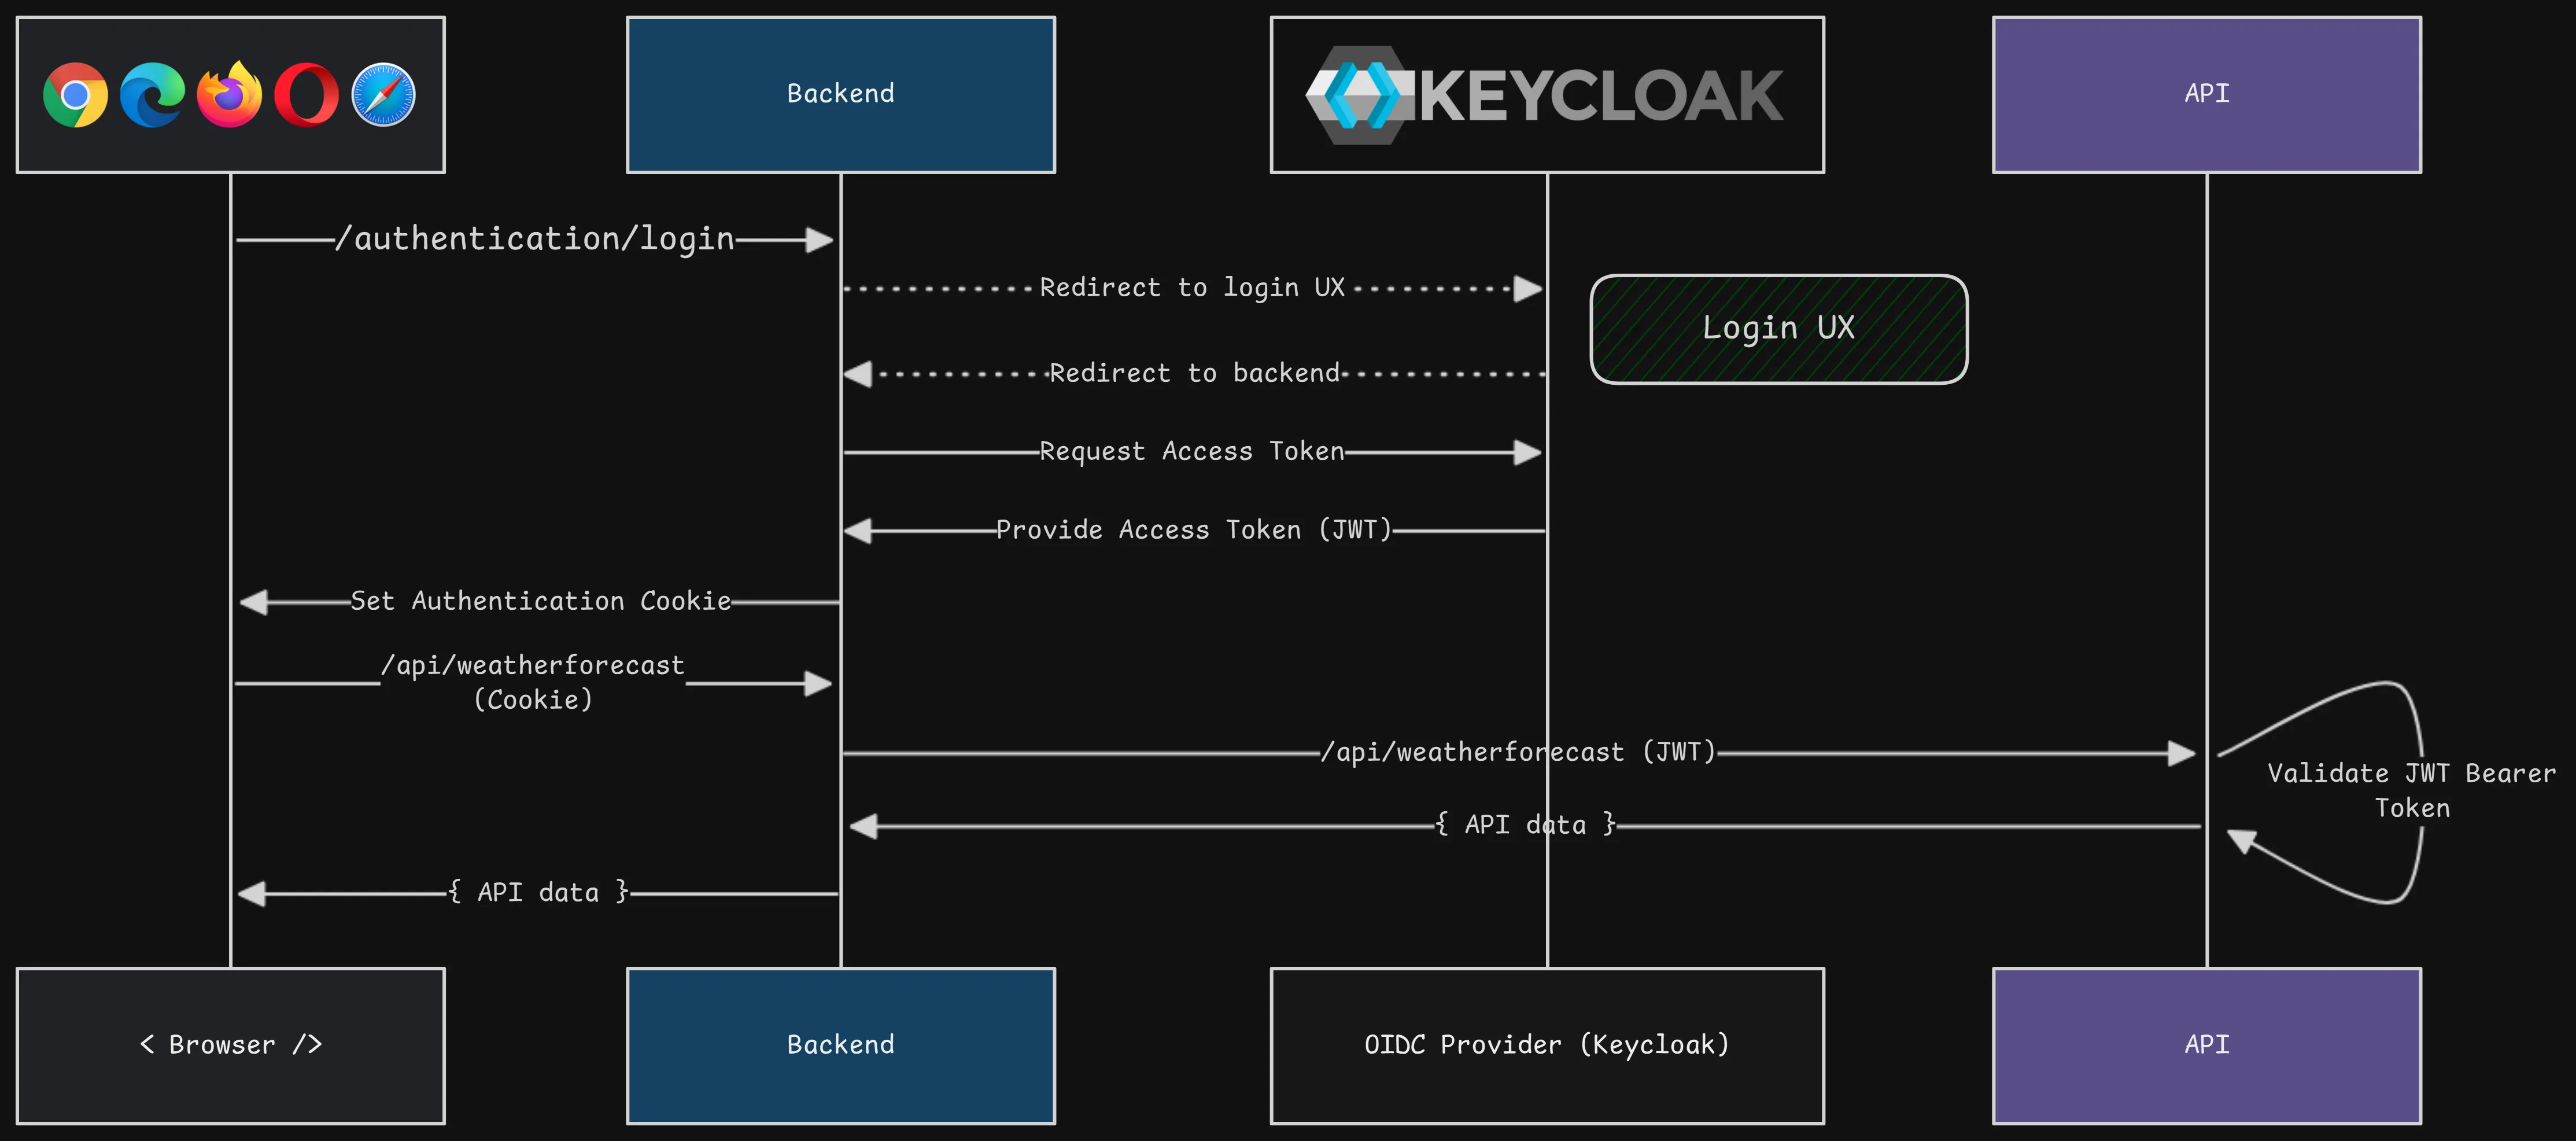
When the backend calls a separate API, it also obtains an access token from Keycloak and forwards that token to the API. The API validates the JWT bearer token before returning data:
Production considerations
Section titled “Production considerations”When deploying Keycloak authentication to production environments, there are several important security considerations:
HTTPS metadata requirements
Section titled “HTTPS metadata requirements”By default, JWT Bearer authentication in ASP.NET Core has RequireHttpsMetadata = true, which requires that the Authority URL uses HTTPS.
For production scenarios, configure the Authority URL explicitly:
builder.Services.AddAuthentication()    .AddKeycloakJwtBearer(        serviceName: "keycloak",        realm: "MyRealm",        configureOptions: options =>        {            // Explicitly set the Authority for production            if (!builder.Environment.IsDevelopment())            {                options.Authority = "https://your-keycloak-server.com/realms/MyRealm";            }
            options.Audience = "my.api";        });
Connection string configuration
Section titled “Connection string configuration”For production deployments, consider using connection strings:
import { function createBuilder(): IDistributedApplicationBuilder
Creates a new distributed application builder
createBuilder, function refExpr(strings: TemplateStringsArray, ...values: unknown[]): ReferenceExpression
Creates a reference expression from a tagged template literal
refExpr } from './.aspire/modules/aspire.mjs';
const const builder: IDistributedApplicationBuilder
function createBuilder(): IDistributedApplicationBuilder
Creates a new distributed application builder
createBuilder();
await const builder: IDistributedApplicationBuilder
IDistributedApplicationBuilder.addConnectionString(name: string, options?: { environmentVariableNameOrExpression?: string | ReferenceExpression;}): IResourceWithConnectionString (+1 overload)
Adds a connection string resource
addConnectionString('keycloak', { environmentVariableNameOrExpression?: string | ReferenceExpression | undefined
function refExpr(strings: TemplateStringsArray, ...values: unknown[]): ReferenceExpression
Creates a reference expression from a tagged template literal
refExpr`https://your-keycloak-server.com`,});
await const builder: IDistributedApplicationBuilder
IDistributedApplicationBuilder.build(): DistributedApplication
Builds the distributed application
build().DistributedApplication.run(cancellationToken?: cancellationToken): void
Runs the distributed application
run();var builder = DistributedApplication.CreateBuilder(args);
builder.AddConnectionString("keycloak", "https://your-keycloak-server.com");
builder.Build().Run();Security best practices
Section titled “Security best practices”- Always use
RequireHttpsMetadata = truein production environments - Use secure, validated SSL certificates for your Keycloak server
- Configure appropriate realm settings and client configurations in Keycloak
- Implement proper token validation and audience checks
- Consider using Keycloak’s built-in security features like rate limiting and brute force protection
 Aspire