


Set up Azure Cosmos DB in the AppHost

This article is the reference for the Aspire Azure Cosmos DB hosting integration. It enumerates the AppHost APIs — with examples for both AppHost.cs and apphost.mts — that you use to model a Cosmos DB account, databases, and containers in your AppHost project.
If you’re new to the Azure Cosmos DB integration, start with the Get started with Azure Cosmos DB integrations guide. For how consuming apps read the connection information this page exposes, see Connect to Azure Cosmos DB.
Installation
Section titled “Installation”To start building an Aspire app that uses Azure Cosmos DB, install the 📦 Aspire.Hosting.Azure.CosmosDB NuGet package:
aspire add azure-cosmosdbLearn more about aspire add in the command reference.
This updates your aspire.config.json with the Azure Cosmos DB hosting integration package:
{ "packages": { "Aspire.Hosting.Azure.CosmosDB": "13.6.0" }}aspire add azure-cosmosdbLearn more about aspire add in the command reference.
Or, choose a manual installation approach:
#:package Aspire.Hosting.Azure.CosmosDB@*<PackageReference Include="Aspire.Hosting.Azure.CosmosDB" Version="*" />Add Azure Cosmos DB resource
Section titled “Add Azure Cosmos DB resource”Once you’ve installed the hosting integration in your AppHost project, you can add an Azure Cosmos DB resource as shown in the following examples:
import { createBuilder } from './.aspire/modules/aspire.mjs';
const builder = await createBuilder();
const cosmos = await builder.addAzureCosmosDB("cosmos-db");
await builder.addNodeApp("api", "./api", "index.js")    .withReference(cosmos);
// After adding all resources, run the app...var builder = DistributedApplication.CreateBuilder(args);
var cosmos = builder.AddAzureCosmosDB("cosmos-db");
var exampleProject = builder.AddProject<Projects.ExampleProject>("apiservice") .WithReference(cosmos);
// After adding all resources, run the app...Run as emulator
Section titled “Run as emulator”For local development, use the Azure Cosmos DB Emulator instead of a live Azure account. Chain RunAsEmulator (or runAsEmulator) on the resource builder:
import { createBuilder } from './.aspire/modules/aspire.mjs';
const builder = await createBuilder();
const cosmos = await builder.addAzureCosmosDB("cosmos-db");await cosmos.runAsEmulator();
// After adding all resources, run the app...var builder = DistributedApplication.CreateBuilder(args);
var cosmos = builder.AddAzureCosmosDB("cosmos-db") .RunAsEmulator();
// After adding all resources, run the app...When you call RunAsEmulator, it configures the Cosmos DB resource to run locally using the Azure Cosmos DB Linux-based (vNext) emulator. The emulator is accessible to Aspire as a container image (mcr.microsoft.com/cosmosdb/linux/azure-cosmos-emulator) using the vnext-latest tag. Aspire creates and starts the container when the AppHost starts.
- CosmosDB Emulator container imageMicrosoft Artifact Registrymcr.microsoft.com/cosmosdb/linux/azure-cosmos-emulator:vnext-latestAlso available:
stable
Tags reflect the latest defaults on the microsoft/aspire main branch, and may be newer than the version pinned by the package you install.
Configure emulator gateway port
Section titled “Configure emulator gateway port”The vNext emulator automatically exports its own traces and metrics to the Aspire dashboard. Aspire configures its OTLP endpoint and enables the emulator’s built-in exporter with ENABLE_OTLP_EXPORTER=true. This is emulator telemetry, not a replacement for instrumenting your consuming application, and it doesn’t apply to the classic emulator.
By default, the Cosmos DB emulator container exposes the following endpoint:
| Endpoint | Container port | Host port |
|---|---|---|
https | 8081 | dynamic |
To configure a fixed host port, call WithGatewayPort (or withGatewayPort) inside the emulator callback:
import { createBuilder } from './.aspire/modules/aspire.mjs';
const builder = await createBuilder();
const cosmos = await builder.addAzureCosmosDB("cosmos-db");await cosmos.runAsEmulator({    configureContainer: async emulator => {        await emulator.withGatewayPort({ port: 7777 });    }});
// After adding all resources, run the app...var builder = DistributedApplication.CreateBuilder(args);
var cosmos = builder.AddAzureCosmosDB("cosmos-db") .RunAsEmulator(emulator => { emulator.WithGatewayPort(7777); });
// After adding all resources, run the app...The Cosmos DB emulator container’s port is mapped to the host port as shown in the following table:
| Endpoint name | Port mapping (container:host) |
|---|---|
https | 8081:7777 |
Configure classic emulator partition count
Section titled “Configure classic emulator partition count”To configure the partition count for the classic Cosmos DB emulator container, call WithPartitionCount (or withPartitionCount) inside the classic emulator callback. The default Linux-based (vNext) emulator doesn’t support partition counts and throws a NotSupportedException if you call this API with RunAsEmulator (or runAsEmulator).
import { createBuilder } from './.aspire/modules/aspire.mjs';
const builder = await createBuilder();
const cosmos = await builder.addAzureCosmosDB("cosmos-db");await cosmos.runAsClassicEmulator({    configureContainer: async emulator => {        await emulator.withPartitionCount(100); // Defaults to 25    }});
// After adding all resources, run the app...var builder = DistributedApplication.CreateBuilder(args);
var cosmos = builder.AddAzureCosmosDB("cosmos-db") .RunAsClassicEmulator(emulator => { emulator.WithPartitionCount(100); // Defaults to 25 });
// After adding all resources, run the app...For the classic emulator, this is a shorthand for setting the AZURE_COSMOS_EMULATOR_PARTITION_COUNT environment variable.
Configure emulator data volume
Section titled “Configure emulator data volume”To persist the emulator data across container restarts, attach a named volume:
import { createBuilder } from './.aspire/modules/aspire.mjs';
const builder = await createBuilder();
const cosmos = await builder.addAzureCosmosDB("cosmos-db");await cosmos.runAsEmulator({    configureContainer: async emulator => {        await emulator.withDataVolume();    }});
// After adding all resources, run the app...var builder = DistributedApplication.CreateBuilder(args);
var cosmos = builder.AddAzureCosmosDB("cosmos-db") .RunAsEmulator(emulator => { emulator.WithDataVolume(); });
// After adding all resources, run the app...The data volume is mounted at /tmp/cosmos/appdata in the emulator container. When a name parameter isn’t provided, the name is generated. The AZURE_COSMOS_EMULATOR_ENABLE_DATA_PERSISTENCE environment variable is automatically set to true. For more information on data volumes, see Docker docs: Volumes.
Configure emulator with persistent lifetime
Section titled “Configure emulator with persistent lifetime”To configure the Cosmos DB emulator container with a persistent lifetime, call the WithLifetime method with ContainerLifetime.Persistent:
var builder = DistributedApplication.CreateBuilder(args);
var cosmos = builder.AddAzureCosmosDB("cosmos-db")    .RunAsEmulator(emulator =>    {        emulator.WithLifetime(ContainerLifetime.Persistent);    });
// After adding all resources, run the app...Run as classic emulator
Section titled “Run as classic emulator”Use the classic (Windows-based) Azure Cosmos DB emulator instead of the default Linux-based (vNext) emulator by calling RunAsClassicEmulator (or runAsClassicEmulator):
import { createBuilder } from './.aspire/modules/aspire.mjs';
const builder = await createBuilder();
const cosmos = await builder.addAzureCosmosDB("cosmos-db");await cosmos.runAsClassicEmulator();
// After adding all resources, run the app...var builder = DistributedApplication.CreateBuilder(args);
var cosmos = builder.AddAzureCosmosDB("cosmos-db") .RunAsClassicEmulator();
// After adding all resources, run the app...RunAsClassicEmulator configures the Cosmos DB resource to use the stable tag of the Azure Cosmos DB Emulator container image. Unlike the default vNext emulator, the classic emulator requires a TLS/SSL certificate. For more information, see Export the emulator’s TLS/SSL certificate.
Configure the Data Explorer
Section titled “Configure the Data Explorer”The Linux-based (vNext) emulator used by RunAsEmulator includes a built-in Data Explorer web UI. Call WithDataExplorer (or withDataExplorer) inside the emulator callback to expose it:
import { createBuilder } from './.aspire/modules/aspire.mjs';
const builder = await createBuilder();
const cosmos = await builder.addAzureCosmosDB("cosmos-db");await cosmos.runAsEmulator({    configureContainer: async emulator => {        await emulator.withDataExplorer();    }});
// After adding all resources, run the app...var builder = DistributedApplication.CreateBuilder(args);
var cosmos = builder.AddAzureCosmosDB("cosmos-db") .RunAsEmulator(emulator => { emulator.WithDataExplorer(); });
// After adding all resources, run the app...WithDataExplorer exposes a separate data-explorer endpoint that lets you view and manage data stored in the emulator via a browser-based UI. The Data Explorer is only available with the vNext emulator (RunAsEmulator) — calling it after RunAsClassicEmulator throws a NotSupportedException.
Connect to an existing Azure Cosmos DB account
Section titled “Connect to an existing Azure Cosmos DB account”You might have an existing Azure Cosmos DB account you want to connect to. Chain a call to AsExisting (or asExisting) on the resource builder:
import { createBuilder } from './.aspire/modules/aspire.mjs';
const builder = await createBuilder();
const existingCosmosName = await builder.addParameter("existingCosmosName");const existingCosmosRG = await builder.addParameter("existingCosmosResourceGroup");
const cosmos = await builder.addAzureCosmosDB("cosmos-db");await cosmos.asExisting(existingCosmosName, { resourceGroup: existingCosmosRG });
await builder.addNodeApp("api", "./api", "index.js")    .withReference(cosmos);
// After adding all resources, run the app...var builder = DistributedApplication.CreateBuilder(args);
var existingCosmosName = builder.AddParameter("existingCosmosName");var existingCosmosResourceGroup = builder.AddParameter("existingCosmosResourceGroup");
var cosmos = builder.AddAzureCosmosDB("cosmos-db") .AsExisting(existingCosmosName, existingCosmosResourceGroup);
builder.AddProject<Projects.ExampleProject>() .WithReference(cosmos);
// After adding all resources, run the app...For more information on treating Azure Cosmos DB resources as existing resources, see Use existing Azure resources.
Add Azure Cosmos DB database and container resources
Section titled “Add Azure Cosmos DB database and container resources”Aspire models parent-child relationships between Azure Cosmos DB resources. An Azure Cosmos DB account (AzureCosmosDBResource) can have multiple databases (AzureCosmosDBDatabaseResource), and each database can have multiple containers (AzureCosmosDBContainerResource).
Add a database
Section titled “Add a database”To add an Azure Cosmos DB database resource, call AddCosmosDatabase (or addCosmosDatabase) on the Cosmos DB account resource builder:
import { createBuilder } from './.aspire/modules/aspire.mjs';
const builder = await createBuilder();
const cosmos = await builder.addAzureCosmosDB("cosmos-db");const db = await cosmos.addCosmosDatabase("db");
// After adding all resources, run the app...var builder = DistributedApplication.CreateBuilder(args);
var cosmos = builder.AddAzureCosmosDB("cosmos-db");var db = cosmos.AddCosmosDatabase("db");
// After adding all resources, run the app...The AddCosmosDatabase call adds a logical database named db to your Cosmos DB account. The database is a logical container for collections and users.
Add a container
Section titled “Add a container”An Azure Cosmos DB container is where data is stored. When you create a container, you must supply a partition key path. To add an Azure Cosmos DB container resource, call AddContainer (or addContainer) on the database resource builder:
import { createBuilder } from './.aspire/modules/aspire.mjs';
const builder = await createBuilder();
const cosmos = await builder.addAzureCosmosDB("cosmos-db");const db = await cosmos.addCosmosDatabase("db");const container = await db.addContainer("entries", "/id");
// After adding all resources, run the app...var builder = DistributedApplication.CreateBuilder(args);
var cosmos = builder.AddAzureCosmosDB("cosmos-db");var db = cosmos.AddCosmosDatabase("db");var container = db.AddContainer("entries", "/id");
// After adding all resources, run the app...The second argument to AddContainer (or addContainer) is the partition key path (for example, "/id"). In the TypeScript AppHost, you can also pass an array of paths for composite partition keys. For more information, see Databases, containers, and items in Azure Cosmos DB.
Parent-child resource relationship example
Section titled “Parent-child resource relationship example”The following example demonstrates a full parent-child hierarchy — a single Cosmos DB account with two databases, each containing multiple containers:
import { createBuilder } from './.aspire/modules/aspire.mjs';
const builder = await createBuilder();
const cosmos = await builder.addAzureCosmosDB("cosmos");
const customers = await cosmos.addCosmosDatabase("customers");const profiles = await customers.addContainer("profiles", "/id");
const orders = await cosmos.addCosmosDatabase("orders");const details = await orders.addContainer("details", "/id");const history = await orders.addContainer("history", "/id");
await builder.addNodeApp("api", "./api", "index.js")    .withReference(profiles)    .withReference(details)    .withReference(history);
await builder.build().run();var builder = DistributedApplication.CreateBuilder(args);
var cosmos = builder.AddAzureCosmosDB("cosmos");
var customers = cosmos.AddCosmosDatabase("customers");var profiles = customers.AddContainer("profiles", "/id");
var orders = cosmos.AddCosmosDatabase("orders");var details = orders.AddContainer("details", "/id");var history = orders.AddContainer("history", "/id");
builder.AddProject<Projects.Api>("api") .WithReference(profiles) .WithReference(details) .WithReference(history);
builder.Build().Run();The preceding code adds a Cosmos DB account named cosmos with two databases: customers and orders. The customers database has a single container named profiles, while the orders database has two containers: details and history. The partition key for each container is /id.
The following diagram illustrates the parent-child relationship between the Azure Cosmos DB resources:
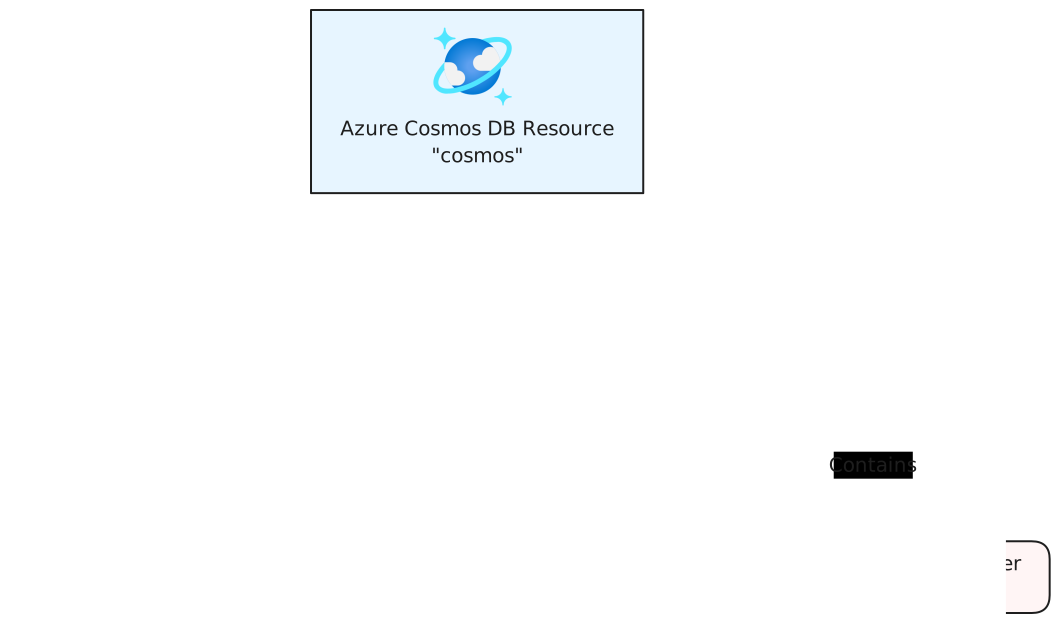
When your AppHost code expresses parent-child relationships, consuming apps can deep-link to these resources by name. For example, the customers database can be referenced by name in the client project, registering a Microsoft.Azure.Cosmos.Database instance that connects to the customers database. The same applies to named containers.
Enable access key authentication
Section titled “Enable access key authentication”By default, the Azure Cosmos DB hosting integration uses Microsoft Entra ID (role-based access). To enable access key authentication instead, call WithAccessKeyAuthentication (or withAccessKeyAuthentication):
import { createBuilder } from './.aspire/modules/aspire.mjs';
const builder = await createBuilder();
const cosmos = await builder.addAzureCosmosDB("cosmos-db");await cosmos.withAccessKeyAuthentication();
// After adding all resources, run the app...var builder = DistributedApplication.CreateBuilder(args);
var cosmos = builder.AddAzureCosmosDB("cosmos-db") .WithAccessKeyAuthentication();
// After adding all resources, run the app...When access key authentication is enabled, Aspire injects additional AccountKey and ConnectionString connection properties into consuming apps. For a complete list of connection properties by authentication mode, see Connect to Azure Cosmos DB.
Provisioning-generated Bicep
Section titled “Provisioning-generated Bicep”If you’re new to Bicep, it’s a domain-specific language for defining Azure resources. With Aspire, you don’t need to write Bicep by hand — the provisioning APIs generate it for you. When you publish your app, the generated Bicep is output alongside the manifest file. When you add an Azure Cosmos DB resource, the following Bicep is generated:
@description('The location for the resource(s) to be deployed.')param location string = resourceGroup().location
resource cosmos 'Microsoft.DocumentDB/databaseAccounts@2024-08-15' = {  name: take('cosmos-${uniqueString(resourceGroup().id)}', 44)  location: location  properties: {    locations: [      {        locationName: location        failoverPriority: 0      }    ]    capabilities: [      {        name: 'EnableServerless'      }    ]    consistencyPolicy: {      defaultConsistencyLevel: 'Session'    }    databaseAccountOfferType: 'Standard'    disableLocalAuth: true  }  kind: 'GlobalDocumentDB'  tags: {    'aspire-resource-name': 'cosmos'  }}
output connectionString string = cosmos.properties.documentEndpoint
output name string = cosmos.name
The preceding Bicep provisions an Azure Cosmos DB account resource. Additionally, role assignments are created for the Azure resource in a separate module:
@description('The location for the resource(s) to be deployed.')param location string = resourceGroup().location
param cosmos_outputs_name string
param principalId string
resource cosmos 'Microsoft.DocumentDB/databaseAccounts@2024-08-15' existing = {  name: cosmos_outputs_name}
resource cosmos_roleDefinition 'Microsoft.DocumentDB/databaseAccounts/sqlRoleDefinitions@2024-08-15' existing = {  name: '00000000-0000-0000-0000-000000000002'  parent: cosmos}
resource cosmos_roleAssignment 'Microsoft.DocumentDB/databaseAccounts/sqlRoleAssignments@2024-08-15' = {  name: guid(principalId, cosmos_roleDefinition.id, cosmos.id)  properties: {    principalId: principalId    roleDefinitionId: cosmos_roleDefinition.id    scope: cosmos.id  }  parent: cosmos}
The generated Bicep is a starting point and is influenced by changes to the provisioning infrastructure in C#. Customizations to the Bicep file directly will be overwritten, so make changes through the C# provisioning APIs to ensure they are reflected in the generated files.
Customize provisioning infrastructure
Section titled “Customize provisioning infrastructure”All Aspire Azure resources are subclasses of the AzureProvisioningResource type. This type enables fluent customization of the generated Bicep using the ConfigureInfrastructure (or configureInfrastructure) API. For example, you can configure the kind, consistencyPolicy, locations, and more:
import { createBuilder } from './.aspire/modules/aspire.mjs';
const builder = await createBuilder();
const cosmos = await builder.addAzureCosmosDB("cosmos-db");await cosmos.configureInfrastructure(async infra => { const resources = await infra.getProvisionableResources(); const account = resources.find(r => r.resourceType === 'Microsoft.DocumentDB/databaseAccounts'); if (account) { account.tags = { ...account.tags, ExampleKey: 'Example value' }; }});var builder = DistributedApplication.CreateBuilder(args);
builder.AddAzureCosmosDB("cosmos-db") .ConfigureInfrastructure(infra => { var cosmosDbAccount = infra.GetProvisionableResources() .OfType<CosmosDBAccount>() .Single();
cosmosDbAccount.Kind = CosmosDBAccountKind.MongoDB; cosmosDbAccount.ConsistencyPolicy = new() { DefaultConsistencyLevel = DefaultConsistencyLevel.Strong, }; cosmosDbAccount.Tags.Add("ExampleKey", "Example value"); });Hosting integration health checks
Section titled “Hosting integration health checks”The Azure Cosmos DB hosting integration automatically adds a health check for the Cosmos DB resource. The health check verifies that the Cosmos DB is running and that a connection can be established to it.
The hosting integration relies on the 📦 AspNetCore.HealthChecks.CosmosDb NuGet package.
Connection properties
Section titled “Connection properties”For the full reference of Azure Cosmos DB connection properties — and how consuming apps in C#, TypeScript, Python, and Go read them — see Connect to Azure Cosmos DB.
 Aspire