


Set up Azure Table Storage in the AppHost

This article is the reference for the Aspire Azure Table Storage hosting integration. It enumerates the AppHost APIs — with examples for both AppHost.cs and apphost.mts — that you use to model Azure Storage accounts and table resources in your AppHost project.
If you’re new to the Azure Table Storage integration, start with the Get started with Azure Table Storage integrations guide. For how consuming apps read the connection information this page exposes, see Connect to Azure Table Storage.
Installation
Section titled “Installation”To start building an Aspire app that uses Azure Table Storage, install the 📦 Aspire.Hosting.Azure.Storage NuGet package:
aspire add azure-storageLearn more about aspire add in the command reference.
This updates your aspire.config.json with the Azure Storage hosting integration package:
{ "packages": { "Aspire.Hosting.Azure.Storage": "13.6.0" }}aspire add azure-storageLearn more about aspire add in the command reference.
Or, choose a manual installation approach:
#:package Aspire.Hosting.Azure.Storage@*<PackageReference Include="Aspire.Hosting.Azure.Storage" Version="*" />Add Azure Table Storage resource
Section titled “Add Azure Table Storage resource”Once you’ve installed the hosting integration in your AppHost project, you can add an Azure Storage resource and then add a table resource to it:
import { createBuilder } from './.aspire/modules/aspire.mjs';
const builder = await createBuilder();
const tables = await builder.addAzureStorage("storage")    .addTables("tables");
await builder.addProject("apiservice", "../ExampleProject/ExampleProject.csproj")    .withReference(tables)    .waitFor(tables);
// After adding all resources, run the app...await builder.build().run();var builder = DistributedApplication.CreateBuilder(args);
var tables = builder.AddAzureStorage("storage") .AddTables("tables");
builder.AddProject<Projects.ExampleProject>("apiservice") .WithReference(tables) .WaitFor(tables);
// After adding all resources, run the app...builder.Build().Run();-
An Azure Storage resource named
storageis added to the AppHost. -
A table storage resource named
tablesis added to the storage resource by chaining a call toAddTables(oraddTables). -
The table storage resource is referenced from the consuming project with
WithReference(orwithReference), which injects connection properties as environment variables. -
WaitFor(orwaitFor) ensures the consuming project waits until the table storage resource is ready before starting.
Run as emulator (Azurite)
Section titled “Run as emulator (Azurite)”For local development, configure the storage resource to use the Azurite emulator instead of a real Azure Storage account. Call RunAsEmulator (or runAsEmulator) on the storage resource:
import { createBuilder } from './.aspire/modules/aspire.mjs';
const builder = await createBuilder();
const storage = await builder.addAzureStorage("storage")    .runAsEmulator();
const tables = await storage.addTables("tables");
await builder.addProject("apiservice", "../ExampleProject/ExampleProject.csproj")    .withReference(tables)    .waitFor(tables);
// After adding all resources, run the app...await builder.build().run();var builder = DistributedApplication.CreateBuilder(args);
var storage = builder.AddAzureStorage("storage") .RunAsEmulator();
var tables = storage.AddTables("tables");
builder.AddProject<Projects.ExampleProject>("apiservice") .WithReference(tables) .WaitFor(tables);
// After adding all resources, run the app...builder.Build().Run();When RunAsEmulator (or runAsEmulator) is called, the Aspire AppHost starts an Azurite container and routes all Azure Storage API calls to it during local development. No Azure subscription or credentials are required.
- Storage Emulator container imageMicrosoft Artifact Registrymcr.microsoft.com/azure-storage/azurite:3.35.0
Tags reflect the latest defaults on the microsoft/aspire main branch, and may be newer than the version pinned by the package you install.
Configure Azurite container ports
Section titled “Configure Azurite container ports”By default, when Aspire configures the Azurite container, it exposes the following endpoints:
| Endpoint | Container port | Host port |
|---|---|---|
blob | 10000 | dynamic |
queue | 10001 | dynamic |
table | 10002 | dynamic |
The host port is dynamic by default. When the container starts, the ports are mapped to random ports on the host machine. To fix the endpoint ports, configure them inside the RunAsEmulator (or runAsEmulator) callback:
import { createBuilder } from './.aspire/modules/aspire.mjs';
const builder = await createBuilder();
const storage = await builder.addAzureStorage("storage")    .runAsEmulator({        configureContainer: async (azurite) => {            await azurite                .withBlobPort(27000)                .withQueuePort(27001)                .withTablePort(27002);        }    });
// After adding all resources, run the app...await builder.build().run();var builder = DistributedApplication.CreateBuilder(args);
var storage = builder.AddAzureStorage("storage") .RunAsEmulator(azurite => { azurite.WithBlobPort(27000) .WithQueuePort(27001) .WithTablePort(27002); });
// After adding all resources, run the app...builder.Build().Run();The preceding code configures the Azurite container ports as follows:
| Endpoint | Port mapping (container:host) |
|---|---|
blob | 10000:27000 |
queue | 10001:27001 |
table | 10002:27002 |
Configure Azurite container with persistent lifetime
Section titled “Configure Azurite container with persistent lifetime”To configure the Azurite container with a persistent lifetime so it survives app restarts, call WithLifetime (or withLifetime) with ContainerLifetime.Persistent:
import { createBuilder, ContainerLifetime } from './.aspire/modules/aspire.mjs';
const builder = await createBuilder();
const storage = await builder.addAzureStorage("storage")    .runAsEmulator({        configureContainer: async (azurite) => {            await azurite.withLifetime(ContainerLifetime.Persistent);        }    });
// After adding all resources, run the app...await builder.build().run();var builder = DistributedApplication.CreateBuilder(args);
var storage = builder.AddAzureStorage("storage") .RunAsEmulator(azurite => { azurite.WithLifetime(ContainerLifetime.Persistent); });
// After adding all resources, run the app...builder.Build().Run();Configure Azurite container with data volume
Section titled “Configure Azurite container with data volume”To persist Azurite data across container restarts with a data volume, call WithDataVolume (or withDataVolume) on the emulator resource:
import { createBuilder } from './.aspire/modules/aspire.mjs';
const builder = await createBuilder();
const storage = await builder.addAzureStorage("storage")    .runAsEmulator({        configureContainer: async (azurite) => {            await azurite.withDataVolume();        }    });
// After adding all resources, run the app...await builder.build().run();var builder = DistributedApplication.CreateBuilder(args);
var storage = builder.AddAzureStorage("storage") .RunAsEmulator(azurite => { azurite.WithDataVolume(); });
// After adding all resources, run the app...builder.Build().Run();The data volume is mounted at the /data path in the Azurite container and when a name parameter isn’t provided, the name is formatted as .azurite/{resource name}. For more information on data volumes and details on why they’re preferred over bind mounts, see Docker docs: Volumes.
Configure Azurite container with data bind mount
Section titled “Configure Azurite container with data bind mount”To add a data bind mount to the Azurite container instead of a named volume, call WithDataBindMount (or withDataBindMount):
import { createBuilder } from './.aspire/modules/aspire.mjs';
const builder = await createBuilder();
const storage = await builder.addAzureStorage("storage")    .runAsEmulator({        configureContainer: async (azurite) => {            await azurite.withDataBindMount({ path: '../azurite/data' });        }    });
// After adding all resources, run the app...await builder.build().run();var builder = DistributedApplication.CreateBuilder(args);
var storage = builder.AddAzureStorage("storage") .RunAsEmulator(azurite => { azurite.WithDataBindMount("../azurite/data"); });
// After adding all resources, run the app...builder.Build().Run();Data bind mounts rely on the host machine’s filesystem to persist Azurite data across container restarts. The bind mount path ../azurite/data is relative to the AppHost directory. For more information, see Docker docs: Bind mounts.
Connect to storage resources
Section titled “Connect to storage resources”When the Aspire AppHost runs, storage resources can be accessed by external tools such as the Azure Storage Explorer. If your storage resource is running locally using Azurite, it’s automatically discovered by the Azure Storage Explorer.
To connect to the storage resource from Azure Storage Explorer, follow these steps:
-
Run the Aspire AppHost.
-
Open the Azure Storage Explorer.
-
View the Explorer pane.
-
Select the Refresh all link to refresh the list of storage accounts.
-
Expand the Emulator & Attached node.
-
Expand the Storage Accounts node.
-
You should see a storage account with your resource’s name as a prefix:
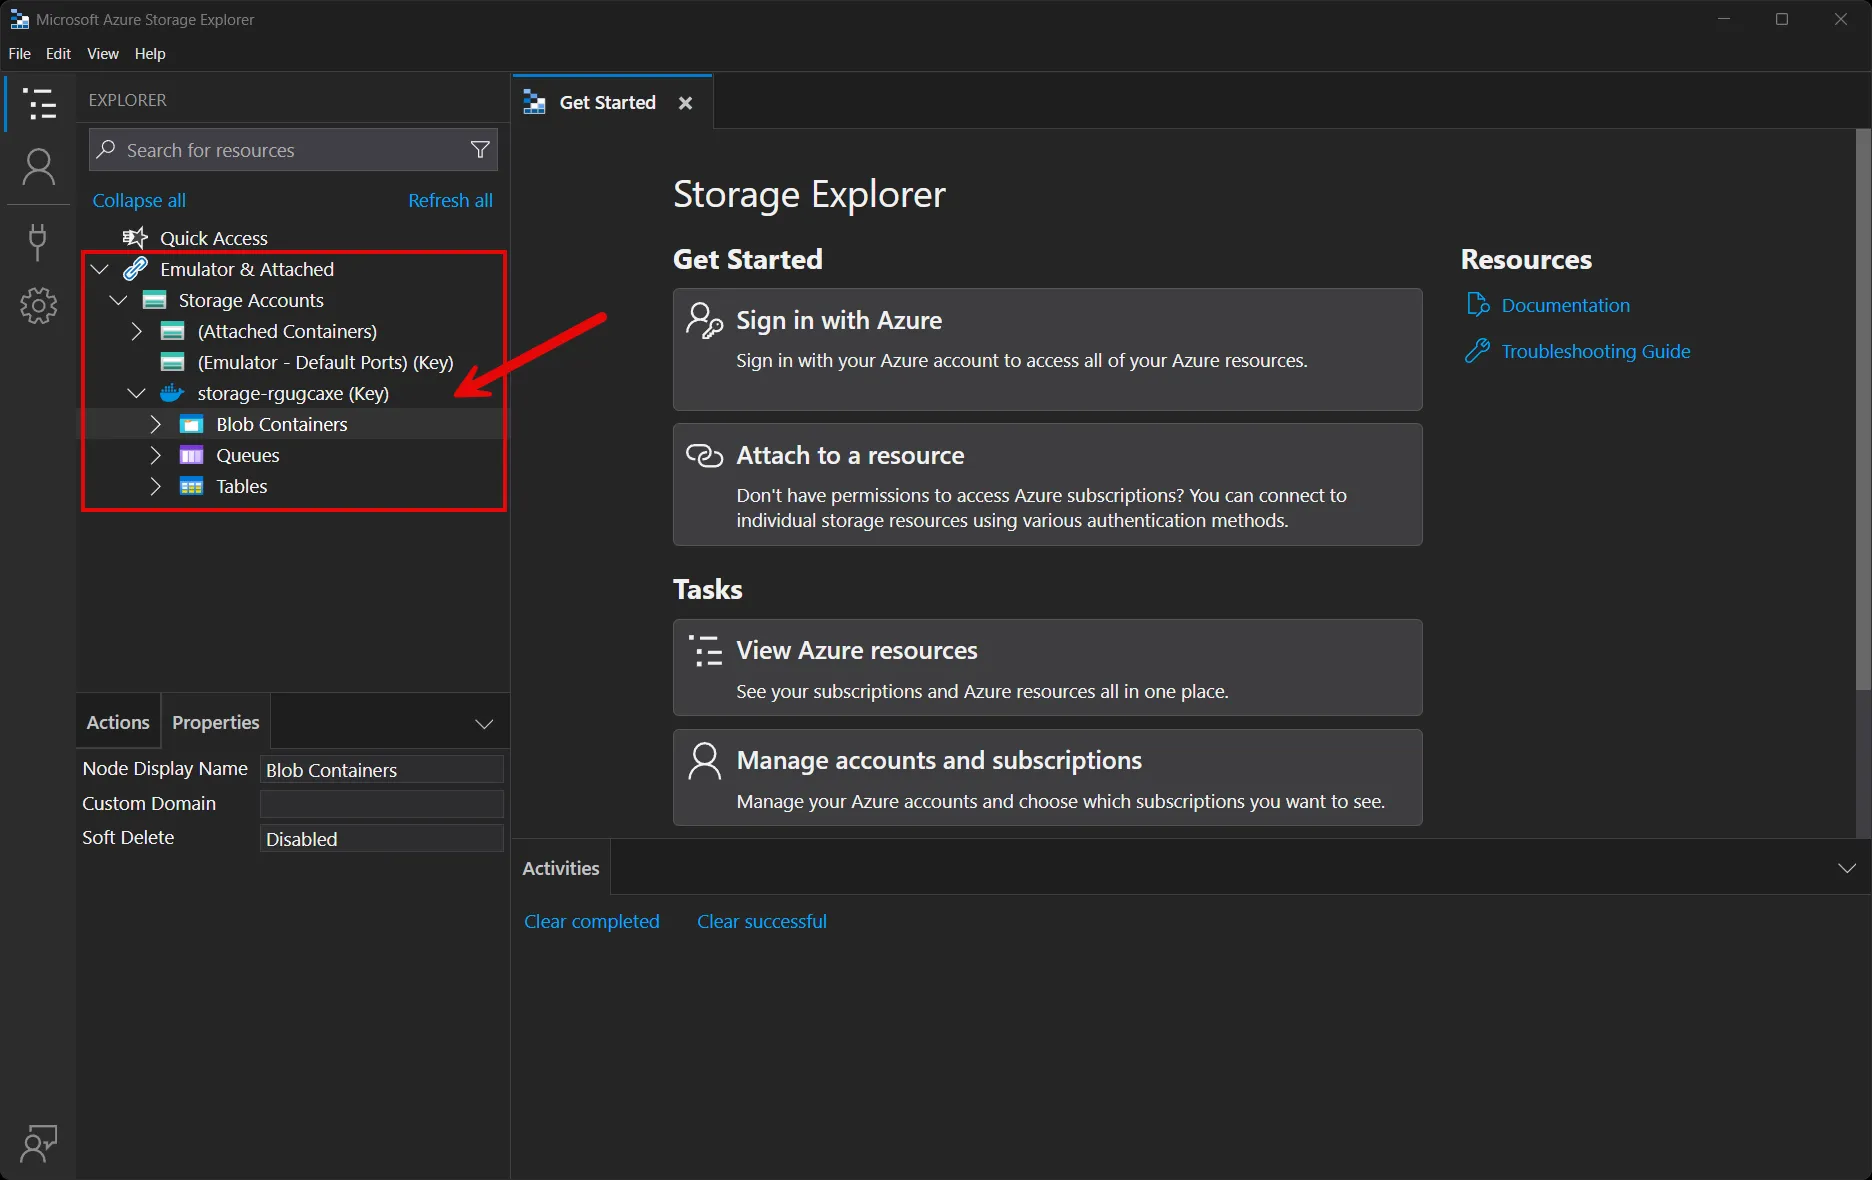
For more information on using the Azure Storage Explorer, see Get started with Storage Explorer.
Connect to an existing Azure Storage account
Section titled “Connect to an existing Azure Storage account”If you have an existing Azure Storage account, you can connect to it using the AsExisting (or asExisting) method instead of provisioning a new one:
import { createBuilder } from './.aspire/modules/aspire.mjs';
const builder = await createBuilder();
const existingStorageName = await builder.addParameter("existingStorageName");const existingStorageResourceGroup = await builder.addParameter("existingStorageResourceGroup");
const storageAccount = await builder.addAzureStorage("storage")    .asExisting(existingStorageName, { resourceGroup: existingStorageResourceGroup });
const tables = await storageAccount.addTables("tables");
await builder.addProject("apiservice", "../ExampleProject/ExampleProject.csproj")    .withReference(tables);
// After adding all resources, run the app...await builder.build().run();var builder = DistributedApplication.CreateBuilder(args);
var existingStorageName = builder.AddParameter("existingStorageName");var existingStorageResourceGroup = builder.AddParameter("existingStorageResourceGroup");
var storageAccount = builder.AddAzureStorage("storage") .AsExisting(existingStorageName, existingStorageResourceGroup);
var tables = storageAccount.AddTables("tables");
builder.AddProject<Projects.ExampleProject>("apiservice") .WithReference(tables);
// After adding all resources, run the app...builder.Build().Run();When you call RunAsExisting, PublishAsExisting, or AsExisting methods to work with resources that are already present in your Azure subscription, you must add certain configuration values to your AppHost to ensure that Aspire can locate them. The necessary configuration values include SubscriptionId, AllowResourceGroupCreation, ResourceGroup, and Location. If you don’t set them, “Missing configuration” errors appear in the Aspire dashboard. For more information, see Use existing Azure resources.
Connection properties
Section titled “Connection properties”When you reference an Azure Table Storage resource using WithReference (or withReference), Aspire injects the following connection properties into the consuming app:
| Property Name | Environment variable | Description |
|---|---|---|
ConnectionString | {RESOURCE}_CONNECTIONSTRING | The full Azure Storage connection string. Available in emulator mode and when configured for key-based access. |
TableEndpoint | {RESOURCE}_TABLEENDPOINT | The URI of the Table Storage service endpoint, with the format https://{accountname}.table.core.windows.net/. Available when using Azure Managed Identity or token-based access. |
For example, for a resource named tables, the environment variables are TABLES_CONNECTIONSTRING and TABLES_TABLEENDPOINT.
For per-language connection examples and client library setup, see Connect to Azure Table Storage.
 Aspire